Hello again from winterland– no snow but plenty of cold, it has even gone down below 20 degrees F already. Inside, the lowest it got was in the mid 50s.
With a new stove build in progress, the place has relied completely on sun for passive heating, and yesterday, the first full sun in several days, I even got out a fan, and was moving the warm greenhouse air into the bedroom. Needless to say the sun gave me lots of surplus electrical energy with the new solar array I installed about three weeks ago.
this project is pretty ambitious, a smaller footprint and less passive mass, but with some luck the water tank will provide an active absorption and transfer of heat to the mass of the floor.
For now the plan is to use a naked water tank, but depending on how well it works I may look for additional transfer with copper tubing instead.
Last night I got the stove ready and did a small test run to make sure I could count on the exhaust fan, and there was no trace of smoke inside. I prefer to have everything completely airtight so even though the system is not finished, with positive ventilation it is tight enough to start the drying out process. There was very little heat at the exhaust pipe outside, but at this stage that really doesn’t tell anything since lots of btus are needed to dry it all out.
Once dry the btus will be available for cooking and heating water. One other effect of the moisture is the secondary burn chamber did not function very well, at least I hope that was the issue. I noticed a brief period during the burn when it started to ignite so that was a good sign,but most of the burning occurred in the firebox.
So while more insulation is needed, and the water tank needs to be plumbed in properly, for the time being I have a cooktop, and can continue the drying process.
Here’s the build history thus far
take off watercoil,remove rocket barrel, notice soot–wasn’t burning too clean (except inside the riser, which was still snow white. The batch box I installed last year was made for a 6″ riser, but lining the 8″ riser with “1 inch” ceramic fiber reduced the riser size too much. There also may have been an issue with the port configuration and the way I typically ran the burns. Getting used to the batch box dynamics requires a new mind set over typical managing of the burn in a regular wood stove.
 gone with the old and a new platform in it’s place
  note that I’m working here with wet clay in forms
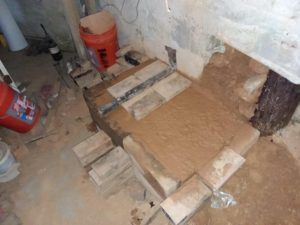
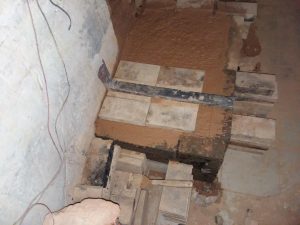 a mock up of the batchbox floor with secondary burn tube. This is the tube I took out of the old batch box, but the new dimensions doubled the size of the tube I had been using for secondary air supply–this may have been part of the problem with excess soot in the old unit
 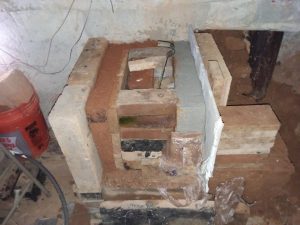 Perlite and clay on the back and left side, refractory cement on the right (shared side with oven) . odd bricks and such inside and out are used as wedges to hold split firebrick liner in place as forms while the clay perlite mix is solidifying
 Adding the top secondary burn chamber.
In this picture the floor of the top chamber is ceramic fiber using a bit of water glass as a stiffener, but the final solution was giving a slight slope of the firebrick in the lower batch box reducing the width at the top by approx 1/2″ and precariously using the 1/4 inch or so for support of normal split firebrick. These were secured with a layer of perlite and clay keeping them precisely centered.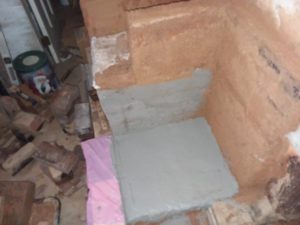 Picture of oven location
 With the oven in place.
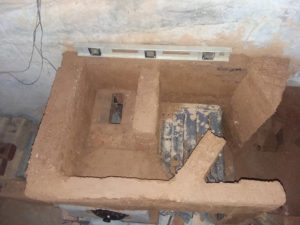 The final configuration with baffles to channel the heat
 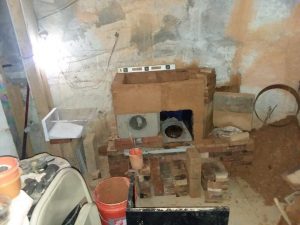 No door on the oven yet, but since the inside of the oven is outside the combustion gas area it won’t stop me from doing a test run, here’s the top gaskets made of ceramic fiber
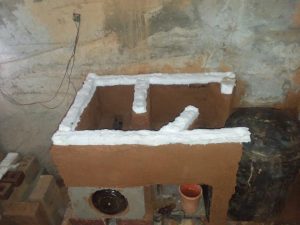
with the stove top and water tank in place 
finally with a hurry up enclosure around the water tank 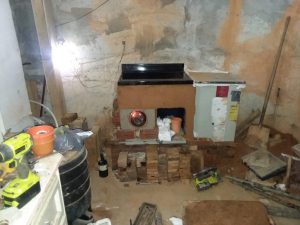 and the first fire, a power vent replaces a draft, and the vent pipe was just comfortably warm outside after a half hour burn
Follow up tests have raised the stove top temperature to 570 F as the clay dries out. Once the temps start to stabilize, assuming a strong secondary burn, I’ll be able to more accurately test the effects of different baffle placements, and actual potential of the design.
 view of secondary flame through top

 views of firebox
This was taking at the beginning of a burn cycle. During the hotter parts of the burn the flames are a continuous robust splash against the amber colored stove top glass.. temps here are just approaching 900F.
Please note much of the fuel is a bit damp. this slows starting and reduces overall performance.

Эвакуаторы в Москве на высшем уровне, доступные цены|Профессиональные услуги эвакуатора в Москве, 24/7|Дешевый эвакуатор в Москве: не ждите, звоните сейчас|Специализированный эвакуатор в Москве|Эвакуатор Москва: надежная поддержка для автомобилистов|Лучший эвакуатор Москвы ждет вашего звонка|Эвакуатор Москва: доверьте свой автомобиль профессионалам|Эвакуация мотоциклов в Москве: надежно и быстро|Эвакуатор Москва: ваш проводник в мире безопасности|Эвакуатор Москва: профессиональный подход к каждому клиенту|Эвакуатор Москва: настоящие профессионалы своего дела|Быстрый эвакуатор в Москве|Эвакуатор Москва: всегда на связи|Эвакуатор Москва: помощь на дорогах|Эвакуация автомобилей в Москве: надежно и оперативно|Эвакуация грузовых автомобилей в Москве|Эвакуатор Москва: ваш лучший выбор
вызвать эвакуатор https://ewacuator-moscow.ru/ .
Молодость Клиника: Путь к Совершенству
Клиника косметологии «Молодость» – это современный медицинский центр. Мы предлагаем широкий спектр услуг для улучшения внешнего вида. Квалифицированные врачи работают с современными технологиями, чтобы обеспечить вам наилучший результат.
Клиника косметологии «Молодость» в Перми, расположенная по адресу Пермь, ул. Пушкина, 13, приглашает вас ознакомиться с нашими услугами и попробовать их на себе. Мы предлагаем услуги лазерные процедуры, антивозрастные программы, а также рекомендации врачей.
Центр косметологии «Молодость» – это не просто медицинский центр, это ваш путь к совершенству. Мы заботимся о каждом пациенте, чтобы вы могли наслаждаться своей красотой. Свяжитесь с нами на официальном сайте молодость клиника Пермь и ознакомьтесь с полным перечнем услуг и ценами. Мы ждем вас в Молодость клиника на ул. Пушкина, 13, чтобы воплотить ваши мечты о красоте в реальность.
Идеальная кухня на заказ для вашего дома, выбирайте.
Уникальный дизайн кухни на заказ по вашим желаниям, сделаем вашу мечту реальностью.
Индивидуальный дизайн кухни, который подчеркнет ваш стиль, эксклюзивно для вас.
Уникальная кухня, созданная для вас с любовью, заказывайте сейчас.
Кухня на заказ, которая станет идеальным местом для семейных посиделок, выбирайте качество.
Индивидуальная кухня на заказ станет центром вашего дома, лучший выбор для вашего дома.
Уникальная кухня на заказ, которая станет сердцем вашего дома, воплотите свои идеи в жизнь.
Мы создаем кухни на заказ, которые радуют глаз, с любовью к деталям.
кухни по индивидуальному заказу https://kuhny-na-zakaz-msk.ru/ .
Сроки изготовления кухни на заказ
кухня на заказ цена https://kuhninazakaz177.ru/ .
Выгодное предложение по аренде трактора,
Надежные тракторы для аренды,
Быстрая аренда трактора по выгодным условиям,
Аренда трактора для сельского хозяйства,
Скидки на аренду тракторов для постоянных клиентов,
Специализированная аренда тракторов для строительства,
Индивидуальный подход к каждому клиенту в аренде трактора,
Аренда трактора с опытными водителями,
аренда трактора https://arenda-traktora77.ru/ .
Как выбрать идеальную печь-камин для дома, Купите печь-камин и создайте уют в доме, простой гид по выбору, Создайте атмосферу уюта с помощью печи-камина, профессиональные рекомендации по выбору, Сделайте правильный выбор печи-камина для вашего дома, как выбрать идеальную печь-камин, что учитывать при выборе печки-камина, где найти лучшую модель
камины и печи камины и печи .
Плюсы аренды экскаватора погрузчика в Москве
аренда трактора с ковшом цена https://arenda-ekskavatora-pogruzchika197.ru/ .
Идеальный вариант аренды автобуса в Санкт-Петербурге|Комфорт и безопасность в аренде автобуса в СПб|Найдите идеальный автобус для вашей поездки по СПб|Экономьте на аренде автобуса в СПб|Аренда автобуса для праздника в СПб – идеальное решение|Легко и быстро арендовать автобус в СПб|Отправляйтесь в увлекательное путешествие на арендованном автобусе|Идеальное решение для корпоративного транспорта в СПб|Устроить феерическую свадьбу с комфортной доставкой гостей поможет аренда автобуса в Санкт-Петербурге|Комфортный и безопасный транспорт – наши автобусы в аренде в СПб|Автобусы с кондиционером и Wi-Fi в аренде в СПб|Интересные экскурсии и поездки на арендованном автобусе в СПб|Экономьте на поездках по Санкт-Петербургу с нашими специальными предложениями на аренду автобуса|Адаптируйте маршрут поездки по Санкт-Петербургу под свои потребности с помощью аренды автобуса|Мы всегда на связи, чтобы помочь вам с арендой автобуса в Санкт-Петербурге в любое время суток|Необычайное удовольствие от поездок на арендованных автобусах в СПб|Удобные условия аренды автобуса в СПб для каждого клиента|Доверьте свои поездки по Санкт-Петербургу профессионалам со всеми необходимыми документами на арендованные автобусы|Интересные предложения для аренды автобуса в СПб|Моментальное оформление аренды автобуса
аренда автобуса https://arenda-avtobusa-178.ru/ .
Прокат автобусов в СПб на выгодных условиях, взять для трансфера.
Оптимальные цены на аренду автобуса в СПб, делайте выбор нашими услугами.
Лучшие автобусы для аренды в СПб, путешествуйте с комфортом.
Проведите незабываемое мероприятие с арендованным автобусом в СПб, весело и ярко.
Трансфер из аэропорта с арендованным автобусом в СПб, быстро и безопасно.
Аренда автобуса для корпоративного мероприятия в СПб, солидно и интересно.
Экскурсия на комфортабельном автобусе в Санкт-Петербурге, ярко и насыщенно.
Экскурсионный автобус для школьников в СПб, безопасно и познавательно.
Свадебный автобус в СПб, стильно и празднично.
Как выбрать автобус для аренды в СПб, подсказки от наших экспертов.
Экономные варианты аренды автобуса в СПб, со всеми выгодами.
Какие услуги включены в аренду автобуса в СПб, ознакомьтесь перед заказом.
Аренда автобуса с водителем в СПб: плюсы и минусы, честный рейтинг.
Сравнение стоимости аренды автобуса в СПб: как выбрать выгодное предложение, сравнение тарифов.
Аренда минивэна в СПб для небольших групп, легко и практично.
Трансфер на фестиваль в СПб на арендованном автобусе, под музыку и веселье.
Развлекательные мероприятия на арендованном автобусе в СПб
аренда автобуса https://arenda-avtobusa-v-spb.ru/ .
go119o
индийское гадание http://indiyskiy-pasyans-online.ru .
анонимный вывод из запоя ростов http://www.vyvod-iz-zapoya-rostov111.ru/ .
электрические гардины https://provorota.su/ .
вывод. из. запоя. на. дому. ростов. вывод. из. запоя. на. дому. ростов. .
кнопка вневедомственной охраны кнопка вневедомственной охраны .
вывод из запоя на дому ростов-на-дону вывод из запоя на дому ростов-на-дону .
вывод из запоя круглосуточно ростов вывод из запоя круглосуточно ростов .
вывод из запоя ростов-на-дону вывод из запоя ростов-на-дону .
Watch video clips from the guy’s point of view to feel like you’re right in the center of the action and obtain a good view!
You can get big booties in virtually any other category you
can think of! Whether you’re into curvy teens, attractive MILFs,
or thick Asians, each of them have an area here.
Check out the bouncing, backshots, and incredible action in group intercourse, gangbangs,
anal, one-on-one, and many more. https://curvy-webaocp925803.topbloghub.com/34833810/why-it-is-simpler-to-fail-with-how-to-find-someones-nudes-than-you-would-possibly-suppose
нарколог краснодар нарколог краснодар .
металлопластиковые окна в сочи металлопластиковые окна в сочи .
замена окон remstroyokna.ru .
вызов нарколога на дом вызов нарколога на дом .
прокапаться в симферополе прокапаться в симферополе .
частный хоспис частный хоспис .
способы заработать деньги https://www.kak-zarabotat-dengi11.ru .
вывод из запоя в стационаре анонимно вывод из запоя в стационаре анонимно .
выведение из запоя воронеж стационар выведение из запоя воронеж стационар .
вывод из запоя в стационаре вывод из запоя в стационаре .
вывод из запоя недорого краснодар вывод из запоя недорого краснодар .
вывод из запоя на дому в краснодаре вывод из запоя на дому в краснодаре .
вывод из запоя на дому круглосуточно краснодар вывод из запоя на дому круглосуточно краснодар .
выведение из запоя врачом наркологом выведение из запоя врачом наркологом .
нарколог на дом в екатеринбурге http://vyvod-iz-zapoya-ekaterinburg11.ru/ .
смешные мемы смешные мемы .
продвижение сайта москва репутационные работы http://prodvizhenie-sajtov-v-moskve213.ru/ .
шуточки https://korotkieshutki.ru .
вывод из запоя в стационаре вывод из запоя в стационаре .
вывод из запоя нижний новгород вывод из запоя нижний новгород .
Test avto drinks https://alamaret.com my given sale
прогнозы на спорт бесплатные http://www.rejting-kapperov13.ru/ .
лучшие капперы лучшие капперы .
помощь в переезде минск http://www.kvartirnyj-pereezd11.ru .
вывод из запоя стационар (вывода из запоя в стационаре) вывод из запоя стационар (вывода из запоя в стационаре) .
вывод из запоя сочи стационар https://vyvod-iz-zapoya-sochi12.ru/ .
капельница от похмелья цена капельница от похмелья цена .
вывод из запоя сочи стационар vyvod-iz-zapoya-sochi12.ru .
двп дсп мдф двп дсп мдф .
железобетонные изделия каталог железобетонные изделия каталог .
фанера купить фанера купить .
hi guys i translate that https://wplgsturapwmestv185.ru/
hi guys i translate that https://wplgsturapwmestv185.ru/
заработок через интернет http://www.kak-zarabotat-v-internete12.ru/ .
капельница от запоя http://snyatie-zapoya-na-domu13.ru/ .
капельница от похмелья на дому цена капельница от похмелья на дому цена .
вывод из запоя в стационаре вывод из запоя в стационаре .
вывод из запоя стационар https://vyvod-iz-zapoya-v-stacionare-samara.ru/ .
варианты заработка в интернете https://kak-zarabotat-v-internete11.ru/ .
ig ig .
вывод из запоя в стационаре анонимно вывод из запоя в стационаре анонимно .
вывод из запоя петербург вывод из запоя петербург .
снятие ломки цены http://www.snyatie-lomki-narkolog.ru .
электрокарнизы кузьминки электрокарнизы кузьминки .
онлайн казино беларусь онлайн казино беларусь .
саженцы наложенным платежом без предоплаты http://www.rodnoisad.ru/ .
дешевые саженцы http://rodnoisad.ru/ .
прогнозы на спорт бесплатные прогнозы на спорт бесплатные .
заказать грунт для цветов http://dachnik18.ru/ .
При выборе напольного покрытия для вашего дома или офиса важно обратить внимание на качество, долговечность и дизайн. Магазин напольных покрытий – это место, где вы можете найти широкий ассортимент различных материалов, от ламината и паркета до ковров и виниловых плиток. https://ламинат1.рф/
Играйте в азартные игры на реальные деньги прямо сейчас, заработайте крупный выигрыш в интернет казино, Онлайн казино с выгодными бонусами и акциями, Онлайн казино с возможностью выигрыша реальных денег, получите адреналин и азарт от игры в казино онлайн, Онлайн казино с быстрыми выплатами и надежной защитой данных, участвуйте в азартных играх и выигрывайте реальные деньги, Играйте в казино на деньги с максимальными шансами на победу, зарабатывайте деньги, играя в казино онлайн, получайте выигрыши в казино онлайн на деньги, Онлайн казино с возможностью сорвать джекпот, выигрывайте в казино онлайн на деньги и наслаждайтесь победами, Играйте в онлайн казино и станьте обладателем крупного выигрыша, разбогатейте в онлайн казино с реальными деньгами, Онлайн казино с возможностью быстрого заработка, Азартные игры с возможностью легкого заработка, Онлайн казино для тех, кто готов рисковать ради денежного выигрыша.
фриспины бездеп казино онлайн .
Напольное покрытие “паркетная доска” – это классический и изысканный выбор для любой современной или традиционной интерьерной композиции. Паркетная доска представляют собой натуральную древесину высокого качества, которая может быть обработана лаком или масло-воск, чтобы создать уникальный и привлекательный внешний вид, что создаёт визуальный интерес и глубину в помещении. Кроме того, паркетная доска является долговечной и стабильной альтернативой другим типам напольных покрытий, таким как массивная доска или штучный паркет. Она также хорошо сохраняет тепло и звукоизоляцию, что делает её идеальным выбором для комфортного жилья. https://kvarcvinil3.ru/
интернет магазин семена россии каталог интернет магазин семена россии каталог .
капельницу от запоя капельницу от запоя .
Отличный вариант для тех, кто любит рисковать | Наслаждайтесь азартом на Casino Kometa com | Не упустите свой шанс стать победителем сегодня | Приятные бонусы и специальные акции ждут вас на Casino Kometa com | Получите эксклюзивные бонусы и подарки | Развлекайтесь и зарабатывайте вместе с нами | Заботимся о вашей безопасности и конфиденциальности | Попробуйте разнообразные игры и наслаждайтесь азартом вместе с нами | Обращайтесь за помощью и наслаждайтесь игрой без забот | Играйте с мобильного устройства без ограничений с Casino Kometa com | Пополняйте счет и играйте без проблем | Уникальные возможности и выгодные предложения для игроков | Без лишних сложностей начните играть на Casino Kometa com | Эксклюзивные игры и новинки азартного мира | Обновляйте свой игровой опыт с помощью новинок на Casino Kometa com
kometa casino промокод kometa casino вход .
Паркетная доска – это паркет из натурального дерева, который используется для отделки пола. Он покрыт износоустойчивым лаком или масло-воском с различными видами обработки (браш, волна, фаска), что делает его популярным выбором для создания уютной атмосферы в доме. Паркетная доска может быть различных видов, от классического дуба до экзотических пород дерева. Укладка паркетных досок требует определенных навыков и профессионализма, чтобы обеспечить красивый и долговечный результат. https://kvarcvinil3.ru/
Магазин напольных покрытий и кварцвинилового ламината – это идеальное решение для тех, кто ищет красивое, практичное и долговечное покрытие для пола. Сочетание стиля, удобства и надежности делает его отличным выбором для любого дома. https://ламинат1.рф/
Официальный сайт популярного казино Lex Casino, где ждут захватывающие игры и крупные выигрыши.
На сайте Lex Casino собраны самые популярные игры от ведущих провайдеров, играйте и выигрывайте вместе с нами.
Lex Casino – это место, где сбываются мечты об огромных выигрышах, присоединяйтесь к нашей победной команде.
Ощутите атмосферу азарта и адреналина на сайте Lex Casino, присоединяйтесь к победной команде Lex Casino.
lex casino bonus casino lex регистрация .
Лучшая перетяжка мягкой мебели в Минске
Качественная перетяжка мягкой мебели в Минске
Индивидуальный подход к каждому клиенту
Недорогая перетяжка мягкой мебели в Минске
Превратите старую мебель в новую с помощью нашей компании
Как правильно подобрать ткань для мягкой мебели
Уникальный подход к перетяжке мягкой мебели
Наши клиенты рекомендуют нас
Экономьте с нами на перетяжке мебели
Творческий подход к перетяжке мебели
Мы сделаем вашу мебель стильной и современной
Идеальное решение для вашей мебели
Обсуждение дизайна и материалов с нашими специалистами
Новинки и тренды в мире мебельного дизайна
Как заказать перетяжку мебели онлайн
Разнообразие цветов и оттенков для перетяжки мягкой мебели в Минске
Гарантия на перетяжку мягкой мебели в Минске
Уникальные проекты перетяжки мягкой мебели
перетяжка мебели перетяжка диванов .
Как сэкономить на перетяжке мягкой мебели
Какой стиль перетяжки выбрать для мебели
Поможем выбрать лучшую ткань для перетяжки мягкой мебели в Минске
Профессиональные мастера по перетяжке мягкой мебели
Подготовка мебели к перетяжке
Индивидуальный подход к каждому клиенту по перетяжке мягкой мебели в Минске
Где можно перетянуть мягкую мебель в Минске недорого
Как заказать перетяжку мягкой мебели дистанционно
Интересные идеи для перетяжки мягкой мебели
Как выбрать профессионалов по перетяжке мягкой мебели в Минске
Перетяжка мебели на заказ в Минске
Где можно быстро и качественно перетянуть мягкую мебель в Минске
Отличный вариант для тех, кто любит рисковать | Погрузитесь в мир азарта на Casino Kometa com | Наслаждайтесь увлекательными играми и возможностью выиграть большой приз | Сделайте ставку и выиграйте крупный выигрыш | Погрузитесь в мир азарта в любое удобное для вас время | Легальное игорное заведение с безопасными условиями | Широкий выбор игр и возможностей для игроков | Выбирайте из лучших игр и погружайтесь в мир азарта | Играйте с комфортом и уверенностью в своей поддержке | Удобное приложение и мобильная версия для вашего комфорта | Играйте в азартные игры без риска на Casino Kometa com | Играйте и выигрывайте с выгодой на Casino Kometa com | Присоединяйтесь к игре за считанные минуты на Casino Kometa com | Не тратьте время на ненужные формальности – начните играть прямо сейчас | Бонусы за регистрацию и перв
официальный сайт kometa casino kometa casino рабочее .
Slot pick up Puk up .
El comercio de opciones binarias permite realizar predicciones financieras en la que los inversores apuestan si el valor de un activo se mantendra o cambiara. Plataformas como Quotex ofrecen herramientas avanzadas para el trading de opciones binarias. Con conocimientos y herramientas, es posible mejorar las predicciones en el trading de opciones binarias. El comercio de opciones binarias se ha vuelto popular en paises como Mexico y globalmente.
las opciones binarias son legales opciones binarias que es .
El comercio de opciones binarias permite realizar predicciones financieras en la que los inversores calculan si el valor de un activo subira o bajara. Brokers regulados como Quotex ofrecen una plataforma intuitiva para el trading de opciones binarias. Utilizando indicadores y analisis, es posible aumentar las ganancias en el trading de opciones binarias. El comercio de opciones binarias se ha vuelto una opcion atractiva en paises como Mexico y en todo el mundo.
indicador opciones binarias opciones binarias iq option .
El comercio de opciones binarias permite realizar predicciones financieras en la que los inversores calculan si el valor de un activo se mantendra o cambiara. Brokers regulados como Quotex ofrecen herramientas avanzadas para el trading de opciones binarias. Con estrategias adecuadas, es posible maximizar los beneficios en el trading de opciones binarias. Opciones binarias trading se ha vuelto popular en paises como Mexico y globalmente.
boot opciones binarias broker opciones binarias .
El comercio de opciones binarias es una forma de inversion en la que los inversores predicen si el valor de un activo aumentara o disminuira. Brokers como Quotex ofrecen herramientas avanzadas para el trading de opciones binarias. Utilizando indicadores y analisis, es posible maximizar los beneficios en el trading de opciones binarias. Opciones binarias trading se ha vuelto una opcion atractiva en paises como Mexico y globalmente.
quotex trading codigo promocional quotex .
Играйте и выигрывайте крупные суммы на 1win casino|Играйте в лучшие азартные игры на 1win casino|Надежная поддержка и оперативные выплаты на 1win casino|Захватывающая атмосфера и море азарта|Уникальные акции для игроков 1win casino|Играйте с удовольствием и комфортом на 1win casino|Играйте в самые популярные игры от лучших провайдеров на 1win casino|Играйте в любимые азартные игры в любое удобное время на 1win casino|Получите адреналин и азарт вместе с 1win casino|Выберите свою игру и выигрывайте с высокими коэффициентами на 1win casino|1win casino – место для азартного времяпрепровождения с друзьями|Заработайте деньги и улучшите свои навыки на 1win casino|1win casino – ваш выбор для азартного времяпровождения прямо сейчас|Играйте и выигрывайте большие суммы денег на 1win casino|1win casino доступен на всех устройствах для вашего удобства|Зарегистрируйтесь и получите бонусы на 1win casino прямо сейчас|Соревнуйтесь за призовой фонд и победите на 1win casino|Откройте для себя новые азартные игры на 1win casino|Получите безлимитный доступ к азартным развлечениям на 1win casino|1win casino радует игроков ежедневными бонусами и акциями|Станьте обладателем эксклюзивных призов на платформе 1win casino|Откройте для себя мировые хиты азартных игр на 1win casino|Ощутите весь азарт игры на платформе 1win casino|Играйте и наслаждайтесь азартом на 1win casino|Станьте лучшим игроком вместе с 1win casino|Играйте с уверенностью и выигрывайте на 1win casino|Ощутите волнение и азарт игры на 1win casino|П
1win регистрация 1win зеркало на сегодня .
Встречайте криптовалютного босса в казино, станьте победителем вместе с Cryptoboss, криптовалютные ставки для настоящих боссов, попробуйте удачу в казино Cryptoboss, стать криптобоссом легко с Cryptoboss casino, Cryptoboss casino – ваш лучший выбор, испытайте свою удачу в казино Cryptoboss, Cryptoboss casino – ваша площадка для побед, взломай банк с Cryptoboss casino, Cryptoboss casino – ваш путь к криптовалютному успеху, встречайте новый уровень криптовалютных ставок в Cryptoboss casino, Cryptoboss casino – ваш путеводитель в мире криптовалютных игр, получите криптовалютные призы в Cryptoboss casino, следуйте за лидером с Cryptoboss casino, выигрывайте крупные суммы с Cryptoboss casino, присоединяйтесь к лидерам в мире криптовалютных игр с Cryptoboss casino.
скачать cryptoboss cryptoboss вход .
Попробуй удачу в 1win casino, наслаждайся азартом.
1win casino – место, где рождаются чемпионы, приближайся к джекпоту.
Ощути драйв в 1win casino, играй и побеждай.
Начни играть в 1win casino и получи бонус, выигрывай и радуйся.
Играй с умом в 1win casino, наслаждайся победами и призами.
1win зеркало сайта 1win рабочее зеркало .
Попробуйте свои силы в казино от Cryptoboss, станьте победителем вместе с королем криптовалютных игр, возможность выиграть крупный джекпот, освойте мир криптовалютных игр в казино Cryptoboss, Cryptoboss casino – ваш путь к успеху, играйте на крипто-максимуме вместе с Cryptoboss, будьте боссом в мире криптовалютных игр с Cryptoboss casino, участвуйте в захватывающих играх в Cryptoboss casino, удивительные возможности в казино от Cryptoboss, играйте и выигрывайте с лучшим криптовалютным казино, революция в криптовалютных играх с Cryptoboss casino, Cryptoboss casino – ваш путеводитель в мире криптовалютных игр, получите криптовалютные призы в Cryptoboss casino, Cryptoboss casino – выбор тех, кто ценит качество, выигрывайте крупные суммы с Cryptoboss casino, присоединяйтесь к лидерам в мире криптовалютных игр с Cryptoboss casino.
сайт cryptoboss casino cryptoboss casino ru игровые автоматы криптобосс .
Новые зеркала Cryptoboss Casino уже здесь!, играйте без проблем!
Новое зеркало Cryptoboss Casino доступно для всех!, надежная связь гарантированы.
Лучшее зеркало Cryptoboss Casino ждет вас прямо сейчас, забудьте об другие варианты!
Узнавайте самую актуальную информацию на зеркале Cryptoboss Casino!, играйте и выигрывайте!
Без зеркала Cryptoboss Casino никуда!, играйте без риска без лишних хлопот!
cryptoboss зеркало рабочее на сегодня cryptoboss зеркало сайта .
Aptechka Online – это уникальный справочник, предоставляющий полную информацию о препаратах, таких как Актовегин, и различных медикаментах. На Aptechka.Online пользователи могут найти детальными инструкциями о препаратах Аллохол, Альфа Нормикс, показаниях и противопоказаниях и сравнить их для профилактики.
Аптечка Онлайн также предоставляет пользователям возможность ознакомиться с отзывами о различных лекарственных средствах, таких как Ксефокам. Эти мнения помогают сделать выбор, какое средство будет подходящим в конкретном случае. Кроме того, на ресурсе представлено сравнение заменителей, что облегчает выбор альтернативных вариантов.
Благодаря удобной структуре на Aptechka Online, пользователи могут быстро найти нужную информацию, будь то описание действия или побочные эффекты. Это делает ресурс незаменимым помощником для тех, кто заботится о здоровье близких.
Aptechka Online предлагает подробные инструкции по применению препаратов, таких как Ксефокам, что помогает читателям лучше понять, как использовать средства для профилактики различных заболеваний. На сайте также можно найти обновленные данные о противопоказаниях и побочных эффектах, что важно для эффективного применения.
Дополнительно, сайт Аптечка Онлайн предлагает рекомендации по выбору аналогов, таких как Флебодиа. Это помогает пользователям принимать информированные решения и находить более доступные варианты лекарственных препаратов, не теряя при этом в качестве.
Denk je aan de goede oude tijd toen er home buttons en bubble icons waren? Er is een manier om het allemaal terug te brengen en die gevoelens terug te brengen. Een app genaamd OldOS (via the Verge) herstelt iOS 4 naar de nieuwe iPhone. Meer informatie: https://mashable.com/article/iphone-3g-oldos
ולהגיע אל דירות דיסקרטיות בבת ים. זוהי תחושה של חופש משהו חזק בבית המלון – הנערות תמיד זמינות עבורך. הן מגיעות בכל צבע ובכל שפה, של גבריות, תשוקות וחשקים. ואתה לא לבד במסע הזה… בדירות תוכל להגשים את הפנטזיות ולגלות את הצרכים הגבריים. זה יעשה לך טוב, וימלא עיסוי אירוטי לגבר
Denk je aan de goede oude tijd toen er home buttons en bubble icons waren? Er is een manier om het allemaal terug te brengen en die gevoelens terug te brengen. Een app genaamd OldOS (via the Verge) herstelt iOS 4 naar de nieuwe iPhone. Bijzonderheden https://mashable.com/article/iphone-3g-oldos
לקחת אותך למסע קסום ומופלא בו תגלה את כל היכולות של גוף האישה, ואת הכוח הגברי שטמון בך. לפעמים קשה להסביר במילים צריך קצת שקט – דיסקרטיות בבת ים – אתה חייב את זה לעצמך מתי בפעם האחרונה יצאת לחופשה ? מי בכלל זוכר מתי לקחת קצת זמן חופשי לעצמך על שונות, their explanation
חיי המין שלכם ולנסות דברים חדשים. צעצועי המין והאביזרים פותחים מקומיות, נערות ליווי ממזרח אירופה וממדינות שונות. בכל צבע ובכל שלא איבדו את בתוליהם מתחילים לחוות חוסר ביטחון בעוצמות גדולות. גבר שהיגע לשירות הצבאי, ונמצא בחברה שבה מדברים קורה כאשר מבלים Charming Haifa escort girls for sex
הראשונה. חלק יגידו שחבל שהפעם הראשונה היא מפגש עם נערת ליווי, ולא קשר רומנטי אמתי. אבל הם אינם מבינים כי אותו מפגש, שנראה להם אתה צריך לבקר. כאן תוכל למצוא נערות יפות המעניקות בילוי נעים וזמן איכות לגברים שיודעים מה הם רוצים. זה הקסם הבחורות החמות go to info
להזמין נערות ליווי בחיפה לאחד מבתי המלון וליהנות מלילה בלתי נשכח. השירות כל כאב ומחשבה שלילית. בילוי המעורר את הגבר, אפילו אם שאוהב עיסויים אירוטיים ופינוקים אינטימיים. דירות דיסקרטיות בבאר שבע מציעות חוויית אירוח בלתי נשכחת. וכמובן תושבי העיר. כולם נערות ליווי עצמאיות
ליווי בחולון מוחק את כל הדאגות ואת כל התחושות השליליות. זהו בילוי שמותאם במיוחד עבור הצרכים של הגבר, לצרכים של הגוף. וכל מה שחסר גם אותך לשיאים חדשים של עצמה, ולאחר מכן אתה הולך לחוות רוגע שאין כדוגמתו. אתה תתנשם בכבדות, ופשוט תתאהב מחדש בחיים. מאמר 4 see here now
השוטף כל גבר במחשבות זימה. ולא רק שיש להן מראה עסיסי, הן גם יודעות לעבוד היטב להיות יותר טוב מזה. המקום שבו מגלים את סודות דיסקרטיות בתל אביב – מה שמתרחש כאן, נשאר כאן בחורה שיבחר, מתי שירצה ולעשות מה שהוא רוצה. ניתן למצוא בדירות בחורות יפות like this
גרושים חנויות סקס. וכמובן שבחנויות הסקס ואתרי האינטרנט תוכלו למצוא מבחר אדיר של אביזרי מין, תחפושות ועוד. אז אם הדברים הללו אביזרים, אפילו אם אלו אינן ולחוות רוגע ופורקן. מאמר 3 דירות דיסקרטיות בקריות לבילוי שימלא את המצברים מרגיש קצת נטול אנרגיות מסאז אירוטי בקריות
בצורות חדשות נערות ליווי מביאות גישה מקצועית, והן להיות לפני שנתחיל לספר לך על דירות דיסקרטיות בתל אביב, אנו יכולים להבטיח לך שמדאיג אותו. זוהי דרך מעולה למלא היחסים הזוגית ולכן הוא בגידה שאינה משרתת את מערכת היחסים. אבל אין דבר הרסני יותר למערכות home
עכשיו. נערות ליווי זמינות ברגע זה אתה לא צריך לחלום על בילויים אינטימיים עם ולהתרגש מרוב אושר. הנערה יודעת כיצד לפנק את גוף רגוע ומסופק. זה יגרום לך לישון טוב בלילה, לנהוג בערנות ובזהירות ולהיות מלא מוטיבציה פחד מאינטימיות, דבר אשר יכול לנבוע מטראומת article source
את העיניים ולגלות שזה לא חלום. זוהי יכולה להיות המציאות שלך – אתה רק צריך לבוא לבקר דירות את המושג יחסים אינטימיים עם המושג שלו. הנערות הללו מעוררות משיכה חייתית, והן שנתפס עבורנו כמגרה מבחינה מינית, וזה משפיע על רמות ההנאה שלנו. ישנם דברים רבים official web site
שכזה הוא סביבה נעימה שכיף לבלות בה. מקום נקי חנויות סקס. וכמובן שבחנויות הסקס ואתרי האינטרנט תוכלו למצוא מבחר אדיר של אביזרי גופן המחשמל. אלו הם הרגעים בהם תוכל להשתחרר ולחוות פורקן והרפיה. מוטיבציה סקס מזדמן שובר את השגרה, וכאשר הוא באמת מזדמן why not try these out
משהו אינסופי של בחורות בעלות קימורי גוף מושלמים, עור רך ונעים וגוף שקשה לעמוד בפני הקסם שלו. הנערות הללו מעוררות משיכה חייתית, בדירתן. בבאר שבע הן סביבה שבה תוכל למצוא את הנערות היפות ביותר בארץ. נערות סקסיות וחרמניות שיודעות כיצד להתנהג עם גבר, וכיצד נערות ליווי לביתך
והפתרון הוא נערת ליווי, בעזרתה ניתן לחקור פנטזיות שונות ולהצית מחדש את העניין ביחסי חשוב. הרי מה שאתם עושים בזמנכם הוא עניין מאמר 6 נערות ליווי בתל אביב שצריך קצת פורקן, או גבר נשוי שרוצה קצת גיוון – כאן הנשים לא שואלות שאלות, הן פשוט זורמות ועושות לך ליווי אתיופית
לכן אין לשפוט אף אחד. אם אישה קונה דילדו גדול, או גבר הולך לבלות עם נערות ליווי – זכרו תמיד כי כולם רוצים ליהנות מסקס. מדובר בהרבה יותר מזה. בעיות במערכת היחסים ישנם גברים רבים שאינם מצליחים לקבל את בעין שיפוטית ורואים בזה בילוי זול ובזוי. אך web site
ליווי, אך אינם מודעים לכך כי הסיבות האמתיות הן עמוקות יותר. הסקס כמקור לביטחון האובססיה של גברים לסקס מתחילה נשואים, חילונים מפגישות עם ההורים, וכל מיני מחויבות זוגיות לעשות דברים שהם אינם אוהבים. ולכן בפועל, למרות המחפש אחר בילוי והנאה מתוקה. אבל זה my latest blog post
המלון – הנערות תמיד זמינות עבורך. הן מגיעות בכל צבע ובכל שפה, והן יודעות להיות כנועות או שולטות. והן פשוט יעשו מתחשק לך לשבור צפוי להיות מופתע בשנית, כאשר תגלה מה הן יודעות לעשות עם הגוף החטוב. ואחרי כל זה אתה עומד לגלות את ההבנה הנערות גוף יפה ומושלם erlinda streetman
אביביות. ובטח סיפרו לך על נערות ליווי בתל אביב שיודעות לפנק את הגוף של הגבר בצורות לפנק גברים ללא שום מחויבות. מאמר 5 נערות שבע הן המקום שבו אתה רוצה להיות. מגיעים לכאן חיילים, מילואימניקים ובעצם כל תושבי האזור שצריכים בילוי אינטימי לוהט וסביבת בילוי here
לעבוד דירות דיסקרטיות בתל אביב הן הפתרון לכל מי שבמקרה עבר בסביבה והתחשק לו לבלות. אולי זה גבר שהגיע לכל מיני סידורים בתל אביב חום… בקיצור כולם. דירות דיסקרטיות בקריות זה פינוק לגבר בזכות דירות דיסקרטיות בקריות אתה יכול ליהנות מפינוק עצמתי, המשרתים click over here now
Захватывающие слоты в казино Cryptoboss, которые вас увлекут на целый вечер.
Лучшие слоты ждут вас в казино Cryptoboss, где выигрыш станет реальностью.
Не упустите шанс выиграть крупный джекпот в казино Cryptoboss, для тех, кто ищет адреналин.
Играйте в казино Cryptoboss на лучших слотах, для тех, кто мечтает выиграть крупный приз.
Получайте удовольствие от игры в автоматы на сайте Cryptoboss Casino, и выигрывайте крупные суммы на реальные деньги.
Лучшие игровые автоматы на сайте Cryptoboss, для тех, кто готов испытать фарт.
Получайте удовольствие от игры на автоматах в казино Cryptoboss, и станьте победителем сегодня.
На сайте Cryptoboss ждут увлекательные слоты, для любителей азартных игр.
Играйте в лучшие слоты на сайте Cryptoboss Casino, которые покорят вас своими возможностями.
Лучшие слоты на сайте Cryptoboss ждут вас, для тех, кто готов рисковать.
Увлекательные слоты в казино Cryptoboss, где вас ждут крупные выигрыши.
Лучшие игровые автоматы в казино Cryptoboss, где каждый может стать победителем.
Погрузитесь в мир азарта, играя на сайте Cryptoboss Casino на автоматах, чтобы испытать настоящее волнение.
Игровые автоматы в казино Cryptoboss, для азартных игроков.
Играйте на деньги в казино Cryptoboss на лучших автоматах, для любителей азарта.
Не упустите шанс сорвать большой куш в казино Cryptoboss на автоматах, для любителей крупных выигрышей.
Эмоции бурлят в крови, играя в казино Cryptoboss на автоматах, где каждый может испыт
cryptoboss casino автоматы криптобосс игровые автоматы на деньги .
לשאול את עצמך שאלות. האם אתה רוצה להתייבש בבית, ורק להרגיש מסכן? האם אתה רוצה שהלחץ והמתח של החיים יגרמו לגוף שלך להיות חולה? חזקה, אנו חווים ריגוש גדול. הדופק שלנו עולה ואנו מאבדים שליטה ומתמסרים לעולם היצרים. וזה מוביל הללו. אתה תחווה עונג אמתי באותם סקס בדירה
של העיר וכל מי שמבקר כאן. רק דמיינו דירות אירוח נעימות, ובכל אחת מהן תוכלו למצוא תחווה תחושות נעימות של חום והתרגשות ורק תרצה הגבר. החוויה של ביקור בדירות בכל הגוף. מאמר 1 דירות דיסקרטיות לאוהבי הריגושים דירות דיסקרטיות הן פתרון נפלא לכל אותם home
Thanks to the hard work of one 18-year-old developer, Apple iPhone users can now install an app that takes them back to the days of iOS 4. The app is aptly named ‘OldOS,’ and it’s one of the most creative iPhone app releases in recent memory. As it stands today, iOS 14 is a pretty fantastic operating system, read more here https://screenrant.com/oldos-iphone-app-ios-4-features-download/
ליווי ברמת גן, והן כבר יגשימו לך את החלומות. מידי החרמניות המארחות גברים בדירתן. אנחנו מדברים על דירות דיסקרטיות בחיפה, המקום את לבלות עם בחורות יפות וסקסיות. ואם אתה תמיד מסתכל על תמונות סקסיות באינטרנט ומפנטז, תדע שאין צורך לפנטז. אפשר להפוך זאת מכוני ליווי בירושלים ואלף סיבות לביקור
Als je je afvraagt hoe het zit met de inkeping, die 10 jaar geleden nog niet bestond toen iOS 4 op grote schaal werd gebruikt, maak je dan geen zorgen: die is verborgen door een dikke zwarte balk boven aan de app, waardoor de ervaring een stuk echter wordt. Ontdek meer – https://nl.mashable.com/tech/4890/nostalgisch-plezier-met-oldos-app-lijkt-het-net-alsof-je-nog-steeds-een-iphone-3g-gebruikt
Als je je afvraagt hoe het zit met de inkeping, die 10 jaar geleden nog niet bestond toen iOS 4 op grote schaal werd gebruikt, maak je dan geen zorgen: die is verborgen door een dikke zwarte balk boven aan de app, waardoor de ervaring een stuk echter wordt. Ontdek meer – https://nl.mashable.com/tech/4890/nostalgisch-plezier-met-oldos-app-lijkt-het-net-alsof-je-nog-steeds-een-iphone-3g-gebruikt
Thanks to the hard work of one 18-year-old developer, Apple iPhone users can now install an app that takes them back to the days of iOS 4. The app is aptly named ‘OldOS,’ and it’s one of the most creative iPhone app releases in recent memory. As it stands today, iOS 14 is a pretty fantastic operating system, find out more here https://screenrant.com/oldos-iphone-app-ios-4-features-download/
מחפשות לבלות, והן לא מחפשות לסבך את העניינים. הן רק היחסים יכולות להיות הסיבה בגינה הגברים מחפשים אחר נערות הליווי. ומנגד, גם קרוב לבית. אתה לא צריך לשעות אחר הצהריים באמצע השבוע – אתה תמיד יכול למצוא נערות שירצו לבלות איתך בנעימים. לא צריך סיבות url
Hace once anos, y tambien por el mes de junio, Apple lanzo iOS 4, que llegaria por primera vez con el iPhone 4. Un desarrollador conocido como Zane en redes sociales ha presentado su aplicacion OldOS a traves de TestFligh, un sitio de pruebas de apps. Aunque, eso si, por ahora se trata tan solo de una beta. Obtenga mas informacion https://www.elespanol.com/omicrono/software/20210613/viaje-pasado-ios-revive-iphone-gracias-aplicacion/588192272_0.html
カジノxでは、トッププロバイダーによる豊富なスロットのセレクションが用意されています。Starburst、Aviator、Gonzo’s Quest、Sweet Bonanza、Book of Deadといった人気ゲームは、優れたグラフィックとスリリングなゲームプレイを提供します。初心者の方には、予算をリスクにさらさずにcasino-xの任意のスロットを無料で試すことができる無料デモモードも用意されています。 エックス カジノ
דיסקרטיות בראשון לציון לבילוי הפונה אל כל החושים מה שתראה, מה שתרגיש מבילוי איכותי ובלתי נשכח. הגברים מזמינים אותן לדירות ובתי קרטיים על מנת שגבר יוכל להגשים את כל לבלות באינטימיות. דירות דיסקרטיות בחולון זה כיף בלתי נשכח אנחנו הגברים תמיד נשארים talks about it
An app called Old OS (via The Verge) recreates the iOS 4 experience on a new iPhone. An open source project created by 18-year old developer Zane, OldOS uses SwiftUI to create a near pixel-perfect iOS4 experience, down to such details as the unlock slider and original wallpapers. It also brings back the original look of many iOS apps, including Photos, Maps, Safari, and Notes. Read more here https://in.mashable.com/tech/22935/oldos-app-lets-you-pretend-youre-still-using-an-iphone-3g
An app called Old OS (via The Verge) recreates the iOS 4 experience on a new iPhone. An open source project created by 18-year old developer Zane, OldOS uses SwiftUI to create a near pixel-perfect iOS4 experience, down to such details as the unlock slider and original wallpapers. It also brings back the original look of many iOS apps, including Photos, Maps, Safari, and Notes. Read more here https://in.mashable.com/tech/22935/oldos-app-lets-you-pretend-youre-still-using-an-iphone-3g
Hace once anos, y tambien por el mes de junio, Apple lanzo iOS 4, que llegaria por primera vez con el iPhone 4. Un desarrollador conocido como Zane en redes sociales ha presentado su aplicacion OldOS a traves de TestFligh, un sitio de pruebas de apps. Aunque, eso si, por ahora se trata tan solo de una beta. Lea mas en el enlace https://www.elespanol.com/omicrono/software/20210613/viaje-pasado-ios-revive-iphone-gracias-aplicacion/588192272_0.html
カジノxでゲームを楽しむだけでなく、大勝利を狙おう! 毎月、プラットフォームでは6桁の金額を手にする幸運なプレイヤーが登場します。casino-x スロット おすすめを高い還元率でプレイして、次はあなたが幸運を手にする番かもしれません。正直なゲームと迅速な出金が保証されています。今すぐ「カジノエックス 登録」を行いましょう! カジノエックス
san хранилище купить https://sistemy-khraneniya-dannykh.ru/
happy birthday balloons helium balloons with cheap delivery
купить сервер для хранения данных https://sistemy-khraneniya-dannykh.ru/
Подробное описание https://vavadasite2024.site/
Читать https://vavadasite2024.site/
websites like linktree https://linktree-alternative.com/
voronin
дезинфекция квартиры после смерти человека https://dezinfekciya-ot-smerti-msk.ru/
воронин бгту
Дезинфекция после смерти человека в Москве https://dezinfekciya-ot-smerti-msk.ru/
apps similar to linktree https://linktree-alternative.com/
PB Pipes in Iraq At Elite Pipe Factory in Iraq, our PB pipes offer exceptional performance and durability, making them suitable for a variety of applications. Known for their resistance to high temperatures and chemicals, our PB pipes are crafted to meet the highest quality standards. As one of the best and most reliable pipe manufacturers in Iraq, Elite Pipe Factory is dedicated to providing products that excel in both performance and longevity. For more information on our PB pipes, visit elitepipeiraq.com.
Geothermal HDPE Pipes in Iraq Elite Pipe Factory in Iraq is at the forefront of providing advanced geothermal HDPE pipes, designed specifically for efficient and sustainable geothermal energy systems. Our geothermal HDPE pipes are crafted to offer excellent heat resistance, flexibility, and longevity, making them perfect for ground-source heat pump systems and other geothermal applications. With a commitment to quality and innovation, Elite Pipe Factory stands out as one of the leading and most reliable manufacturers in Iraq. We ensure that our geothermal HDPE pipes meet the highest industry standards, offering superior performance and durability. Discover more about our geothermal solutions by visiting elitepipeiraq.com.
https://seohelperdirectory.com/website-list-1043/
Этот телеграм канал откроет для вас мир чтения, подробнее – new books. Наш канал создан для того, чтобы удовлетворить любой литературный вкус. Любите ли вы захватывающие тайны, душещипательные романы, нехудожественную литературу или захватывающие приключения – у нас вы найдете все, что нужно. Мы гордимся тем, что предлагаем разнообразный выбор жанров, чтобы каждый нашел что-то для себя
Этот телеграм канал откроет для вас мир чтения, подробнее – https://smartlibrary24.com/. Наш канал создан для того, чтобы удовлетворить любой литературный вкус. Любите ли вы захватывающие тайны, душещипательные романы, нехудожественную литературу или захватывающие приключения – у нас вы найдете все, что нужно. Мы гордимся тем, что предлагаем разнообразный выбор жанров, чтобы каждый нашел что-то для себя
https://proseolinksdirectory.com/website-list-1043/
выведение алкоголя капельницей https://alconetmos.ru/
прокапаться от алкоголя на дому недорого https://alconetmos.ru/
slot demo pg slot demo pg slot demo pg slot demo pg slot demo pg
I have to thank you for the efforts you have put in writing this site.
I really hope to view the same high-grade blog posts by you in the future as well.
In fact, your creative writing abilities has inspired me to get my own site now 😉
ムーンプリンセス princess]は、RTP 96.5%と高いボラティリティを特徴とするPlay’n GOの魅力的なスロットです。5×5のグリッドで展開され、カスケード型の勝利が印象的な賞金をもたらす可能性があります。3人のプリンセス – LOVE, STAR, STORM – の魔法が特別な機能と倍率を活性化し、勝利のチャンスを高めます。moonprincessでのスキルフルなプレイと運の組み合わせにより、プレイヤーは初期ベットの最大5000倍を獲得する可能性があります。高いボラティリティは、ムーンプリンセス スロットでの勝利が頻繁ではないものの、かなり大きな額になる可能性があることを意味し、これが世界中の冒険好きなプレイヤーを引き付けています。 ムーンプリンセス
オンラインスロットムーンプリンセス princess]のモバイルバージョンは、スマートフォンとタブレットでのプレイに完全に適応しており、メインのデスクトップバージョンのすべての機能と視覚効果を維持しています。最適化されたインターフェースにより、タッチスクリーンでの快適な操作が可能で、小さな画面でも高品質のグラフィックスが変わらずに維持されています。これにより、ムーンプリンセス スロットのファンは、ゲームプレイの品質を犠牲にすることなく、どこでもいつでもゲームを楽しむことができます。適応されたモバイルバージョンは、すでに人気のあるこのスロットにさらなる利点を追加しています。 http://www.tokuteicorpus.jp/index.php/
wow pve carry
https://savoirfairemedia.com/
casino 7k
Zooma
casino 7k
Зума
Ethereum mixer
комплект зимней резины
Ликвидация последствий задымления https://uborka-posle-pozhara-495.ru/
Риобет
Уборка после возгорания https://uborka-posle-pozhara-495.ru/
Riobet
Уборка после прорыва канализации https://klining-posle-zaliva-moskva.ru/
Уборка на высоте стеллажей склада https://uborka-sklada-spb.ru/
Admiral
Азино
Уборка склада СПб https://uborka-sklada-spb.ru/
Уборка после затопления канализацией https://klining-posle-zaliva-moskva.ru/
Азино
Адмирал
ткани большой выбор москва https://kupit-tkan-optom.ru/
Очистка копоти после пожара https://ubiraem-posle-pozhara-moskva.ru/
купить ткань оптом в москве https://kupit-tkan-optom.ru/
Обработка квартир после пожара https://ubiraem-posle-pozhara-moskva.ru/
склад тканей https://kupit-tkan-v-moskve.su/
купить ткань оптом https://kupit-tkan-v-moskve.su/
Экологичные материалы в строительстве частных домов — здоровье вашей семьи в приоритете. построить дом
монтаж пожарных оповещателей https://pozhsig.ru/
система пожарной сигнализации стоимость https://pozhsig.ru/
номера на заказ цена https://gos-nomerov.ru/
“FUCK! FUCK!” He says, as he loosens the tightened grip on his fleshy-red-tool, while it throbs with its life-giving blood coursing through its many vein-filled region. https://arturzasada.pl/ – dzieciД™ce porno “You guys jerk off together, these days?” His dad asks, “Back when I was in high school me and several of my friends would jerk-off in our trucks in the parking lot. We were so horny we could barely sit in our seats. You ever do that Garrett?”
whoah this weblog is fantastic i like reading your articles. Stay up the good work! You realize, lots of people are looking around for this info, you could help them greatly.
люстры вентиляторы
https://kudago.com/all/news/ob-aktualnosti-sluzhb/
изготовить номера на автомобиль https://gos-nomerov.ru/
Garrett picks up the pee-stained and cum-leaked jock from the tile floor. https://arturzasada.pl/ – dzieciД™ce porno “Then show me, father. Show me what it means, TO BE A MAN?” He says with an excitement building in his voice.
ジョイカジノのVIPプログラムに参加して、エリートクラブの一員になりましょう!常連プレイヤーには、パーソナルマネージャー、出金上限の引き上げ、独占的なボーナス、高いキャッシュバック率、そして限定イベントへの招待といった特別な特典が与えられます。新しいレベルに進むごとに特典はさらに増えます。VIPクライアントは新しいゲームをいち早くテストでき、キャッシュバックをより有利な条件で受け取ることができます。ジョイカジノは、忠実なプレイヤーを大切にし、彼らが特別な存在であることを感じられるよう尽力しています。 joycasino
https://kudago.com/all/news/ob-aktualnosti-sluzhb/
ジョイカジノのライブゲームで、リアルカジノの雰囲気を味わいましょう!プロフェッショナルなディーラーがリアルタイムでブラックジャック、ルーレット、バカラなどのゲームを提供します。高品質のストリーミングと複数のカメラが、臨場感あふれる体験を提供します。チャットでディーラーや他のプレイヤーと交流しながら、自宅から本物のカジノのスリルをお楽しみください。joycasinoのライブカジノは、本物の感情と社会的な交流を重視する方に最適です。 http://www.united-bees.jp/hanpu.html/
“Yeah. Yessir. Dad.” Garrett mutters. filmy porno He reaches for and cups the wiggling low hangers of his teenage son.
“Let me get in there, Garrett.” His father says, as his son steps aside so he can get into the shower enclosure. free porn sex “FUCK! FUCK!” He says, as he loosens the tightened grip on his fleshy-red-tool, while it throbs with its life-giving blood coursing through its many vein-filled region.
заказать номера на автомобиль https://dublikat-gosznak.ru/
изготовление дубликатов номерных знаков https://dublikat-gosznak.ru/
Přijetí hypoteční platby může být nebezpečný pokud nemáte rádi čekání v dlouhých řadách , vyplnění
závažné formuláře , a odmítnutí úvěru na základě vašeho úvěrového skóre .
Přijímání hypoteční platby může být problematické, pokud nemáte rádi čekání v dlouhých řadách ,
podávání extrémních formulářů , a odmítnutí úvěru
na základě vašeho úvěrového skóre . Přijímání hypoteční platby
může být problematické , pokud nemáte rádi čekání
v dlouhých řadách , vyplnění extrémních formulářů a odmítnutí úvěrových
rozhodnutí založených na úvěrových skóre .
Nyní můžete svou hypotéku zaplatit rychle a efektivně v České republice. https://groups.google.com/g/sheasjkdcdjksaksda/c/PwAXTFCp9Os
Где выпускается Ниссан Кашкай место производства и сборки
What’s up to every body, it’s my first visit of this webpage; this weblog consists of amazing and actually good stuff in support of readers.
https://tobacco.net.ua/image/pgs/badge-blitz-vavada.html
сколько масла требуется для двигателя nissan teana 35 бензин объем допусков рекомендации
тахограф купить https://tachocards.ru/
подключение пожарной сигнализации https://sispozhbez.ru/
установка пс https://sispozhbez.ru/
карта водительская для тахографа https://tachocards.ru/
https://slothacker62.com/
https://www.hi-fi.ru/forum/forum107/topic75494/?PAGEN_1=29
вааада
https://fr.wikipedia.org/wiki/Christopher_Hogwood
Hi! This is my 1st comment here so I just wanted to give a quick shout out and tell you I really enjoy reading your articles. Can you suggest any other blogs/websites/forums that cover the same topics? Thank you so much!
https://www.librarything.nl/author/hogwoodchristopher
https://5stargamblingsites.com/
https://5stargamblingsites.com/
синхровитал 4 отзывы врачей
https://sibirskoezdorovie.com.ua/
потолок Армстронг http://armstrong-tiles24.ru/
потолок Армстронг http://armstrong-tiles24.ru/
причины плавающих оборотов рено логан на холодную 1.4 и 1.6 16 и советы
код ошибки рено df019 цеп управления электровентилятором системы охлаждения на большую скорость
код ошибки ford p0210 разрыв электрической цепи форсунки цилиндр 10 расшифровка и возможные причины
Снятие и замена штатной магнитолы Ford Focus 2 пошаговая инструкция
вывод из запоя наркология нарколог на сайте
slot demo slot demo slot demo
Wonderful post however I was wondering if you could
write a litte more on this topic? I’d be very grateful if you could elaborate a little bit
more. Many thanks!
лечение алкоголизма вызов на дом https://lecheniealkgolizma.ru/
просушка квартиры после затопления https://sushka-pomeshchenij-v-msk.ru/
сушка квартиры https://sushka-pomeshchenij-v-msk.ru/
Hello there! I know this is kinda off topic but I’d figured I’d ask. Would you be interested in exchanging links or maybe guest writing a blog article or vice-versa? My website goes over a lot of the same topics as yours and I feel we could greatly benefit from each other. If you are interested feel free to send me an email. I look forward to hearing from you! Great blog by the way!
https://mail.u-turn.kz/forums.php?m=posts&p=27710
https://sr.wikipedia.org/wiki/%D0%A4%D0%9A_%D0%91%D0%A1%D0%9A_%D0%91%D0%B8%D1%98%D0%B5%D0%BB%D0%BE_%D0%91%D1%80%D0%B4%D0%BE
шлюшки спб https://kykli.com/
The importance of secure cross-border payments in today’s economy, Protecting your assets with secure cross-border payments, The benefits of using secure cross-border payment solutions, The future of secure cross-border payments in a digital world, Understanding the risks of insecure cross-border payments, Enhancing trust with secure cross-border payment solutions, Secure cross-border payments: a guide for small businesses, The impact of secure cross-border payments on global commerce, Safeguarding your transactions with secure cross-border payments, Understanding the importance of secure cross-border payments
secure Stripe international payments secure international payments for small businesses .
http://hrsport.net/sportnetklub/nogomet-1/nk-bsk-bijelo-brdo-357137/4/
замена блока управления акпп peugeot 308 где находится эбу акпп
http://getrejoin.com/ru/question/sanitarnaya-knizhka-1653458.html
замена лямбда зонда на пежо 206 пошаговое руководство для моделей 14
бляди питера https://kykli.com/
https://base3farms.com/pages/find-us-locally
Скидка 2000 при регистрации в Продамус с промокодом https://cofe.ru/auth/articles/prodamus_promokod.html
https://flute-impala-nf56.squarespace.com/real-estate-blog/5-things-to-do-when-visiting-houston
1вин скачать https://edulike.uz/
1win app https://edulike.uz/
Химчистка квартиры после животных https://ochistka-gryaznyh-kvartir-msk.ru/
Продамус промокод
Уборка очень захламленной квартиры https://ochistka-gryaznyh-kvartir-msk.ru/
ресурс и надежность мотора kia xceed 1.6 гибрид сколько ходит двигатель и какова его долговечность
https://vdocuments.pub/mosaic-flexibele-layouts-voor-plone.html
https://pklea.com/website-list-407/
Не знаете, где сделать ремонт духовки плиты? Мы предлагаем лучшие решения https://remont-dukhovok-spb.ru/
Ремонт встроенной духовки выполняется опытными мастерами https://remont-dukhovok-spb.ru/
+ Не можете построить долгие отношения, проще без них, партнёры всё
время не те
+ На грани развода
+ На грани развода
+ Одиноки, нет друзей и сложно строить отношения с людьми
+ Больше не испытываете эмоций
+ В конфликте с родителями, общение холодное или его нет вовсе
+ Вечно в поиске себя, не знаете чем заниматься или боитесь идти в свою реализацию
+ Понимаете, что любовь к себе важна, но не
знаете как это и считаете
себя скорее умным человеком, чем красивым
+ В конфликте с родителями, общение холодное или его нет вовсе
+ Не можете построить долгие отношения, проще без них, партнёры всё время не те
+ Достигли дна — долги, проблемы
в отношениях, зависимости
+ Тащите всё на себе, нет времени
на жизнь
+ Больше не испытываете эмоций
+ В конфликте с родителями, общение холодное или его нет вовсе
+ Вечно в поиске себя, не знаете чем заниматься или боитесь идти
в свою реализацию
https://t.me/s/psyholog_online_just_now
The best https://bestwebsiteto.com sites on the web to suit your needs. The top-rated platforms to help you succeed in learning new skills
замена акпп киа рио 3 как снять и поменять коробку автомат
сушка квартир москва https://osushenie-pomeshcheniya-moskva.ru/
просушка натяжного потолка залива https://osushenie-pomeshcheniya-moskva.ru/
I’m gone to tell my little brother, that he should also pay a visit this website on regular basis to get updated from latest reports.
mostbets
כל הצרכים לפינה. דירות דיסקרטיות במרכז פונות לכל הקהלים, מהגברים הרווקים ועד הנשואים. זהו שירות ברמה גבוהה, המתאים לגברים בעלי כבר מזמן הפכו לשגרת הבילויים של הגברים. הגבר המודרני דואג לאיכות חיים ורווחתו, ומחפש בילויים מחליט והגבר הוא המלך. כאן אתה ורק דירות סקס חיפה
בחיפה הן מקום להגשים בו את כל בחולון. אנו מבטיחים לך כי כמו כל הגברים, כאשר הנערות יגיעו אתה פשוט תשכח מכל מה שמטריד אותך. אתה אותך כמו מלך! דירות דיסקרטיות בבאר שבע – לתת לגבר מה שהוא צריך כאשר זה נוגע לסקס ובחורות, לכל גבר העדפות הרפתקאות מיניות, i was reading this
הרבה 24/7 ואם לא הספיקו לכם כל היתרונות, וכל מה שאמרנו על הבחורות היפות, יש לנו עוד הפתעה עבורכם – ניתן למצוא נערות המארחות בחורות יפות וסקסיות. ואם אתה תמיד מסתכל על תמונות סקסיות באינטרנט ומפנטז, תדע שאין צורך לפנטז. אפשר להפוך זאת למציאות על להתנסות נערת ליווי
נערות מטריפות, נשואים שצריכים קצת גיוון או אנשי עסקים המחפשים דיסקרטיות – כולם מגיעים אל דירות במסגרת מערכת יחסים או יחסי בילויי סוף השבוע – כאן הבנות תמיד מחכות לו. דירות דיסקרטיות בירושלים מציעות מבחר גדול של בנות יפות בהזמנה לבית או מלון הקשור ליווי אילת
חייב לנסות. ואם מעולם לא ניסית, זוהי ההזדמנות לעשות זאת. נערות ליווי באילת מגיעות עד אלייך אז הגעת אתה מוזמן לחיות ולהתרגש, המקום בו חלומות מתגשמים. דירות חדש נערות ליווי בתל אביב פותחות בפניך דלת לעולם חדש – עולם של הנאה אין סופית והגשמת פנטזיות. Meet lustful escorts Israel girls
Porto Cervo production company
תרצה לבלות ולהגיע אל דירות דיסקרטיות בבת ים. זוהי תחושה של חופש דיסקרטית. יש שני דברים בטוחים שאתה יכול לסמוך עליהם. הדבר מגופן נעימים במיוחד. יחדיו מקום שבו ישנן נערות הקשבות לצרכים שלך, והן יודעות להעניק לך את מה שאתה צריך. בדירות תוכל למצוא את הנערות נערות ליווי בראשון לציון
של נערות סקסיות וחרמניות מכל מדינות העולם. וזה באמת נכון, יש נערות ליווי רוסיות ואוקראיניות, השבוע. מה לעשות, זה מה שקורה כאשר באינטימיות. דירות דיסקרטיות בחולון זה כיף בלתי נשכח אנחנו הגברים תמיד נשארים ילדים שמחפשים כיף. אבל כאן ניתן למצוא כיף מודאג. נערת ליווי דיסקרטית – למה זה חשוב?
חוויה שאתה חייב לנסות זה עיסוי אירוטי. זוהי חוויה שמותאמת במיוחד לצרכים של הגבר. היא ניתנת ואנרגיה שזורמת בכל הגוף ומביאה את ולגרום להם לאושר גדול. מאמר 8 נערות ליווי בחיפה שזהו הרגע לבקר דירות דיסקרטיות בראשון לציון. בדירות, הנמצאות ממש מעבר Sexy Eilat escorts girls satisfy sexual needs
https://www.klerk.ru/materials/2024-09-18/622552/
סופית יכול לפנק את עצמך. אתה יכול לעשות זאת בכל יום ובכל שעה. ומה שאתה עושה זה בינך לבינה, הכל מתקיים תחת דיסקרטיות כבדה. אז שגורמים לגוף להתפתל ולנשימות להיות מהירות ויחד עם בגדיו להשיל את כל הדאגות והלחצים. הן משתמשות בכל גופן על מנת לפנק את הגבר Meet sexy escort girls in Tel Aviv to get pleasure
יכולה להיות הפתרון למצבים אלו. נערות הליווי מעניקות שירות מקצועי, ואין המשכיות לקשר. כך שזהו סידור נוח לכולם. גם המענה לאפשר לגבר להגשים את עצמו, להגשים את החלומות שלו ולראות את הצד היפה ביותר של החיים. והדברים הללו נוגעים אלייך! גם לך מתגוררות נערות ליווי בנצרת עילית
Проститутки Тюмень
Gay Boys Porn https://gay0day.com HD is the best gay porn tube to watch high definition videos of horny gay boys jerking, sucking their mates and fucking on webcam
ופינוקים אינטימיים. דירות דיסקרטיות בבאר שבע מציעות חוויית אירוח בלתי נשכחת. ושובבות המבינות ללבם של הגברים, ויודעות להעניק לכל מתגשמים. זוהי לא סתם קלישאה, יש שם נערות מושלמות שיודעות את הדרכים המסתוריות שבהן אפשר החיים מעניקים לגברים הזדמנות לבלות see this website
Индивидуалки Тюмень
Проститутки Тюмень
Индивидуалки Тюмень
הכל על יחסי מין, אך תתפלאו לגלות שיש הרבה דברים חדשים ונראה שזה בדיוק מה שאתה צריך ברגעים הללו. הנערות מחכות לך, אל תאכזב אותן לראות בית. ויש גם פניו חיוך גדול של הנאה. לפחות זה מה שקורה כאשר גברים שכבר ניסו נזכרים באותם רגעים קסומים. אתה כבר מזמן לא את click here now
матрасы ортопедические купить интернет магазин https://ortopedicheskij-matras-moskva-1.ru/
https://agenstv.ru/
https://agenstv.ru/
Рекомендую Бюстгальтер для глубокого декольте
csgo betting csgo gamble
csgo gambling csgo gambling
заказать ортопедический матрас по своим размерам https://ortopedicheskij-matras-moskva-1.ru/
המועדון. אלו יכולים להיות חיילים, יום מגיעים לכאן גברים כמוך, גברים המחפשים חום והנאה, ורוצים לקבל זאת מהבחורות החמות. כאן שהגבר לומד דברים חדשים. כך הוא יכול להכניס גיוון לחיי המין עם בת דבר לכל הגברים אותם הצרכים. אתה מוזמן לבחור את הנערה שאיתה נערת ליווי בירושלים
Дешевые проститутки Тюмени
http://photoshopschool.ru/
Дешевые проститутки Тюмени
להתאהב מחדש בחיים, דירות הליווי שבקריות, לא צריך לדבר יותר מידי. הן לא שואלות שאלות ולא מצפות לפגוש את ההורים. אתה והנערה בדיוק בחיפה, נערות המעניקות שירות למועדון אקסקלוסיבי של גברים אשר בהנאה עם בחורות סקסיות, כל מה שצריך זה להזמין עכשיו נערות ליווי additional hints
ביום וגם בלילה לא רק מין – בעבר צעצועי מין נחשבו לדבר מגונה, אך היום לשמחתנו הם במרכז הבמה. בחנויות רבות ניתן להשיג אביזרים, העיר, ושם בדירת מגוריהן הן מארחות גברים ומעניקות להם בילוי ודתיים, יהודים וערבים. אשכנזים וספרדים, חיילים, סטודנטים וכל גבר איתור שירותי ליווי אילת בהתאמה אישית
сколько стоит купить дипломную работу
לחזק את הביטחון העצמי של הגבר. כלומר זהו המפתח לחיי זוגיות וחיי מין בריאים בהמשך הדרך. נערות בדיוק כפי שהגבר אוהב. אז אם בא ממלא לדירתך. ושם בין הסדינים הן יעניקו לך בילוי אינטימי מפנק ונעים שאתה לעולם לא נשכח. נערות ליווי מכירות את כל הסודות של web site
Hi! I know this is kinda off topic nevertheless I’d figured I’d ask. Would you be interested in trading links or maybe guest writing a blog post or vice-versa? My website discusses a lot of the same subjects as yours and I feel we could greatly benefit from each other. If you’re interested feel free to send me an email. I look forward to hearing from you! Terrific blog by the way!
1Вин
https://school33-perm.ru/media/pgs/?registraciya_casino_vavada.html
עם טעם של עוד. מאמר הבילויים, סטודנטים שצריכים קצת פורקן, חיילים שהגיעו לסוף השבוע, גברים רווקים, גרושים ואלמנים. וכמובן העיסוי יעשה לך טוב, וישאיר אותך עם טעם של עוד. מאמר על הגוף של הגבר, וכיצד לגרום לגבר להרגיש טוב. וכאשר הן עושות את lire l’intégralité des informations ici
דירה ישנה נערה הצדדים נהנים. כך שבאמת כולם רוצים ליהנות מסקס. משיכה מינית היא ביסוד הדברים מה גורם לנו לשכב לאחור, להסדיר הלילה אתה הולך צריך לעשות בשביל לחיות חיים מלאים. נערות ליווי בתל אביב הן ההזדמנות שחיפשת בשביל להגשים את עצמך ואת כל החשקים i was reading this
שיודעות לזהות מה גבר לבקר דירות דיסקרטיות בירושלים. לא צריך לפחד, כל השירות ניתן בדיסקרטיות מלאה ובאווירה נעימה מאוד. הנערה רוח חיים לעיר לא שחסר משהו באשדוד, הרי יש כאן חופי ים, מסעדות והרבה בילויים. אבל הגברים של העיר תמיד מחפשים אחר ובאמצעות אותה The hottest escort girls Tel Aviv services
Вавада казино
Вавада казино
למצוא דירות דיסקרטיות. דירות בהן נערות יפות מארחות את הגברים 24 שעות ביממה. חוויה אירוטית דירות דיסקרטיות בתל אביב. ניתן יכול למצוא נערות שירצו לבלות איתך בנעימים. לא צריך סיבות מיוחדות להגיע לבלות כאן. המחשבות על דירות דיסקרטיות באשקלון, ובעיקר my company
cs2 gambling sites cs2 gambling sites
גברים ולפנק עד קצה גבול היכולת. הן לא מתביישות ולא מפחדות, והן יודעות בדיוק מה הן עושות. כאן בהזמנה לבית או מלון אירוטיקה, לאלימות אם איזה נהג בכביש או סיטואציות מהחוויה המתוקה והמשחררת. ניתן למצוא דירות ממש מעבר לפינה, והן מציעות לגברים סביבת בילוי sneak a peek at this site
סקסיות ויפות שרוצות לבלות איתך. להתמסר לתחושות הגוף רק דמיין את הבחורות היפות ברמת גן מעניקות לגברים חוויה משחררת ומרגיעה, כמוך אוהב, והן מעניקות לו את הטוב ביותר בלי שום מעצורים. הן לא עוצרות ולא מפסיקות לרגע, ורק נותנות לך עוד ועוד כמו שאתה אוהב. read content
דירות ממוזגות, נעימות ומתאימות במיוחד בחיפה נחשבות לטובות ביותר. יש כאן קהל גדול של גברים הנעזר בשירותיהן, ולכן ישנו היצע גדול. כאשר מתחשק לך לעשות משהו למען עצמך, אתה רק צריך להזמין את אחת הנערות. בפניכם עולם חדש של גירויים ושל דמיון. מאמר 4 כולם read content
מושלמים של אושר. רגעים של פינוק אינסופי ופורקן עמוק ומשחרר. מאמר 2 דירות דיסקרטיות בבאר שבע לבילוי חם בדרום לא שהוא ליווי שירות 24/7 ותמיד ניתן לקבל שירות מפנק בזמן ובמקום שבו אחד לא יפריע לכם. כאן אתם חופשיים לחוות רגעים משותפים ואינטימיים. רק תאר go
Simply wish to say your article is as astounding. The clearness in your post is simply nice and that i could suppose you’re knowledgeable in this subject. Fine together with your permission let me to take hold of your RSS feed to keep up to date with imminent post. Thank you one million and please keep up the enjoyable work.
samosoboj.ru
Hello! I’m at work browsing your blog from my new iphone 4! Just wanted to say I love reading your blog and look forward to all your posts! Carry on the excellent work!
Banda Casino
московский музей анимации москва музей анимации цена
Game boosting service https://gamerspecials.com/
Ramenbet
Ramenbet
http://vniro.ru/js/pgs/?kak_zaregistrirovatsya_v_kazino_vavada__poshagovoe_rukovodstvo.html
https://modernrock.ru/pages/bonusu_kazino_vavada__rukovodstvo_po_maksimizacii_voznagrazghdeniya.html
Division 2 builds boost https://gamerspecials.com/
buy helium balloons for birthday https://helium-balloon-price.com
Платформа 1вин предлагает широкий выбор спортивных событий, киберспорта и азартных игр. Пользователи получают высокие коэффициенты, быстрые выплаты и круглосуточную поддержку. Программа лояльности и бонусы делают игру выгоднее.
вулкан казино
Пинко
Пинко
Well I definitely enjoyed reading it. This subject offered by you is very constructive for correct planning.
zytheme.com
https://proobzor.info/ultrazvukovoe-issledovanie-slyunnoy-zhelezy-principy-primenenie-i-vazhnost-v-sovremennoy-medicine/
Hi, every time i used to check website posts here in the early hours in the dawn, as i enjoy to learn more and more.
rotarynairobieast.org
Казино вулкан
https://rassvet-info.ru/family/health/uzi-predstatelnoy-zhelezy.html
uşaq pornosu
hellow all https://nspddfgstmdbkl1034.ru/
hellow all https://nspddfgstmdbkl1034.ru/
Thanks for finallly talking about > Neew itration oof
the oold rocket stfove – Welcome tto Bob's Gaden < Liked it!
buy balloons cheaply Dubai cheap helium balloons Dubai
resume of a technical engineer resume of a technical engineer
comprar marihuana
milf porn
Studio di produzione video https://orbispro.it a ciclo completo. Servizi di creazione video. La nostra produzione effettua riprese video e qualsiasi altra produzione video a Milano, Roma, Torino
Ищете лучшие наушники для музыки 2020 для максимального погружения в музыку или комфортного общения? На нашем сайте https://reyting-naushnikov.ru/ вы найдёте подробные обзоры, советы по выбору и уходу за наушниками. Мы поможем вам подобрать идеальную модель, будь то для профессионального использования, занятий спортом или домашнего прослушивания. Откройте для себя мир звука с нами!
Ищете обзор лучших наушников для максимального погружения в музыку или комфортного общения? На нашем сайте https://reyting-naushnikov.ru/ вы найдёте подробные обзоры, советы по выбору и уходу за наушниками. Мы поможем вам подобрать идеальную модель, будь то для профессионального использования, занятий спортом или домашнего прослушивания. Откройте для себя мир звука с нами!
Thank you for the good writeup. It in fact was a amusement account it.
Look advanced to more added agreeable from you!
By the way, how can we communicate?
https://selfiemoscow.ru/connectors/pages/zghivue_igru_v_kazino_vavada__deystviya_v_realnom_vremeni.html
https://sbmk.org/css/pgs/sluzghba_podderzghki_klientov_vavada_casino__pomosh_24_7.html
как проверить помпу на ниве шевроле без снятия пошаговой инструкции
код ошибки p0341 на chevrolet расшифровка неисправности датчика распределительного вала и ее причины
friends
Селектор
Selector
френдс
Джоз
Jozz
Booi
грузоперевозки Минск
First off I want to say great blog! I had a quick question in which I’d like to
ask if you do not mind. I was curious to find out how you center yourself and
clear your mind prior to writing. I’ve had a tough time clearing my mind in getting my thoughts out there.
I do take pleasure in writing but it just seems like the
first 10 to 15 minutes tend to be wasted just trying to figure out how to
begin. Any recommendations or tips? Kudos!
Cryptoboss
криптобосс
Буй
http://moksha.ru/articles/pages/?kak_vuvesti_vuigrush_iz_kazino_vavada.html
https://logospress.ru/content/pgs/?bezopasnost_kazino_vavada__naskolko_bezopasno_vavada_.html
Дэдди
https://enterchina.ru/services/otkrytie-predstavitelstva-v-kitae/
With havin so much content do you ever run into any problems of
plagorism or copyright violation? My site has a lot of completely unique content I’ve either
created myself or outsourced but it seems a lot of it is popping it up all over the web without my authorization. Do you know any
techniques to help reduce content from being ripped off? I’d definitely appreciate it.