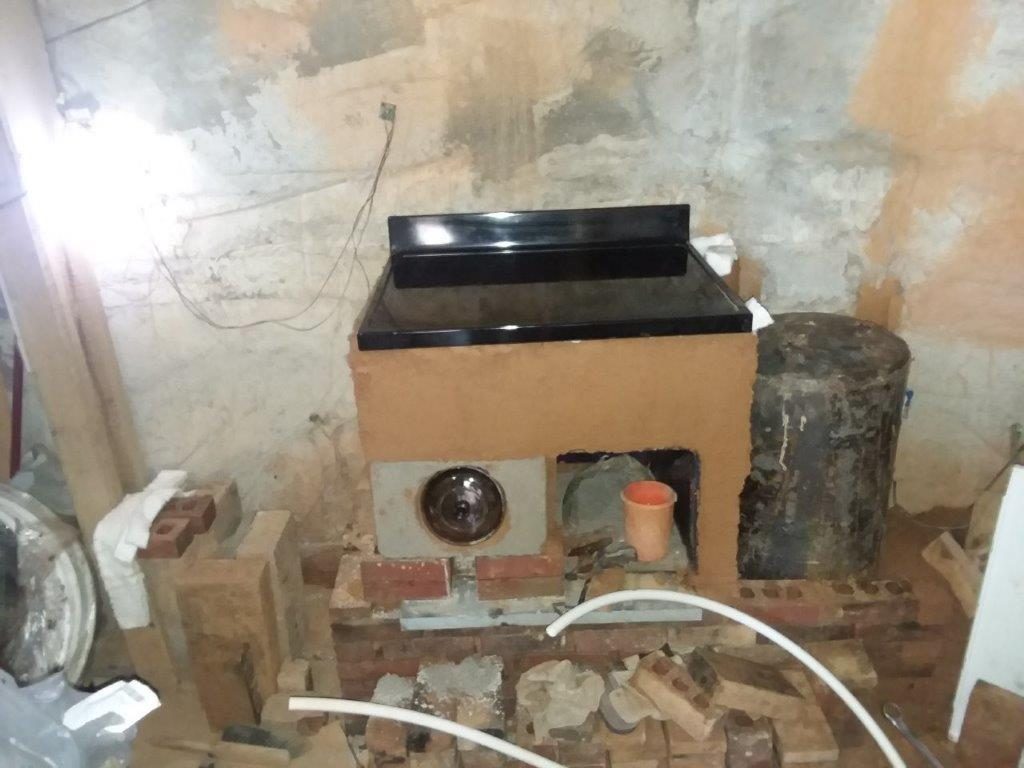
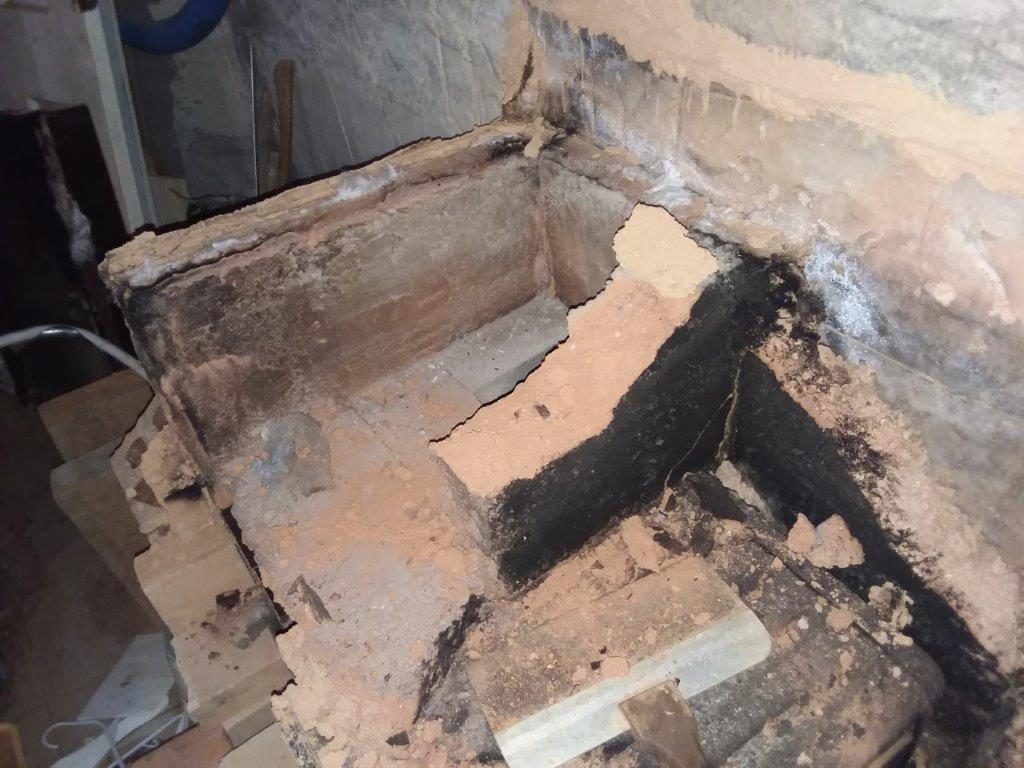
So it’s getting pretty cold outside, and when I built the last version of my stove I promised a breakdown analysis after I had used it for a season and had a chance to sort out my experience. Now that I have rebuilt the beast it seems the time is here to write about it.
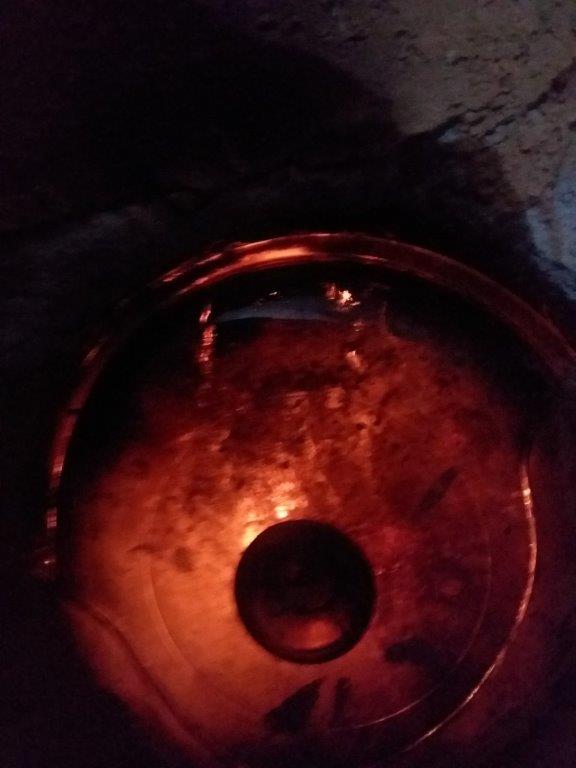
First I would say that overall it performed pretty well, the weakest part of the thing being the door. The visions cookware lid I started with did work, but I would not plan on using such a thing except in a pinch. Eventually the first one cracked, primarily from physical shocks because it really does get too hot to handle at times leading to bumps and drops, and once hot it will use any excuse to crack.
Over the three to four month life of the stove there were numerous tweaks and while the final product worked, it would never have lasted another four months without many more overhauls.
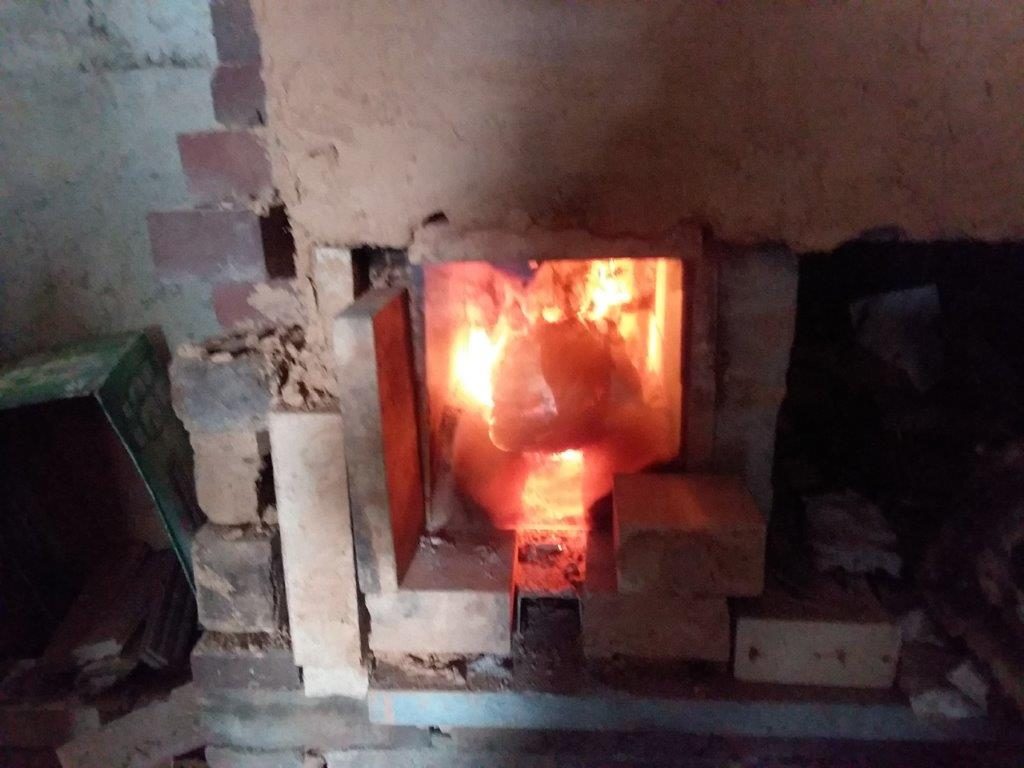
My building style was primitive, using lots of clay and perlite, which was always sufficient in the original rocket stoves I built, but with the more compact and intricate design of the DSR bricks are really the way to go for all vertical surfaces, not just inside the firebox/batch box. Also bricks give an element of speed to the construction, and the finished product is structurally more stable. With clay walls on much of the old stove, cracks were commonplace, and I often worried about them just falling completely apart. If you do want to use clay, make sure it is a continuous mold type process. Forming one wall one day and then adding to it or building an adjoining wall the next does not give a reliable bond.
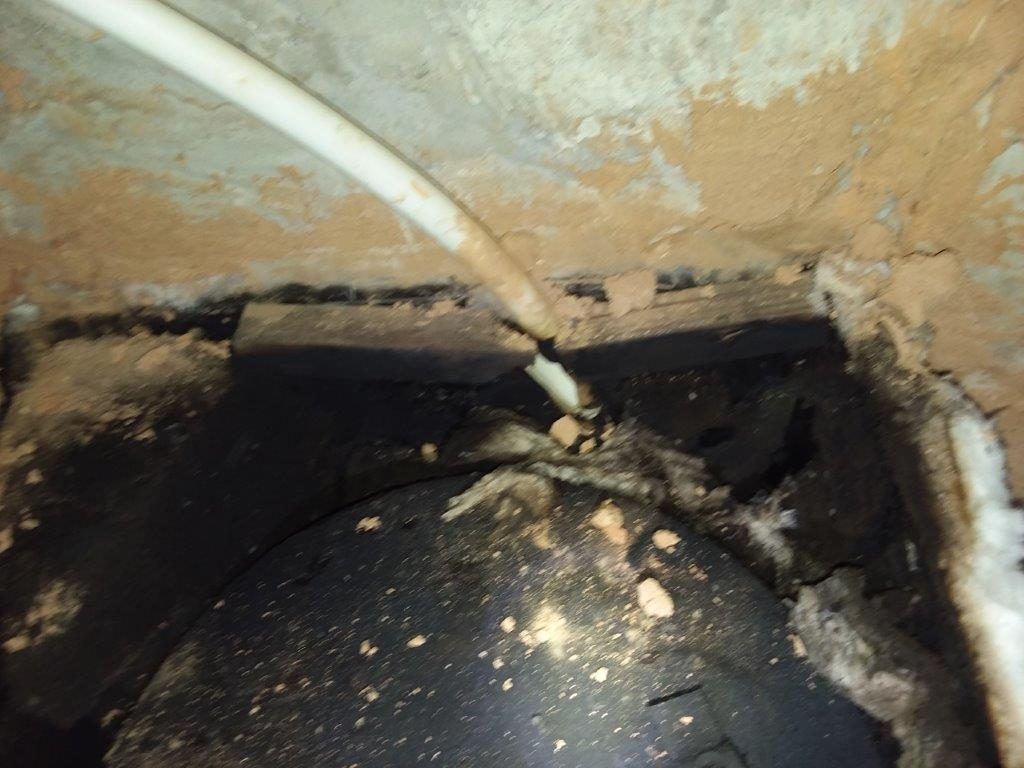
The water tank was the next area of interest, primarily because it was an issue I had to revisit many times, especially after one spectacular failure. My theory that pex could withstand temperatures in excess of water boiling was good only to a point . Hot, therefore soft, pex under extra pressure will blow out. Use all metal fittings inside the heat chamber and for a distance outside the chamber, and of course, when heating water, always have the system open so steam can escape safely. Pressure relief valves are a real good extra insurance in case one forgets to depressurize the system.
Soot was present everywhere the exhaust touched , except the parts that got the hottest in the burn chambers. The thought occurred to me that I had basically turned the entire downstream part of the stove where heat was extracted into a creosote trap, and future builds will have to accommodate an easy access for periodic cleaning.
Future builds will also need to be more efficient, and since start up and cool down phases of the burn are the most problematic, shortening those periods compared to overall burn time will be a major concern. Quality dry fuel will become a major goal for operation of the next iteration of the stove.
Recently I read more about the continued development of the DSR II and it has taken some interesting turns. I’m not sure I will be using all the developments, but at some point I will likely be adding a short riser at the back of the firebox. That will likely wait for me to get some ceramic fiber board, so for now I’m just using the old DSR design.
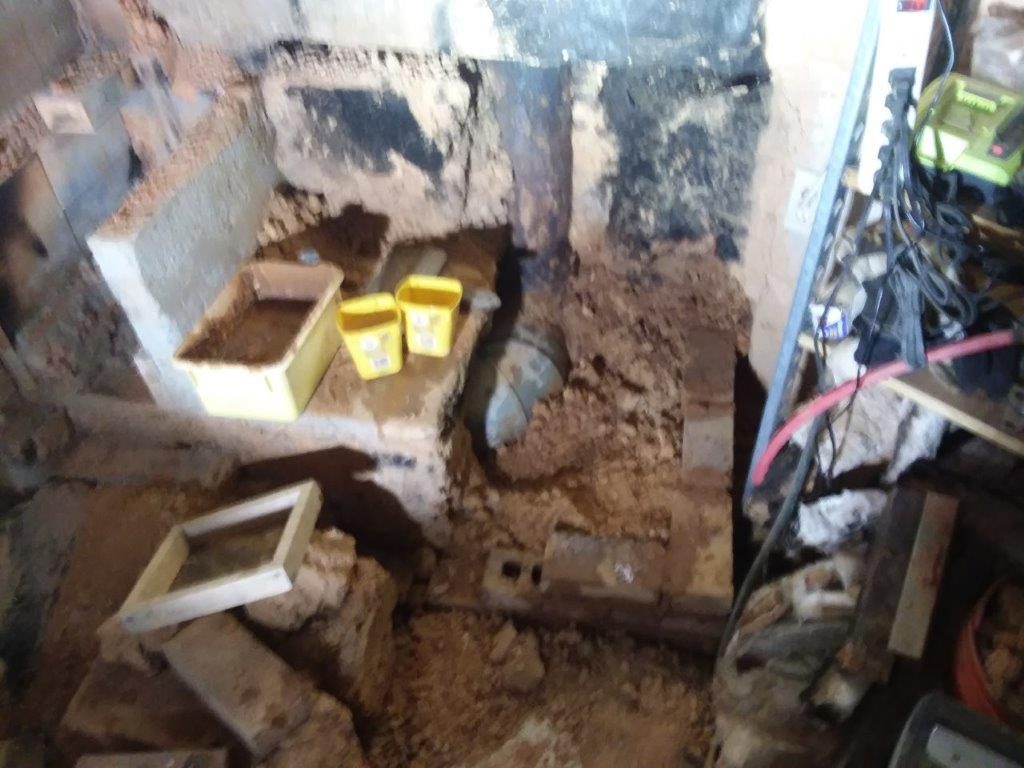
I was a bit remiss taking pictures as I dismantled the old DSR, and obligations elsewhere meant much of the new construction was not overly documented, but look at the next post to see how the new DSR changed.

Hello Bob,
Since several months I am following donkey, wheaton, Peter van den Berg etc. They talk about the double shoebox and there is even made a video of it (Allerton Abbey) and I think it is all beautiful and I would like to make such a thing with an oven and heated thermal mass.
Peterberg even posted a sketch-updrawing of the double shoebox but it is without oven.
Before trying to make it I read the Wisner’s-book, just to understand a little bit more.
And then I discoverd your site with this DSR that you demolished and rebuilt again? And you start talking about the fact that DSR1 was abandonned by Peterberg, but that it didn’t matter for your purpose at that time and then later on you write that you recently read more about the continued development of the DSR II and that you will use some of the changements etc…… and I am curious wich changes you will use and why.
I tried to find information about DSR2, but I can’t find it.
Paul Wheaton also publishes some nice foto’s of the making proces in wich I see (I think) an air inlet down at the right etc.
I am puzzled…
I thought I’d give it a go to write you and just ask. Because the way you made your DSR seemed to be the most rudimentary/straightforward (I don’t know the word) without to much industrial things. Later you explain why you will change to firebricks and it seems logical to me and your way of building/thinking seems to be close to the way I would like to build things.
Maybe you are able to answer my questions (above) and maybe you even have some drawings, foto’s of the making proces etc?
I am so eager to start building, but I also want to make a nice thing that works (A cooktop with oven and eventually a heated bank that is rather efficient).
Hopefully you are able to answer my questions,
best regards,
Pieter
Hello Bob,
thank you very much for your reply. I was curious to here from you, but I think 4 days isn’t that big of a delay 😉 I am very pleased with you replying!
I know donkey’s forum (that is how I found you) and for some reason I then didn’t find the thread but 3 days ago I found out about DSR2 being developed and the outcome.
As a result of this info I got the idea idea to use the DSR2 as a motor for the cooktop that was made in Allerton (and what you made), with DSR1 as a ‘motor’. And I wanted to know if that woud be possible. Therefore I placed this idea (drawing included) at a dutch forum where I hoped Peterberg would read it (Dutch is my language). His answer was that he doubted if the DSR2 would give enough heat to cook on and he advised me to look for a proven design since my experience in stove building is almost none.
But his answer makes me even more curious. First of all I didn’t understand why it would not heat enough to cook on. What is your experience?
The DSR2 cooktop, as said before, I want to make with an oven and a bench all separately manageable; when I don’t need the cooktop I would insulate it (like you with a ceramic fiber blanket?) so the heat goes either to the bench or the oven. There will be a lot of ‘tubes’ with valves to direct the heat.
As a profession I build with clay, lightstraw and wood and I know masonry. Do you think it is a big deal to built this? And most important; do you think it makes sense to try and build this? I want a thing that heats a room while cooking or just after that.
I understand that your idea is to insulate it from the inside? Why not from the outside? like you already do? ….if I understand it well…..
Curious to hear from you…take your time 😉
Best regards,
Pieter
Hello Bob,
Because of your advice I dicided to give it a try and -if its true that the price for his plans ánd help (eventually) is 80 dollars- I am going to contact Walker Stoves.
Since my experience with building this sort of stuff is almost ‘0’ I think I’d better build a thing that has proven to work. Aside I can always experiment.
I am excited to start.
Thank you very much for your effort. I already learned a lot only communicating with you. Thank you.
Pieter
ps
Maybe you would like to know, but I never receive emails that you posted a reaction (after spam controle). I can only see them when I go to your site.
Hi Bob,
I bought drawings from walker stoves. Very nice so I don’t have to nvent things myself ;-)…..and the nicest part of it is that Matt (Walker Stoves) has a stove chat every wednesday! Very, very interesting and a lot to learn from. So nice he does this.
And you know what? There was a question if you could cover the CFGlass-top with some insulation if you would want to bring as much heat as possible to the rest of the things to be heated (bench, watertank…..) Matt couldn’t answer the question because he didn’t know. He would be afraid the glasstop would not be able to handle the heat. Since you have done that (You did didn’t you?) you are the expert on this topic. Can the glas cooktop handle the heat?
I am going to build the masonry heater of walker stoves. Using the IFB for the core and clay around it. I think it will eventually look like your stove. 😉
Keep you posted
лучшая коллекция порно лучшая коллекция порно .
капперы капперы .
Камины для создания уюта в вашем доме, модели.
Интернет магазин печей предлагает широкий ассортимент товаров для отопления: https://www.magazin-kaminy.ru/ .
платные игры скачать бесплатно на android http://www.android-games-download.ru .
Discover the future of gaming with Musk Empire – a groundbreaking Web3 experience! Build your business realm without donations. Upgrade your ventures to amplify your hourly profits. Play, accumulate, and eventually convert in-game wealth for real money. Join the Empire of Musk today and craft your virtual wealth! invitation link https://t.me/muskempire_bot/game?startapp=hero1956359439
услуги seo https://prodvizhenie-sajtov15.ru .
синий диплом купить rushkadiplomik.ru .
купить аттестат за классов mandiplomik.ru .
акустическое оборудование для актового зала акустическое оборудование для актового зала .
переговорные москва https://oborudovanie-peregovornyh-komnat.ru/ .
Кредит под залог: финансы на вашей стороне, разберитесь.
срочный выкуп квартир в Санкт-Петербурге https://ctekc.ru .
диплом ссср москве где купить mandiplomik.ru .
Начните экономить с нашим промокодом прямо сейчас! http://www.free-promocode.ru .
купить диплом о высшем образовании в иваново купить диплом о высшем образовании в иваново .
A year on from Qatar 2022, what’s the legacy of a World Cup like no other?
bs2site.at
The 2022 World Cup final will go down as one of the most exciting, dramatic and memorable matches in the history of the game.
It was the scene of Lionel Messi’s greatest moment on a soccer pitch, in which he cemented his legacy as the best player of his generation after finally guiding Argentina to World Cup glory.
It was, for many, the perfect, fairytale ending to a tournament which thrilled well over a billion fans around the world. So good, perhaps, that many forgot it bookended the most controversial World Cup in history.
https://bs2-clear.in
блэкспрут
Rewind to the start of the tournament and the talk was all about matters off the field: from workers’ rights to the treatment of the LGBTQ+ community.
Just hours before the opening match, FIFA President Gianni Infantino launched into a near hour-long tirade to hundreds of journalists at a press conference in Doha, where he accused Western critics of hypocrisy and racism.
“Reform and change takes time. It took hundreds of years in our countries in Europe. It takes time everywhere, the only way to get results is by engaging ] not by shouting,” said Infantino.
At one point, the FIFA president challenged the room of journalists, stressing FIFA will protect the legacy for migrant workers that it set out with the Qatar authorities.
“I’ll be back, we’ll be here to check, don’t worry, because you will be gone,” he said.
So, a year on from the World Cup final, what is the legacy of the 2022 World Cup?
купить диплом в выборге rushkadiplomik.ru .
enclosed vehicle shipping enclosed vehicle shipping .
cross country vehicle shipping cross country vehicle shipping .
купить бланк диплома образованиях rushkadiplomik.ru .
Актуальные скидки и промокоды 24/7 http://www.promokodbar.ru .
создание сайта разработчики сайта http://www.biztest.ru .
где купить диплом о среднем специальном образовании где купить диплом о среднем специальном образовании .
ВНЖ Испании ВНЖ Испании .
hexa g-минус 13 – купить онлайн в интернет-магазине химмед
Tegs: 3,5-dibromo-1 2,4,5-trifluorophenyl methyl -1h-1,2,4-triazole – купить онлайн в интернет-магазине химмед
3,5-dibromo-1 3,4-dichlorophenyl methyl -1h-1,2,4-triazole – купить онлайн в интернет-магазине химмед
1- 3,5-dimethylphenyl -3- ethoxycarbonyl -5-methyl-4,5-dihydro-1h-pyrazole-5-carboxylic acid – купить онлайн в интернет-магазине химмед
hexa g-минус 14 – купить онлайн в интернет-магазине химмед https://chimmed.ru/products/hexa-g-minus-14-id=8430859
поисковое продвижение web сайтов https://www.prodvizhenie-sajtov15.ru .
seo продвижение корпоративных сайтов в москве seo продвижение корпоративных сайтов в москве .
купить аттестат за 8 класс rushkadiplomik.ru .
Для заказа прогона Хрумером, вам необходимо обратиться к специализированным компаниям или Вы можете заказать у нас по наращиванию линк билдинг
так же мы предоставляем услуги по сео продвижению с помощью гса прогонов через тир и поможем если будет нужно оптимизировать ваш проект
для быстрой связи через телеграмм логин @pokras7777 либо добавится в нащу группу в телеграмм https://t.me/bazixrumer либо через скайп логин pokras7777
мы будем рады вам помочь в любых вопросах по наращиванию трафика на вашем проекте время работы 24/7 без выходных!
Hi,
I hope this message finds you well.
We are excited to introduce ourselves as your go-to custom clothing manufacturer, specializing in promotional tees and other apparel. We provide customized clothing to elevate your brand’s representation.
Exclusive Offers:
? Worldwide Shipping
? Free Samples
Why Choose Us?
1. Fastest Turnaround
2. No MOQ Limit
3. 100% Quality Check
4. Reasonable Prices
5. Sample Facility Before Bulk Orders
We look forward to the opportunity to collaborate with you. Please share your details to move forward.
Best Regards,
Saad
Contact with us:
WhatsApp:+923467428081
WhatsApp: https://wa.me/923467428081
Website: https://www.pamooinds.com
Instagram: https://instagram.com/pamoo_industry
Facebook: https://www.facebook.com/pamoosports
TikTok: https://www.tiktok.com/@pamooinds
внутренний аудит сайта http://www.prodvizhenie-sajtov15.ru .
Монтаж кондиционера Монтаж кондиционера .
enclosed vehicle transport enclosed vehicle transport .
shipping a car across the country shipping a car across the country .
ВНЖ цифрового кочевника Испании ВНЖ цифрового кочевника Испании .
продвижение сайтов в москве в топ продвижение сайтов в москве в топ .
Установка сплит системы Установка сплит системы .
поисковое продвижение сайтов в москве поисковое продвижение сайтов в москве .
карниз электрический https://elektrokarniz1.ru .
гадать индийский пасьянс гадать индийский пасьянс .
продвижение сайтов гугл москва продвижение сайтов гугл москва .
частное продвижение сайтов москва http://www.prodvizhenie-sajtov13.ru .
Discovered an article that’s sure to appeal to you – I recommend checking it out https://rt.rulet-18.com
вывод из запоя цены на дому ростов http://www.vyvod-iz-zapoya-rostov111.ru/ .
вывод из запоя на дому ростов-на-дону вывод из запоя на дому ростов-на-дону .
гадание индийское https://indiyskiy-pasyans-online.ru .
электрокарниз акция электрокарниз акция .
карниз с электроприводом карниз с электроприводом .
Заказать такси https://taxi-gukovo.ru эконом в Гуково дешево с отзывами, ценами и телефонами, онлайн заказ.
кнопка росгвардия кнопка росгвардия .
гадание индийский пасьянс онлайн бесплатно гадание индийский пасьянс онлайн бесплатно .
электрический карниз для штор купить http://www.provorota.su .
тревожная кнопка цена с установкой росгвардии https://www.trknpk.ru .
вывод из запоя ростов на дону на дому вывод из запоя ростов на дону на дому .
вывод из запоя с выездом ростов vyvod-iz-zapoya-rostov111.ru .
вывод из запоя в стационаре ростова вывод из запоя в стационаре ростова .
вывод из запоя дешево ростов-на-дону http://vyvod-iz-zapoya-rostov11.ru .
вывод из запоя на дому http://www.vyvod-iz-zapoya-rostov112.ru .
Аренда яхты. Сервис онлайн бронирования доступны по всему миру. Аренда морского и речного транспорта,. Лодки, яхты, катера от бюджетного до продвинутого класса. Сайт arendakatera.pro”
Морские прогулки. Большой выбор морских прогулок. Уникальные маршруты. Наш Сайт Аренда яхт
вывод из запоя на дому ростов круглосуточно вывод из запоя на дому ростов круглосуточно .
вывод из запоя с выездом ростов https://www.vyvod-iz-zapoya-rostov112.ru .
нарколог на дом недорого нарколог на дом недорого .
ремонт телефонов айфон в москве адреса
вызов нарколога на дом круглосуточно http://www.narkolog-na-dom-krasnodar11.ru/ .
установка пластиковых окон установка пластиковых окон .
вызов нарколога на дом вызов нарколога на дом .
прокапаться от алкоголя на дому прокапаться от алкоголя на дому .
Because the admin of this web page is working, no hesitation very quickly it will be famous, due to its quality contents.
please rate my page too
http://wiki.motorclass.com.au/index.php/Do_You_Ask_A_Friendship – thin milf
http://forum.changeducation.cn/forum.php?mod=viewthread&tid=806962 – ome tv naked
http://camillacastro.us/forums/viewtopic.php?id=445250 – men having sexs
http://camillacastro.us/forums/viewtopic.php?id=450796 – edstop365
http://forum.changeducation.cn/forum.php?mod=viewthread&tid=761533 – free utub porn
=oo3345#
https://videotxxx.com/videos/20179625/my-friend-from-the-united-states-new-york-wanted-to-record-homemade-porn/?promo=31626 video
https://videotxxx.com/videos/20179623/chubby-amateur-wife-sucking-her-husband-and-fucking-in-missionary-until-orgasm-homemade-amateur-sex/?promo=31626 video
https://videotxxx.com/videos/20179623/chubby-amateur-wife-sucking-her-husband-and-fucking-in-missionary-until-orgasm-homemade-amateur-sex/?promo=31626 video
https://videotxxx.com/videos/20179591/stepmom-casual-fuck-to-stpson-reverse-cowgirl/?promo=31626 video
https://videotxxx.com/videos/20179591/stepmom-casual-fuck-to-stpson-reverse-cowgirl/?promo=31626 video
стоимость остекления окон стоимость остекления окон .
нарколог на дом платный выезд http://www.narkolog-na-dom-krasnodar12.ru .
кодировка гипнозом xn——7cdhaozbh1ayqhot7ooa6e.xn--p1ai .
дом престарелых в береговом http://xn—–1-43da3arnf4adrboggk3ay6e3gtd.xn--p1ai .
пансионат для пожилых в симферополе пансионат для пожилых в симферополе .
как быстро заработать денег http://www.kak-zarabotat-dengi11.ru .
как можно заработать деньги https://kak-zarabotat-dengi11.ru .
вывод из запоя анонимно краснодар вывод из запоя анонимно краснодар .
принудительный вывод из запоя краснодар http://www.vyvod-iz-zapoya-krasnodar11.ru .
вывод из запоя воронеж (вывод из запоя в воронеже) https://www.vyvod-iz-zapoya-v-stacionare-voronezh.ru .
zaym onlayn na 20 dney vzyat’ na kartu srochno bez otkaza – spisok zaymov na 20 dney v luchshih mfo s polucheniem na bankovskuyu kartu, schet i elektronnyy koshelek. zdes’ mojno srochno vzyat’ den’gi v dolg srokom do 3-h nedel’. onlayn-zayavki prinimayutsya kruglosutochno, bez otkaza. odobrenie zayma s 18 let po pasportu, s lyuboy kreditnoy istoriey. – zaym 20 dney na sayte credit24.pro
Tegs: carmoney без залога – займы под 0% до 100000 рублей на 75-365 дней – бесплатно при погашении займа в течение 7 дней – микрозаймы в мфо carmoney без залога – условия оформления и причины отказа. 24/7! для граждан рф с 21 лет. – carmoney без залога на сайте credit24.pro
все займы до 15000 рублей с онлайн-переводом на карту 24/7 – список займов до 15 тысяч рублей в лучших мфо с получением на банковскую карту, счёт и электронный кошелёк. здесь можно срочно взять 15000 руб. в долг за 5 минут. онлайн-заявки принимаются круглосуточно, без отказа. одобрение займа с 18 лет по паспорту, с любой кредитной историей. – займ 15000 на сайте credit24.pro
все займы до 20000 рублей с онлайн-переводом на карту 24/7 – список займов до 20 тысяч рублей в лучших мфо с получением на банковскую карту, счёт и электронный кошелёк. здесь можно срочно взять 20000 руб. в долг за 5 минут. онлайн-заявки принимаются круглосуточно, без отказа. одобрение займа с 18 лет по паспорту, с любой кредитной историей. – займ 20000 на сайте credit24.pro
zaym onlayn na 60 dney vzyat’ na kartu srochno bez otkaza – spisok zaymov na 60 dney v luchshih mfo s polucheniem na bankovskuyu kartu, schet i elektronnyy koshelek. zdes’ mojno srochno vzyat’ den’gi v dolg srokom do 2-h mesyacev. onlayn-zayavki prinimayutsya kruglosutochno, bez otkaza. odobrenie zayma s 18 let po pasportu, s lyuboy kreditnoy istoriey. – zaym 60 dney na sayte credit24.pro https://credit24.pro/zaymy/60-dnej/
выведение из запоя воронеж стационар выведение из запоя воронеж стационар .
лечение наркозависимости в стационаре лечение наркозависимости в стационаре .
вывод из запоя капельница краснодар вывод из запоя капельница краснодар .
вывод из запоя краснодар наркология вывод из запоя краснодар наркология .
вывод из запоя в стационаре вывод из запоя в стационаре .
Привет!
Приобрести диплом ВУЗа.
gendou.com/user/originaldipl
Здравствуйте!
Заказать диплом университета.
myweektour.ru/kupit-diplom-byistroe-i-legkoe-oformlenie
вывод из запоя капельница http://vyvod-iz-zapoya-ekaterinburg.ru/ .
Добрый день!
Диплом бакалавра
raceburo.ru/kupit-diplom-legkost-i-byistrota-protsessa
Привет!
Мы можем предложить документы техникумов
phimodasecia.com.br/2024/08/18/kupit-diplom-627969ylx
Дайте своему авто лучший уход
Детейлинг студия авто – https://deteylingavto-msk.ru .
Инновации в автомобильном дизайне, для идеального внешнего вида.
Detailing center – https://www.bestdeteyling-msk.ru/ .
Премиум уход за Вашим автомобилем
Детейлинг центр автомобиля http://www.deteylingcenter-msk.ru/ .
Лучшая детейлинг студия для Вашего авто, получите консультацию.
Detailing – https://deteylingmoscowcenter.ru/ .
telegra.ph/gde-mozhno-kupit-diplom-svarshchika-08-13-2
вывести из запоя цена вывести из запоя цена .
Привет!
купить аттестат.
Добрый день!
Приобрести диплом любого университета.
mirstalkera.4admins.ru/viewtopic.php?f=50&t=2012
срочный вывод из запоя на дому недорого срочный вывод из запоя на дому недорого .
Существуют ли домашние средства для лечения акне? – Домашние средства включают использование масла чайного дерева, алоэ вера и экстракта зеленого чая, но их эффективность варьируется.
Are there home remedies for acne? – Home remedies include using tea tree oil, aloe vera, and green tea extract, but their effectiveness varies.
лечение угрей http://allmedweb.ru/ .
Привет!
Купить диплом ВУЗа.
forum.index.hu/User/UserDescription?u=2012142
Здравствуйте!
Мы готовы предложить документы ВУЗов
travelingvacation.com/2024/08/18/kupit-diplom-493557goy
ремонт смартфонов в москве
выведение из запоя врачом наркологом выведение из запоя врачом наркологом .
telegra.ph/kupit-diplom-v-barnaule-08-13-5
смешные фотки http://kartinkitop.ru .
продвижение сайтов в москве и московской области http://prodvizhenie-sajtov-v-moskve213.ru/ .
Смешные картинки http://www.kartinkitop.ru .
продвижение сайта в москве продвижение сайта в москве .
Здравствуйте!
Приобрести диплом о высшем образовании.
artistecard.com/originaldipl
Добрый день!
Мы можем предложить документы ВУЗов
phaiyai.go.th/question/kupit-diplom-456947lac
telegra.ph/kupit-diplom-pedagogicheskogo-instituta-08-13
Добрый день!
Диплом юриста
shockmusik.ru/kupit-diplom-ofitsialnoe-oformlenie
Привет, друзья!
Приобрести диплом о высшем образовании.
fanart-central.net/user/originaldipl/profile
Привет!
Мы можем предложить документы техникумов
justbevictorious.com/kupit-diplom-367142ysx
telegra.ph/kupit-diplom-tehnikuma-chelyabinsk-08-13-2
Позаботьтесь о своем автомобиле уже сегодня.
Детейлинг студия авто – https://deteyling-cars.ru .
Мы заботимся о каждой детали внешности вашего автомобиля
Detailing auto – http://www.deteylingpro-msk.ru/ .
Эффективные методы детейлинга для Вашего автомобиля
Детейлинг студия автомобиля – https://deteylingcarservice.ru/ .
Ваша машина будет сиять как новая
Детейлинг про Москва – http://www.deteylingstudioms.ru .
Привет, друзья!
Диплом бакалавра
aurorahcs.com/forum/viewtopic.php?t=647843
Короткие шутки Короткие шутки .
шуточки https://korotkieshutki.ru/ .
вывод из запоя в стационаре воронежа http://www.vyvod-iz-zapoya-v-stacionare.ru/ .
топ капперов топ капперов .
вывод из запоя в стационаре анонимно вывод из запоя в стационаре анонимно .
Thanks, I have recently been searching for information about this subject for ages and yours is the best I have discovered so far.
вывод из запоя в нижнем новгороде вывод из запоя в нижнем новгороде .
Здравствуйте!
Мы предлагаем документы ВУЗов
phaiyai.go.th/question/kupit-diplom-456947lac
рейтинг капперов рейтинг капперов .
наркология вывод из запоя в стационаре http://www.vyvod-iz-zapoya-v-stacionare13.ru .
Привет, друзья!
Мы предлагаем документы ВУЗов
phimodasecia.com.br/2024/08/18/kupit-diplom-627969ylx
Как оказалось, купить диплом кандидата наук не так уж и сложно
Как освоить искусство детейлинга кузова автомобиля, не имея специальных навыков
Мойка кузова – https://www.himchistka-kuzova.ru/ .
Подробная инструкция по химчистке салона автомобиля
Лучшая химия для химчистки салона автомобиля – himchistka-salona.ru .
Доверьте свой автомобиль профессионалам в студии детейлинга
Детейлинг сервис – https://deteylingstudiocar.ru/ .
Закажите индивидуальный сабвуфер прямо сейчас
Изготовление короба для сабвуфера – https://sabvufer-audio.ru .
Официальная покупка школьного аттестата с упрощенным обучением в Москве
Как купить диплом о высшем образовании с минимальными рисками
Test avto drinks https://alamaret.com my given sale
переезд квартиры http://www.kvartirnyj-pereezd11.ru .
Легальная покупка диплома о среднем образовании в Москве и регионах
квартирный переезд квартирный переезд .
быстрый вывод из запоя в стационаре http://www.vyvod-iz-zapoya-sochi11.ru .
Сколько стоит диплом высшего и среднего образования и как его получить?
Полезные советы по безопасной покупке диплома о высшем образовании
Привет!
Мы можем предложить документы техникумов
jobbutomlands.se/question/kupit-diplom-724803gci
выведение из запоя на дому в сочи https://vyvod-iz-zapoya-sochi11.ru .
That is a really good tip particularly to those fresh to the blogosphere.
Short but very accurate information… Thanks for
sharing this one. A must read article!
Официальная покупка школьного аттестата с упрощенным обучением в Москве
Полезные советы по безопасной покупке диплома о высшем образовании
Добрый день!
Мы можем предложить документы ВУЗов
thataiblog.com/2024/08/19/kupit-diplom-171816lqg
Эффективный детейлинг автотранспорта в Москве, для удовлетворения самых взыскательных клиентов.
Детейлинговый центр – https://car-deteyling-msk.ru .
наркология вывод из запоя в стационаре http://www.vyvod-iz-zapoya-sochi12.ru .
Аттестат 11 класса купить официально с упрощенным обучением в Москве
Диплом пту купить официально с упрощенным обучением в Москве
капельница на дом круглосуточно http://www.snyatie-zapoya-na-domu11.ru .
Добрый день!
Мы предлагаем документы ВУЗов
thehumanbehaviour.com/kupit-diplom-561836kut
фанера мдф фанера мдф .
вывод из запоя анонимно вывод из запоя анонимно .
сделать капельницу на дому от алкоголя сделать капельницу на дому от алкоголя .
Как оказалось, купить диплом кандидата наук не так уж и сложно
Процесс получения диплома стоматолога: реально ли это сделать быстро?
влагостойкая фанера купить fanera-kupit11.ru .
Привет!
Мы предлагаем документы ВУЗов
rajmudraofficial.com/question/kupit-diplom-414601kwm
жби изделия цена kupit-zhbi.ru .
Процесс получения диплома стоматолога: реально ли это сделать быстро?
Ищете возможность получить деньги срочно и без лишних проверок? В Telegram канале Кредит онлайн без отказов круглосуточно собраны только проверенные МФО, которые действительно выдают займы без отказов. Вам не нужно беспокоиться о своей кредитной истории или высоких требованиях. У нас минимальные условия для заемщиков, и деньги можно получить даже с плохой КИ. Просто зайдите на канал, выберите подходящее предложение и получите деньги на карту в течение нескольких минут. Все быстро, удобно и без скрытых условий.
Привет, друзья!
Мы готовы предложить документы техникумов
jobbutomlands.se/question/kupit-diplom-724803gci
жби изделия цена http://www.kupit-zhbi.ru .
Зачем тратить время на походы в банк и кучу документов, если можно получить займ до 30 000 рублей быстро и без проблем? В нашем Telegram канале Микрозаймы по паспорту мгновенно ты найдешь предложения, которые одобряются за минуты. Забудь про долгие ожидания и ненужные проверки — деньги поступят на карту сразу после одобрения. Бери займ легко и удобно, и трать время на важные дела!
Как получить диплом техникума с упрощенным обучением в Москве официально
Здравствуйте!
Мы предлагаем документы техникумов
ntep2008.com/index.php?name=webboard&file=read&id=119051
Где и как купить диплом о высшем образовании без лишних рисков
Всё, что нужно знать о покупке аттестата о среднем образовании
ast-diplomas.com
Приобретение диплома ПТУ с сокращенной программой обучения в Москве
Легальная покупка школьного аттестата с упрощенной программой обучения
Сколько стоит диплом высшего и среднего образования и как его получить?
Приобретение диплома ПТУ с сокращенной программой обучения в Москве
hi guys i say that https://wplgsturapwmestv185.ru/
Привет!
Мы готовы предложить документы техникумов
bizbuildboom.com/kupit-diplom-789463eij
Предложения микрокредитов под 0% от более 40 ведущих МФО заслуживают внимания новых клиентов. Анализ показывает, что основными условиями для получения займа являются наличие паспорта, именной банковской карты и возраст от 18 лет. Процесс оформления полностью цифровой и занимает минимальное время, что делает такие кредиты удобными для быстрого решения финансовых вопросов. Это предложение оптимально для тех, кто хочет воспользоваться кредитными средствами без переплат и сложных процедур. В условиях современного рынка микрофинансовых услуг такие условия являются конкурентным преимуществом.
онлайн займ на карту без отказа без проверки
займ без процентов на карту
займы список мфо
микрофинансовые займы
займ на карту онлайн срочно
Как безопасно купить диплом колледжа или ПТУ в России, что важно знать
Покупка диплома о среднем полном образовании: как избежать мошенничества?
Реально ли приобрести диплом стоматолога? Основные этапы
Привет, друзья!
Заказать документ о получении высшего образования.
nc750.ru/member.php?u=2812
Реально ли приобрести диплом стоматолога? Основные этапы
Как избежать рисков при покупке диплома колледжа или ПТУ в России
https://www.gemius.ru/
Привет!
Мы готовы предложить документы ВУЗов
skydancefarms.com/uncategorized/kupit-diplom-321717ynm
Вопросы и ответы: можно ли быстро купить диплом старого образца?
diplomyx-man.ru
Купить диплом о среднем образовании в Москве и любом другом городе
https://mirkulinarii.com/
Как получить диплом техникума с упрощенным обучением в Москве официально
Надежный поставщик динамических и статических прокси, сохраняющий стабильность вашей web активности: аренда резидентных прокси – https://residential-proxy.ru/
Можно ли быстро купить диплом старого образца и в чем подвох?
фулл хаус в покере
Быстрая схема покупки диплома старого образца: что важно знать?
Как официально купить диплом вуза с упрощенным обучением в Москве
Как безопасно купить диплом колледжа или ПТУ в России, что важно знать
https://stomatologiya-minsk.ru/
построить дом под ключ цена https://spbstroymax.ru/
https://prodvizhenie-lubertsy.ru/
Стоимость дипломов высшего и среднего образования и как избежать подделок
Всё, что нужно знать о покупке аттестата о среднем образовании
гос номер московская область https://dublikaty-gosnomer77.ru/
Здравствуйте!
Приобрести документ университета.
lubov.listbb.ru/viewtopic.php?f=2&t=597
יותר נכון, הנערות מגיעות אליהם. מרופאים ופרופסורים, ועד חיילים בסדיר או גברים נשואים. נערות ליווי מגיעות עד הבית אם בא לך נערות מדהימות, אתה רק צריך להתקשר ולקבוע עם הנערות. נערות ליווי זמינות 24 שעות ביממה, והן רק מחכות שתזמין אותן לבית המלון או נערת סקס גם רוצה ליהנות ממך
abc-context.ru
דיסקרטיות בקריות. מאמר 5 דירות דיסקרטיות בתל אביב הן אחד הדברים הנעימים והטובים שהעיר הזו יודעת להציע עבור הגברים שלה את אלו שחווים תקופה קשה בענייני אהבה וזוגיות, ועוד כל מיני קשיים אחרים בחיים. ואלו הם הדברים שהורסים לנו את הבריאות. עיסוי The hottest erotic massage Israel services
заработать в интернете заработать в интернете .
Как сделать сабвуфер поэтапно
Изготовление сабвуфера – https://www.sabvufer-pro.ru/ .
вывод из запоя на дому нижний вывод из запоя на дому нижний .
https://prodvizhenie-podolsk.ru/
Как избежать рисков при покупке диплома колледжа или ПТУ в России
лечение наркозависимости стационаре https://vyvod-iz-zapoya-v-stacionare-samara.ru .
Как получить диплом техникума с упрощенным обучением в Москве официально
Официальная покупка школьного аттестата с упрощенным обучением в Москве
יכול להתאים לשלב שבו הם נמצאים כרגע? והפתרון הוא נערת ליווי, בעזרתה ניתן לחקור פנטזיות שונות ולהצית מחדש את העניין ביחסי הבחורה, ולאחר מכן מגיע לבלות בדירתה. בילוי שגברים צריכים דירות דיסקרטיות באשקלון מציעות את כל מה שגברים צריכים בשביל לממש go to this site
капельница от запоя https://www.snyatie-zapoya-na-domu13.ru .
варианты заработка в интернете http://kak-zarabotat-v-internete12.ru .
интернет заработок интернет заработок .
Здравствуйте!
Мы предлагаем документы ВУЗов
nmpeoplesrepublick.com/community/profile/margrethampton7
вывод из запоя в стационаре анонимно вывод из запоя в стационаре анонимно .
Как получить диплом стоматолога быстро и официально
Приобретение диплома ПТУ с сокращенной программой обучения в Москве
מהחוויה הוא הנערות המעניקות את העיסוי. מדובר בנערות היפות ביותר בארץ, והן מעסות את גופך במסירות רבה וגם הן נהנות מאותה החוויה והסקסיות איתך במיטה. בחורות בעלות ישבנים מפתים ועסיסיים, עור נעים ורך, שיער משי עדין וכמובן שדיים קופצניים כמו בסרטים. והכל מספרים של זונות
способ заработка в интернете https://kak-zarabotat-v-internete11.ru/ .
best welcome bonus https://www.24bet-casino.com/ .
Диплом пту купить официально с упрощенным обучением в Москве
את מה שהוא מחפש. נערות ליווי בחיפה מגיעות אלייך אם מתחשק לך בילוי אינטימי, מלא בחום ואהבה, לא צריך לצאת מהבית. נערות ליווי לתרום לחברה טובה יותר. זה אולי נשמע לכם מוגזם לטעון כי נערות ליווי תורמות לחברה טובה יותר, אך כאשר מסתכלים ובוחנים מי הם have a peek at these guys
Всё, что нужно знать о покупке аттестата о среднем образовании без рисков
want to view instagram want to view instagram .
Как безопасно купить диплом колледжа или ПТУ в России, что важно знать
вывод из запоя в стационаре самара http://vyvod-iz-zapoya-v-stacionare-samara11.ru/ .
Как получить диплом о среднем образовании в Москве и других городах
Сколько стоит диплом высшего и среднего образования и как это происходит?
Как получить диплом техникума с упрощенным обучением в Москве официально
mans-diplomyxx.ru
Диплом вуза купить официально с упрощенным обучением в Москве
Вопросы и ответы: можно ли быстро купить диплом старого образца?
viewer and downloader viewer and downloader .
лечение наркозависимости в стационаре лечение наркозависимости в стационаре .
Официальная покупка диплома вуза с сокращенной программой обучения в Москве
Привет!
Мы можем предложить документы техникумов
simpsonshop.fr/community/profile/stuartfreed027
Официальная покупка диплома вуза с сокращенной программой в Москве
Добрый день!
Купить документ ВУЗа.
avtomobil1980.ixbb.ru/viewtopic.php?id=210#p210
https://chicago.eater.com/2022/3/29/23001399/pop-up-dinners-bars-restaurants-events-chicago-spring-2022
Уборка после залива Москва http://uborka-posle-zatopleniya-moskva.ru/
Официальная покупка диплома вуза с сокращенной программой обучения в Москве
hi guys, check this https://wplgsturapwmestv7435.ru/
Быстрое обучение и получение диплома магистра – возможно ли это?
Как официально купить диплом вуза с упрощенным обучением в Москве
diplomasx24.ru
Активатор Windows 11
Как получить диплом техникума с упрощенным обучением в Москве официально
es.micromentor.org/member/1723515
Процесс получения диплома стоматолога: реально ли это сделать быстро?
https://wplgsturapwmestv2706.ru/
Discover the Latest UK Online Casinos
casinos in the uk casinos in the uk .
Сколько стоит диплом высшего и среднего образования и как его получить?
Вопросы и ответы: можно ли быстро купить диплом старого образца?
Можно ли купить аттестат о среднем образовании? Основные рекомендации
Добрый день!
Приобрести документ ВУЗа.
thefreedommovement.ca/read-blog/1676
vavada регистрации сайт vavada официальный сайт вход
снятие ломки снятие ломки .
вывод из запоя цены санкт-петербург vyvod-iz-zapoya-v-sankt-peterburge.ru .
автоматика для штор купить https://elektrokarniz2.ru/ .
Пошаговая инструкция по безопасной покупке диплома о высшем образовании
Защитите свой авто от механических повреждений и химических воздействий, уточните
Оклейка авто защитной пленкой цена – https://okleyka-mashiny.ru/ .
Срок службы пленки на фарах, и как поддерживать в хорошем состоянии.
Оклейка фар полиуретановой пленкой – https://okleyka-far.ru .
Защитная пленка на автомобиле: необходимость или избыток?
Оклейка автомобиля пленкой – plenka-avto.ru .
Что нужно знать о защите фар пленкой
Оклейка фар полиуретановой пленкой цена в Москве – plenka-fary.ru .
Полезная информация как купить диплом о высшем образовании без рисков
Всё, что нужно знать о покупке аттестата о среднем образовании без рисков
Официальная покупка диплома вуза с сокращенной программой обучения в Москве
https://casino2-vavada.ru/
Аттестат школы купить официально с упрощенным обучением в Москве
вывод из запоя спб цены http://www.vyvod-iz-zapoya-v-sankt-peterburge.ru .
снять ломку наркомана снять ломку наркомана .
Медицинский центр «Анонимная наркология» предоставляет широкий спектр услуг по оказанию помощи пациентам, страдающим различными зависимостями. Лечение алкоголизма, наркомании под руководством опытных специалистов позволяет добиться максимальных результатов за короткий срок.
https://omsk.zapoy-clinic.ru
Медицинский центр «Анонимная наркология» предоставляет широкий спектр услуг по оказанию помощи пациентам, страдающим различными зависимостями. Лечение алкоголизма, наркомании под руководством опытных специалистов позволяет добиться максимальных результатов за короткий срок.
https://fryazino.zapoy-clinic.ru
электрокарниз для дома цена https://elektrokarniz2.ru/ .
Уборка помещений после трупов http://klining-posle-smerti-msk.ru/
Официальная покупка школьного аттестата с упрощенным обучением в Москве
Реально ли приобрести диплом стоматолога? Основные этапы
Innovative and creative wedding productions, we are committed to delivering excellence.
wedding photo and video wedding photo and video .
Наш сайт предлагает удобные решения для тех, кто ищет финансовую помощь. Оформить займ на карту без отказа можно быстро и просто, не выходя из дома. Мы сотрудничаем с проверенными МФО, что гарантирует надежность и безопасность. Процесс занимает всего несколько минут, а деньги поступают на карту мгновенно. Никаких сложных проверок или необходимости предоставлять справки. Это идеальный способ оперативно решить финансовые трудности.
Реально ли приобрести диплом стоматолога? Основные этапы
Как приобрести диплом о среднем образовании в Москве и других городах
Официальная покупка диплома вуза с сокращенной программой обучения в Москве
Быстрая схема покупки диплома старого образца: что важно знать?
Официальная покупка диплома ПТУ с упрощенной программой обучения
Дезинсекция Москва dezinfekciya-mcd.ru
По вопросу уничтожение клопов Вы на верном пути. Мы значимся официальной дезинфекционной и санитарной службой столицы России Москвы. Все работники квалифицированы, оборудование и составы одобрены Роспотребнадзором, поэтому не стоит сомневаться, приглашая нас, всё пройдет в наилучшем виде. Также будет действовать гарантия до пяти лет на оказанные услуги.
лучшие капперы в телеграмме лучшие капперы в телеграмме .
Привет, друзья!
Мы предлагаем документы ВУЗов
itdongnam.com/kupit-diplom-307422jvz
Официальная покупка диплома ПТУ с упрощенной программой обучения
Официальная покупка школьного аттестата с упрощенным обучением в Москве
Как официально купить аттестат 11 класса с упрощенным обучением в Москве
Какие мифы существуют об акне? – Одни из мифов включают веру в то, что акне вызваны плохой гигиеной, употреблением жирной пищи или недостаточным умыванием лица; эти факторы могут способствовать, но не являются прямыми причинами.
What myths exist about acne? – Common myths include the belief that acne is caused by poor hygiene, eating greasy foods, or not washing the face enough; these factors can contribute but are not direct causes.
угри на лице лечение http://allmed-info.ru/ .
займ на карту без отказа доступен всем совершеннолетним пользователям на нашем сайте. Мы предлагаем список МФО, которые готовы выдать займ в кратчайшие сроки. Для оформления требуется минимум документов – только паспорт. Процентные ставки начинаются от 0%, что делает наши предложения еще более выгодными. Подать заявку можно в любое время суток, а деньги поступят на карту в течение нескольких минут.
Круто + за пост
_________________
букмекерские конторы запрещены в россии или нет
Добрый день!
Мы готовы предложить документы ВУЗов
tastykitchen.online/kupit-diplom-75861agy
Стоимость дипломов высшего и среднего образования и как избежать подделок
Узнайте стоимость диплома высшего и среднего образования и процесс получения
Секреты и хитрости по удалению дефектов на кузове
Удаление царапин с кузова – https://www.czarapiny-udalenie.ru .
онлайн казино беларусь онлайн казино беларусь .
саженцы цена https://rodnoisad.ru .
Диплом пту купить официально с упрощенным обучением в Москве
Купить рабочую одежду blatta.ru
По запросу спецодежда полукомбинезон мужской летний звоните нам. Мы на связи круглосуточно, без выходных. Контактный телефон +7(912)447-84-22 или пишите нам в вотсап. Расположены по адресу: г. Ижевск, Воткинское шоссе, 16 В. Время работы по будням с 9:00 до 18:00. Отправляем одежду по всей России. Успейте купить одежду по отличным расценкам.
Диплом вуза купить официально с упрощенным обучением в Москве
Купить рабочую одежду blatta.ru
Если Вы хотели найти зимние куртки рабочая спецодежда в интернете, то переходите на наш онлайн сайт. Смотрите каталог нашей супер долговечной, исключительной рабочей спецодежды. Прошло то время, когда покупатели выделяли невысокие цены, игнорируя качество. Сейчас, в век инновационных технологий, новации приходят и в область специальной одежды. Оцените самостоятельно, заказав наши лучшие образцы.
Цена нанесения керамики на автомобиль, подробности на сайте.
Детейлинг машины цена – http://www.deteyling-kachestvo.ru/ .
Сравните цены на детейлинг автомобиля в Москве.
Детейлинг автомобиля цена в Москве – http://www.deteyling-prof.ru .
Советы по выбору шумозащиты для машины в Москве, рекомендации.
Шумоизоляция автомобиля недорого http://shumoizolyaciya-pro.ru/ .
Официальное получение диплома техникума с упрощенным обучением в Москве
Диплом техникума купить официально с упрощенным обучением в Москве
Диплом вуза купить официально с упрощенным обучением в Москве
ast-diploms24.ru
рейтинг прогнозистов рейтинг прогнозистов .
купить саженцы купить саженцы .
онлайн казино беларусь онлайн казино беларусь .
Как получить диплом техникума официально и без лишних проблем
Диплом техникума купить официально с упрощенным обучением в Москве
Как приобрести аттестат о среднем образовании в Москве и других городах
ast-diplomas.com
грунт для цветущих растений http://dachnik18.ru/ .
Легальные способы покупки диплома о среднем полном образовании
giantbomb.com/profile/originaldipl
Пошаговая инструкция по официальной покупке диплома о высшем образовании
Процесс получения диплома стоматолога: реально ли это сделать быстро?
Диплом техникума купить официально с упрощенным обучением в Москве
Как правильно приобрести диплом колледжа или ПТУ в России, важные моменты
Безопасная дезинфекция в Москве dezinfekciya-mcd.ru
По запросу дезинфекция москва Вы на нужном пути. Мы значимся официальной дезинфекционной и санитарной службой города Москва. Все работники квалифицированы, оборудование и препараты одобрены Роспотребнадзором, поэтому не стоит сомневаться, позвонив нам, всё пройдет в наилучшем виде. Также предоставляется гарантия до 5 лет на представленные услуги.
Где узнать цены на шумоизоляцию автомобиля в Москве?, Узнайте здесь.
Шумоизоляция антикор автомобиля http://www.shumoizolyaciya-polnaya.ru .
Для увеличения срока службы покрытия.
Удаление царапин на кузове автомобиля цена москва – https://www.udalenie-czarapin.ru/ .
Как приобрести аттестат о среднем образовании в Москве и других городах
Здравствуйте!
Мы можем предложить документы ВУЗов
simpsonshop.fr/community/profile/stuartfreed027
Официальная покупка школьного аттестата с упрощенным обучением в Москве
Привет, друзья!
Приобрести документ о получении высшего образования.
samara.listbb.ru/viewtopic.php?f=3&t=480
Приобретение диплома ПТУ с сокращенной программой обучения в Москве
Диплом пту купить официально с упрощенным обучением в Москве
Полезные советы по безопасной покупке диплома о высшем образовании
грунт для цветов интернет магазин http://dachnik18.ru/ .
Child sexual
Существуют различные виды наркотиков,
такие как опиаты (героин), стимуляторы (кокаин,
амфетамин), галлюциногены (ЛСД, грибочки),
депрессанты (барбитураты), и каннабиоиды
(марихуана).
Как не стать жертвой мошенников при покупке диплома о среднем полном образовании
Привет, друзья!
Приобрести документ о получении высшего образования.
ladymystery.ru/forum/topic.asp?TOPIC_ID=10284
Можно ли купить аттестат о среднем образовании, основные моменты и вопросы
Процесс получения диплома стоматолога: реально ли это сделать быстро?
Экспресс мойка двигателя в Москве: быстро и качественно, подробности у нас.
Мойка двигателя авто Мойка двигателя авто .
Здравствуйте!
Мы можем предложить документы техникумов
drshirvany.ir/question/kupit-diplom-369245gmp
Стоимость дипломов высшего и среднего образования и процесс их получения
Как не стать жертвой мошенников при покупке диплома о среднем полном образовании
Чем отличается комплексная мойка от обычной?, для экономии времени и денег.
Комплекс мойка цена Комплекс мойка цена .
Как сделать комплексную мойку автомобиля в домашних условиях, шаг за шагом.
Комплекс машины автомойка moyka-kompleks.ru .
Hey people!!!!!
Good mood and good luck to everyone!!!!!
Как избавиться от вмятин на кузове без покраски, Как вернуть машине идеальный внешний вид без покраски
Удаление вмятин pdr Москва http://www.remont-vmyatin-bezpokras.ru/ .
Полезные советы по безопасной покупке диплома о высшем образовании
Сколько стоит получить диплом высшего и среднего образования легально?
rushkas-diploms.ru
Купить диплом о среднем полном образовании, в чем подвох и как избежать обмана?
Официальная покупка диплома вуза с сокращенной программой в Москве
Процесс получения диплома стоматолога: реально ли это сделать быстро?
hogwartsishere.com/1642942
заказать семена почтой с бесплатной доставкой http://www.semenaplus74.ru .
после капельницы от запоя на дому после капельницы от запоя на дому .
Преимуществом ламината является его разнообразие дизайнов и отделки. Вы можете выбрать ламинат, имитирующий дерево, камень, плитку или любой другой материал, чтобы создать уютный и стильный интерьер в вашем доме. Благодаря широкому выбору цветов и текстур, вы сможете подобрать идеальное покрытие для любого стиля интерьера. https://kvarcvinil5.ru/
Интернет магазин Ламината — это правильный выбор практичного и стильного напольное покрытие, которое пользуется популярностью благодаря своей прочности и долговечности. Он отлично подходит для использования в доме, офисе или любом другом помещении, где требуется красивое и удобное покрытие. Ламинат легко монтируется, прост в уходе и имеет широкий выбор цветов и текстур, что позволяет подобрать оптимальный вариант под любой интерьер. https://kvarcvinil1.ru/
Всё, что нужно знать о покупке аттестата о среднем образовании
Мы осознаем, что каждый случай уникален, и поэтому предлагаем индивидуальный подход к каждому пациенту. Наши специалисты готовы обеспечить консультацию по телефону, где они смогут оценить текущее состояние и потребности пациента, а также предоставить подробную информацию о цене и возможных акциях или скидках, которые могут быть доступны.
https://rostov-na-donu.delta-clinic.ru/vyvod-iz-zapoya
Возможно ли купить диплом стоматолога, и как это происходит
diplomyx.com
Привет!
Мы можем предложить документы ВУЗов
spillbean.in.net/profile/Charissa12
растения и семена купить в Москве http://www.semenaplus74.ru .
Как приобрести диплом о среднем образовании в Москве и других городах
Услуги мойки двигателя в Москве: выбирайте только лучшее, узнайте больше прямо сейчас.
Профессиональная мойка двигателя в Москве https://www.moyka-motor.ru .
После кодирования от алкоголизма человек прекращает употреблять спиртные напитки, из-за чего тяга к ним постепенно ослабевает. Пациент со временем избавляется от физической, а затем уже и от психологической зависимости. Однако нужно понимать, что кодировка, как и любой другой метод лечения алкоголизма, не дает 100% пожизненный результат.
https://roshal.clinica-plus.ru/lechenie-alkogolizma/kodirovanie
стоимость капельницы от запоя стоимость капельницы от запоя .
Запой является следствием длительного хронического употребления алкоголя. Он появляется у человека на фоне алкоголизма. Характерен запой для более поздних стадий болезни, и он отмечается непрерывным употреблением спиртного больше 5-7 дней. У запойных алкоголиков нет абстиненции или похмелья и это один из главных признаков патологического состояния.
https://vysokovsk.clinica-plus.ru/lechenie-alkogolizma/vyivod-iz-zapoya
Привет!
Приобрести документ о получении высшего образования.
topnewsgadget.ru/nastoyashhiy-diplom-pod-vashi-nuzhdyi
Как получить диплом техникума с упрощенным обучением в Москве официально
Быстрое обучение и получение диплома магистра – возможно ли это?
Узнайте стоимость диплома высшего и среднего образования и процесс получения
Как безопасно купить диплом колледжа или ПТУ в России, что важно знать
Наркологическая клиника ЕНС оказывает услуги по выводу из запоя. Используем современные методики взаимодействия с больным, что позволяет стабилизировать физическое и психоэмоциональное состояние пациента.
https://ens-narkologia.ru/neotlozhnaya-pomosch/narkologicheskaya-pomosh/konsultatsiya-psihiatra
Алкогольный абстинентный синдром (ААС) развивается через несколько часов после последнего потребления алкоголя и достигает пика через 24-48 часов. Он характеризуется разнообразными симптомами, включающими тремор, потливость, тахикардию, гипертензию, тошноту, рвоту, бессонницу и тревожность.
http://vyvod-iz-zapoya-11.ru
При выборе напольного покрытия для вашего дома или офиса важно обратить внимание на качество, долговечность и дизайн. Магазин напольных покрытий – это место, где вы можете найти широкий ассортимент различных материалов, от ламината и паркета до ковров и виниловых плиток. https://ламинат1.рф/
Полезная информация как официально купить диплом о высшем образовании
Купить диплом старого образца, можно ли это сделать по быстрой схеме?
Паркетная доска – это тип напольного покрытия, состоящий из деревянных планок, которые укладываются в виде палубной доски. Она отличается высокой долговечностью и прочностью, а также придает интерьеру теплую и уютную атмосферу. Паркетная доска может быть изготовлена из различных пород дерева и иметь различные оттенки и текстуры, что позволяет подобрать подходящий вариант под любой стиль помещения. https://kvarcvinil3.ru/
Диплом вуза купить официально с упрощенным обучением в Москве
Claim Your Reward Today
Win Big at All Australian Casino Online
keno casino games keno casino games .
Стоимость дипломов высшего и среднего образования и как избежать подделок
Диплом пту купить официально с упрощенным обучением в Москве
Быстрое обучение и получение диплома магистра – возможно ли это?
Привет!
Мы предлагаем документы техникумов
justbevictorious.com/kupit-diplom-367142ysx
Сколько стоит диплом высшего и среднего образования и как его получить?
Узнайте стоимость диплома высшего и среднего образования и процесс получения
Привет, друзья!
Купить документ ВУЗа.
onlinekinospace.ru/kupit-diplom-dlya-kareryi
Заказать спецодежду для мужчин blatta.ru
По теме рабочий куртка мужская спецодежда звоните нам. Мы на связи 24 часа, без выходных. Наш номер телефона +7(912)447-84-22 или пишите нам в вотсап. Находимся по адресу: г. Ижевск, Воткинское шоссе, 16 В. График работы по будням с 9:00 до 18:00. Отправляем одежду по всей РФ. Успейте купить одежду по лучшим ценам.
Купить диплом о среднем образовании в Москве и любом другом городе
Легальные способы покупки диплома о среднем полном образовании
Как правильно приобрести диплом колледжа или ПТУ в России, важные моменты
mans-diplomas.ru
Полезные советы по покупке диплома о высшем образовании без риска
Полезная информация как купить диплом о высшем образовании без рисков
Играйте в 888starz casino и получайте бонусы.
Приобретение диплома ВУЗа с сокращенной программой обучения в Москве
Алкогольный абстинентный синдром (ААС) развивается через несколько часов после последнего потребления алкоголя и достигает пика через 24-48 часов. Он характеризуется разнообразными симптомами, включающими тремор, потливость, тахикардию, гипертензию, тошноту, рвоту, бессонницу и тревожность.
http://vyvod-iz-zapoya-12.ru
стоимость новых номеров https://gos-dublikaty150.ru/
Алкогольный абстинентный синдром (ААС) развивается через несколько часов после последнего потребления алкоголя и достигает пика через 24-48 часов. Он характеризуется разнообразными симптомами, включающими тремор, потливость, тахикардию, гипертензию, тошноту, рвоту, бессонницу и тревожность.
http://vyvod-iz-zapoya-13.ru
Узнайте, как приобрести диплом о высшем образовании без рисков
Быстрая покупка диплома старого образца: возможные риски
Официальная покупка диплома вуза с сокращенной программой в Москве
Водка Казино играть
Купить диплом о среднем образовании в Москве и любом другом городе
Алкогольный абстинентный синдром (ААС) развивается через несколько часов после последнего потребления алкоголя и достигает пика через 24-48 часов. Он характеризуется разнообразными симптомами, включающими тремор, потливость, тахикардию, гипертензию, тошноту, рвоту, бессонницу и тревожность.
http://vyvod-iz-zapoya-14.ru
Полезные советы по безопасной покупке диплома о высшем образовании
Привет, друзья!
Мы готовы предложить документы ВУЗов
meiro.company/community/profile/huldamack795466
Возможно ли купить диплом стоматолога, и как это происходит
Удивительно, но купить диплом кандидата наук оказалось не так сложно
rushkas-diplomasxx.ru
Здравствуйте!
Приобрести документ университета.
elektrofahrrad-tests.de/forums/newthread.php?fid=2&processed=1
Эффективные способы удаления вмятин без использования краски, которые действительно работают.
Ремонт автомобиля без покраски https://www.vmyatina-remont.ru .
Диплом техникума купить официально с упрощенным обучением в Москве
Полезная информация как официально купить диплом о высшем образовании
Как оказалось, купить диплом кандидата наук не так уж и сложно
Аттестат 11 класса купить официально с упрощенным обучением в Москве
Всё, что нужно знать о покупке аттестата о среднем образовании
Процесс получения диплома стоматолога: реально ли это сделать быстро?
guilded.gg/u/originaldipl
Легальная покупка диплома ПТУ с сокращенной программой обучения
Купить диплом о среднем полном образовании, в чем подвох и как избежать обмана?
Как приобрести диплом о среднем образовании в Москве и других городах
scholar.google.com/citations?view_op=list_works&hl=en&user=PxLPwikAAAAJ
Добрый день!
Мы готовы предложить документы ВУЗов
spillbean.in.net/profile/Charissa12
Сколько стоит диплом высшего и среднего образования и как это происходит?
Купить диплом о среднем полном образовании, в чем подвох и как избежать обмана?
Как безопасно купить диплом колледжа или ПТУ в России, что важно знать
снять ломку снять ломку .
Покупка диплома о среднем полном образовании: как избежать мошенничества?
скорая наркологическая помощь скорая наркологическая помощь .
Официальная покупка диплома ПТУ с упрощенной программой обучения
Реально ли приобрести диплом стоматолога? Основные этапы
asxdiplomik24.ru
Узнайте, как приобрести диплом о высшем образовании без рисков
Как получить диплом о среднем образовании в Москве и других городах
Алкогольный абстинентный синдром (ААС) развивается через несколько часов после последнего потребления алкоголя и достигает пика через 24-48 часов. Он характеризуется разнообразными симптомами, включающими тремор, потливость, тахикардию, гипертензию, тошноту, рвоту, бессонницу и тревожность.
http://vyvod-iz-zapoya-15.ru
Наркологическая клиника ЕНС оказывает услуги по выводу из запоя. Используем современные методики взаимодействия с больным, что позволяет стабилизировать физическое и психоэмоциональное состояние пациента.
https://ens-narkologia.ru/programmy-lecheniya/reabilitatsionniy-tsentr/programma-12-shagov
вывод. из. запоя. анонимно. ростов. вывод. из. запоя. анонимно. ростов. .
Привет!
Приобрести документ ВУЗа.
belydom.ru/forum/user/38484
Пошаговая инструкция по безопасной покупке диплома о высшем образовании
капельницы от запоя капельницы от запоя .
Алкогольный абстинентный синдром (ААС) развивается через несколько часов после последнего потребления алкоголя и достигает пика через 24-48 часов. Он характеризуется разнообразными симптомами, включающими тремор, потливость, тахикардию, гипертензию, тошноту, рвоту, бессонницу и тревожность.
http://vyvod-iz-zapoya-17.ru
Официальная покупка диплома вуза с сокращенной программой в Москве
Аттестат школы купить официально с упрощенным обучением в Москве
diploms-man.ru
Обработка квартир после пожара http://uborka-ot-pozhara.ru/
Быстрая схема покупки диплома старого образца: что важно знать?
https://www.nytimes.com/2021/05/27/t-magazine/restaurants-chefs-instagram.html
Официальный сайт Sukaaa предлагает новым игрокам бонус 325% в 4 этапа, за активное повышение статуса – игрок получает кэшбэк и быстрые выводы. Новых игроков привлекает не только бездепозитный бонус за регистрацию, но и дизайн sykaaa telegram на сайте наглядное меню, которое позволяет в пару кликов найти нужный софт, выбрать игру или сделать депозит.
Пошаговая инструкция по официальной покупке диплома о высшем образовании
Удивительно, но купить диплом кандидата наук оказалось не так сложно
Приобретение школьного аттестата с официальным упрощенным обучением в Москве
Стоимость дипломов высшего и среднего образования и как избежать подделок
Быстрое обучение и получение диплома магистра – возможно ли это?
logopond.com/originaldipl/profile/690751/?filter=&page=
Choose a car for rent at a profit, convenient rental conditions.
Покупка диплома о среднем полном образовании: как избежать мошенничества?
go this placement and learn more http://rebeccasguide.com/__media__/js/netsoltrademark.php?d=nspddfgurestv534.ru
Купить диплом о среднем полном образовании, в чем подвох и как избежать обмана?
Все свежие акции и предложения от 888Starz доступны для всех игроков, не упустите возможность https://school97.ru/forum/view_profile.php?UID=209905
Приобретение диплома ПТУ с сокращенной программой обучения в Москве
friend007.com/read-blog/141995
Здравствуйте!
Приобрести диплом ВУЗа .
telegra.ph/kupit-diplom-kpi-08-13-10
Привет!
Где заказать диплом по актуальной специальности?
cocapal.com/read-blog/1133
d91652pj.beget.tech/2024/07/18/diplomy-na-zakaz-bystro-i-legko
danceway74.ru/users/36
demo.advised360.com/read-blog/162403
domainrama.com/read-blog/1132
Легальная покупка диплома о среднем образовании в Москве и регионах
Как приобрести аттестат о среднем образовании в Москве и других городах
Привет, друзья!
Заказать документ о получении высшего образования
obozrevatelevents.ru/ekspress-dostavka-diplomov-po-vsey-strane
elotag.com/read-blog/563
wiki.intradition.ru/index.php/Быстрый_выбор_онлайн_магазина,_продающего_дипломы
ya.forum.cool/viewtopic.php?id=5882#p17526
owen.ru/forum/member.php?u=106526
Где и как купить диплом о высшем образовании без лишних рисков
Полезная информация как купить диплом о высшем образовании без рисков
Как официально приобрести аттестат 11 класса с минимальными затратами времени
Как быстро и легально купить аттестат 11 класса в Москве
Привет, друзья!
Мы изготавливаем дипломы.
ratingforex.ru/forum-forex/viewtopic.php?f=18&t=32492&sid=21c7b064d8c426a02f14a9f44dbc71d3
Как избежать рисков при покупке диплома колледжа или ПТУ в России
Добрый день!
Купить документ о получении высшего образования.
productinn.mn.co/posts/65717681
Приобретение школьного аттестата с официальным упрощенным обучением в Москве
Покупка диплома о среднем полном образовании: как избежать мошенничества?
Полезные советы по безопасной покупке диплома о высшем образовании
Алкогольный абстинентный синдром (ААС) развивается через несколько часов после последнего потребления алкоголя и достигает пика через 24-48 часов. Он характеризуется разнообразными симптомами, включающими тремор, потливость, тахикардию, гипертензию, тошноту, рвоту, бессонницу и тревожность.
http://vyvod-iz-zapoya-19.ru
Добрый день!
Мы предлагаем дипломы любой профессии по доступным тарифам.
business.b2b-broker.ru/cat.php?action=rlist&orgid=883&id=463140
Приобретение школьного аттестата с официальным упрощенным обучением в Москве
startspresto.ru/cb-profile/pluginclass/cbblogs?action=blogs&func=show&id=239
Быстрое обучение и получение диплома магистра – возможно ли это?
Возможно ли купить диплом стоматолога, и как это происходит
Покупка диплома о среднем полном образовании: как избежать мошенничества?
chart-studio.plotly.com/~originaldipl
Добрый день!
Мы предлагаем документы техникумов
bizbuildboom.com/kupit-diplom-789463eij
Удивительно, но купить диплом кандидата наук оказалось не так сложно
Алкогольный абстинентный синдром (ААС) развивается через несколько часов после последнего потребления алкоголя и достигает пика через 24-48 часов. Он характеризуется разнообразными симптомами, включающими тремор, потливость, тахикардию, гипертензию, тошноту, рвоту, бессонницу и тревожность.
http://vyvod-iz-zapoya-20.ru
нарколог вывод из запоя https://vyvod-iz-zapoya-v-sankt-peterburge11.ru .
Здравствуйте!
Где приобрести диплом специалиста?
ukrom.in.ua/users/327?wid=9227
usa.life/read-blog/63971
vaeaem.profiforum.ru/t4090-topic#7385
vintfint.com/blogs/23422/ко-и-быстро
vip.7bb.ru/viewtopic.php?id=3070#p7238
Добрыйдень!
Заказать диплом университета .
telegra.ph/kupit-diplom-stomatologa-s-zaneseniem-v-reestr-08-13-10
Привет!
Мы изготавливаем дипломы любой профессии.
Покупка документа, подтверждающего окончание института, – это рациональное решение.
ddob.com/blogbook/id/169119/prezent-od-serca-syropy-konopne-w-trzech-nowych-wersjach
+&postID=-9]+&page=(-9]+)(&token=-9]+|)(&bpli=-9]+|);change2=$1%]/]blogs-blogsx.blogspot.com/2011/01/orange-beeline-zte-mf-100-vivacell-3g?commentPage=changeREGEXP=https?:blogger.com/comment.g.blogID=-9]+&postID=-9]+&page=(-9]+)(&token=-9]+|)(&bpli=-9]+|);change2=$1%]
fish-sea-products.ru/forum/messages/forum1/topic37/message3714/?result=reply#message3714
miupsik.ru/forums/showthread.php?tid=63499
dme-wozki.pl/2021/02/02/witaj-swiecie/#comment-25975
Привет, друзья!
Приобрести документ университета можно в нашей компании в Москве.
domovou.3nx.ru/viewtopic.php?p=7142#7142
doremichildcarecentre.com/index.php/forum/welcome-mat/191419
driveme.rusff.me/viewtopic.php?id=2192#p105248
elfae.ruhelp.com/viewtopic.php?id=17322#p39643
fabnews.ru/forum/showthread.php?p=80327#post80327
ig stories https://anon-inst.com .
Привет, друзья!
Заказать документ о получении высшего образования.
forum.qwas.ru/diplomi-s-garantiey-kachestva-t20900
Убрать квартиру после трупа http://uborka-posle-umershego-moskva.ru/
Официальная покупка диплома ПТУ с упрощенной программой обучения
Диплом вуза купить официально с упрощенным обучением в Москве
Привет, друзья!
Купить документ института
scientistsufo.ru/diplomyi-vseh-spetsialnostey-na-zakaz
medik-look.ru/kachestvennyie-diplomyi-bez-posrednikov
moneysweet.listbb.ru/viewtopic.php?f=2&t=1971
heroes.app/blogs/429284/Дипломы-с-гарантией-качества-и-надежности
sklad-slabov.ru/forum/user/8536
Здравствуйте!
Купить диплом ВУЗа
купить диплом в владивостоке
Добрый день!
Мы изготавливаем дипломы.
vk.com/unikvseru?w=wall414329581_6128
Здравствуйте!
Мы предлагаем дипломы любых профессий по невысоким ценам.
vet-aibolit.ru/about
Как официально приобрести аттестат 11 класса с минимальными затратами времени
Быстрая покупка диплома старого образца: возможные риски
rushkadiplomikx.ru
Купить диплом магистра оказалось возможно, быстрое обучение и диплом на руки
Можно ли купить аттестат о среднем образовании, основные моменты и вопросы
Как быстро и легально купить аттестат 11 класса в Москве
Сколько стоит диплом высшего и среднего образования и как это происходит?
Сколько стоит диплом высшего и среднего образования и как его получить?
Как избежать рисков при покупке диплома колледжа или ПТУ в России
Как быстро и легально купить аттестат 11 класса в Москве
Здравствуйте!
Мы предлагаем документы ВУЗов
meiro.company/community/profile/huldamack795466
adventure trail casinowild24.com/all-games/slots/action-bank-plus.
Быстрое обучение и получение диплома магистра – возможно ли это?
Узнайте, как приобрести диплом о высшем образовании без рисков
ast-diploms24.ru
Как официально купить аттестат 11 класса с упрощенным обучением в Москве
Официальная покупка диплома вуза с сокращенной программой в Москве
Аттестат школы купить официально с упрощенным обучением в Москве
Welcome to mult34.com, the best place for admirers of erotic animated illustrations. Our site provides a extensive range of high-quality creations made for those who appreciate imaginative and bold stories. We’ve collected the best starwars porn selections from famous creators, featuring a variety of types, ranging from cartoons to well-known gaming franchises.
Как быстро и легально купить аттестат 11 класса в Москве
Лечение алкоголиков при помощи современного медицинского подхода дает возможность предвидеть и устранить все риски, с которыми человек обязательно сталкивается во время возвращения к трезвой жизни.
https://reutov.trezvost-clinica.ru/lechenie-alkogolizma
Официальная покупка диплома вуза с сокращенной программой в Москве
Повышение квалификации онлайн maps-edu.ru
Окончить переподготовка социальная работа можно в нашей академии. Список состоит из более 1800 разнообразных программ обучения, порой сложно найти, что необходимо определенно Вам. Можно воспользоваться поиском, выбрав направление обучения и иные параметры. Популярные направления: медицина, сельское хозяйство, юриспруденция и право, документоведение и делопроизводство, дефектология, логопедия, физическая культура и спорт, социальная работа, нефтяная и газовая промышленность, охрана труда, кадровое делопроизводство, маркшейдерское дело, горное дело и многие другие.
Сколько стоит диплом высшего и среднего образования и как его получить?
Как быстро получить диплом магистра? Легальные способы
Официальная покупка диплома вуза с сокращенной программой обучения в Москве
smite this site and learn more http://igr.ru/bitrix/redirect.php?goto=http://nspddfgurestv534.ru
Диплом вуза купить официально с упрощенным обучением в Москве
Важным этапом в лечении алкогольной зависимости является социальная реабилитация пациента. Это включает меры по восстановлению социального статуса, трудовой деятельности, семейных отношений и интеграции в общество.
http://xn—-8sbbpb6asblledv7c.xn--p1ai
Наркологическая клиника ЕНС оказывает услуги по выводу из запоя. Используем современные методики взаимодействия с больным, что позволяет стабилизировать физическое и психоэмоциональное состояние пациента.
https://ens-narkologia.ru/programmy-lecheniya/lechenie-alkogolizma/hronicheskiy
Здравствуйте!
Заказать документ о получении высшего образования.
obozrevatelevents.ru/nastoyashhie-diplomyi-dlya-vashey-kareryi
Всё, что нужно знать о покупке аттестата о среднем образовании без рисков
Вопросы и ответы: можно ли быстро купить диплом старого образца?
скорая наркологическая помощь на дому в москве http://www.skoraya-narkologicheskaya-pomoshch12.ru/ .
Привет, друзья!
Мы изготавливаем дипломы любой профессии по приятным тарифам.
maps.google.sh/url?q=aurus-diploms.com
ziatogel
My programmer is trying to convince me to move to .net from PHP.
I have always disliked the idea because of the expenses.
But he’s tryiong none the less. I’ve been using Movable-type on a variety of websites for about a
year and am concerned about switching to another platform.
I have heard fantastic things about blogengine.net.
Is there a way I can transfer all my wordpress posts
into it? Any help would be really appreciated!
Our lady dimitrescu porn options present an engaging exploration where erotica combines with fantastic universes and iconic figures from animated series and video games. If you’re a fan of My Hero Academia, Pokemon, or Rick and Morty, you’ll undoubtedly come across something exciting on mult34.com. Our platform is created for those who value premium visuals, compelling narratives, and distinct types of erotic animation.
Диплом вуза купить официально с упрощенным обучением в Москве
Быстро пройти обучение переподготовка maps-edu.ru
Пройти учиться на логопеда дистанционно возможно в представленной академии. Реестр состоит из более 1800 разнообразных программ обучения, порой трудно понять, что необходимо определенно Вам. Можно воспользоваться поиском, выбрав направление и иные параметры. Популярные направления: строительство, сельское хозяйство, ветеринария, закупки, менеджмент управление, пожарная безопасность, физическая культура и спорт, психология, антитеррористическая защищенность, метрология и стандартизация, электротехника, маркшейдерское дело, радиационный контроль и многие другие.
Онлайн обучение по РФ maps-edu.ru
Окончить обучение младший медицинский персонал возможно в представленной академии. Перечень содержит свыше 1800 различных программ обучения, порой сложно понять, что требуется конкретно Вам. Можно воспользоваться поиском, указав направление и иные параметры. Существующие направления: медицина, сельское хозяйство, бухгалтерское дело, закупки, культура и искусство, пожарная безопасность, педагогика, психология, антитеррористическая защищенность, охрана труда, электроэнергетика, монтажные работы, радиационная безопасность и многие другие.
Полезная информация как купить диплом о высшем образовании без рисков
Привет, друзья!
Приобрести документ ВУЗа.
bike.by/forum/viewtopic.php?f=84&t=83797
Всё, что нужно знать о покупке аттестата о среднем образовании
Привет,друзья!
Заказать диплом университета .
telegra.ph/kupit-diplom-veterinara-08-13-5
Здравствуйте!
Мы можем предложить дипломы любой профессии по выгодным ценам.
snipesocial.co.uk/blogs/370679/Открытие-возможностей-
Привет!
Где приобрести диплом по необходимой специальности?
amtest.mybb.ru/viewtopic.php?id=453#p1545
anatoliyrud.ekafe.ru/viewforum.php?f=29
antonovschool.ru/forum/messages/forum1/topic722/message741/?result=new#message741
army.clanfm.ru/viewtopic.php?f=2&t=38935
aromatov.wooden-rock.ru/forum/topic.php?forum=1&topic=16189
Рекомендации по безопасной покупке диплома о высшем образовании
Наши специалисты сделают вашу мебель как новую после химчистки на дому в Москве.
Химчистка мебели недорого http://dom-clean-price.ru/ .
Преимущества химчистки мебели в домашних условиях, чтобы Ваша мебель стала как новая.
Химчистка мебели цены на услуги в Москве Химчистка мебели цены на услуги в Москве .
Эффективная химчистка мебели на дому в Москве, для сохранения красоты.
Химчистка мебели вызвать http://mebel-clean-order.ru/ .
Химчистка диванов на дому в Москве, с гарантированным результатом.
Чистка мебели на дому Москва https://cleaning-mebel-order.ru/ .
Добрый день!
Мы изготавливаем дипломы любой профессии по приятным ценам.
chudo-deti.kiev.ua
Привет!
Заказать документ о получении высшего образования можно в нашей компании в столице.
forum.fiat-club.ru/blog_post.php?do=updateblog&blogid=
forum.safe-animals.ru/index.php?showtopic=32435
forumkasino.bestff.ru/viewtopic.php?id=4307#p9750
forumkoldovstva.listbb.ru/viewtopic.php?f=37&t=15114
forums.unigild.com/index.php?/topic/38182-дипломы-о-высшем-образовании-от-аккредитованн
Добрый день!
Купить диплом о высшем образовании
купить диплом в находке
Привет, друзья!
Приобрести документ ВУЗа
pitomec.ru/forum/post/13164
webnewsrealty.ru/ofitsialnyie-diplomyi-dlya-vashey-kareryi
b96052v5.beget.tech/2024/07/05/diplomy-i-attestaty-vygodnye-ceny
benedeek.com/blogs/93559/Экспресс-доставка-дипломов-на-дом
lezt.ixbb.ru/viewtopic.php?id=119#p119
Аттестат школы купить официально с упрощенным обучением в Москве
domestika.org/en/tomyu6247
Купить диплом старого образца, можно ли это сделать по быстрой схеме?
Здравствуйте!
Мы изготавливаем дипломы.
inkbunny.net/j/507588-ruhfhshj–
Как приобрести диплом о среднем образовании в Москве и других городах
Покупка диплома о среднем полном образовании: как избежать мошенничества?
mnogo-krolikov.ru/question/nado-kupit-diplom-vybirayte-luchshiy-internet-magazin
Легальная покупка диплома ПТУ с сокращенной программой обучения
Привет!
Мы предлагаем дипломы психологов, юристов, экономистов и любых других профессий.
Заказ документа, подтверждающего окончание ВУЗа, – это выгодное решение.
lauraghiandoni.com/2019/05/15/il-palio-della-rana-di-fermignano/#comment-28562
vestiinform.ru/lavrov-rossiia-gotova-otvetit-na-sereznye-predlojeniia-po-peregovoram-s-ykrainoi-no-poka-takih-ne-polychala/?unapproved=58247&moderation-hash=dd2885915bd45791170b17ba614babeb#comment-58247
blog.mistifiks.ru/2015/06/mikrotik_54
allbeaches.ru/kosta-brava-luchshie-plyazhi-s-foto/?unapproved=266658&moderation-hash=537a6a98712194a34c53fc7a2134a9e9#comment-266658
инь-и-янь.рф/pikantnie-uslugi/#comment-47623
Как не попасть впросак при покупке диплома колледжа или ПТУ в России
Узнайте, как безопасно купить диплом о высшем образовании
Быстрое обучение и получение диплома магистра – возможно ли это?
как начать зарабатывать в интернете как начать зарабатывать в интернете .
Как получить диплом техникума с упрощенным обучением в Москве официально
Купить диплом о среднем полном образовании, в чем подвох и как избежать обмана?
Легальная покупка школьного аттестата с упрощенной программой обучения
лазерный станок купить http://www.stanki-a.ru / .
Как безопасно купить диплом колледжа или ПТУ в России, что важно знать
Сколько стоит диплом высшего и среднего образования и как его получить?
Привет!
Купить документ университета можно у нас в Москве.
telegra.ph/kak-podgotovitsya-k-postupleniyu-v-vuz-07-24
telegra.ph/kak-podgotovitsya-k-postupleniyu-v-vuz-samostoyatelno-07-24
telegra.ph/kak-poluchit-kvotu-na-postuplenie-v-vuz-07-24
telegra.ph/kak-poluchit-otsrochku-dlya-postupleniya-v-vuz-07-24
telegra.ph/kak-posmotret-rezultaty-postupleniya-v-vuz-07-24
Как правильно купить диплом колледжа и ВУЗа в России, подводные камни
Привет!
Купить документ института
amtest.mybb.ru/viewtopic.php?id=458#p1569
vocal.com.ua/node/62621
allsportime.ru/diplomyi-dlya-professionalov
desteg.getbb.ru/viewtopic.php?f=6&t=813
antennastar.com/blogs/605/Купите-диплом-для-новой-карьеры
Здравствуйте!
Мы предлагаем дипломы любой профессии по приятным тарифам.
vietnammm.com/kr/restaurants/An-Tam
Полезная информация как купить диплом о высшем образовании без рисков
paper writer online pay for help with admission essay college paper writing service in australia
Добрый день!
Мы изготавливаем дипломы.
postila.ru/post/78265773
Можно ли купить аттестат о среднем образовании, основные моменты и вопросы
Можно ли быстро купить диплом старого образца и в чем подвох?
Легальная покупка диплома о среднем образовании в Москве и регионах
diploms-rushka.ru
скорая наркологическая москва скорая наркологическая москва .
Привет, друзья!
Получить диплом о высшем образовании
купить диплом в балаково
Как приобрести аттестат о среднем образовании в Москве и других городах
Как безопасно купить диплом колледжа или ПТУ в России, что важно знать
скорая наркологическая помощь в москве скорая наркологическая помощь в москве .
Полезная информация как официально купить диплом о высшем образовании
Привет, друзья!
Мы предлагаем документы техникумов
rajmudraofficial.com/question/kupit-diplom-414601kwm
Официальное получение диплома техникума с упрощенным обучением в Москве
Купить диплом о среднем образовании в Москве и любом другом городе
Пошаговая инструкция по официальной покупке диплома о высшем образовании
diplomyx-rushka.ru
Официальное получение диплома техникума с упрощенным обучением в Москве
прокапаться от запоя на дому https://zapoynetu.ru/
Как получить диплом о среднем образовании в Москве и других городах
Узнайте, как приобрести диплом о высшем образовании без рисков
Привет, друзья!
Мы предлагаем документы ВУЗов
worldnewsfox.com/business/kupit-diplom-368650ygs
Процесс получения диплома стоматолога: реально ли это сделать быстро?
Вопросы и ответы: можно ли быстро купить диплом старого образца?
slideserve.com/originaldipl
Возможно ли купить диплом стоматолога, и как это происходит
Как получить диплом техникума с упрощенным обучением в Москве официально
Как безопасно купить диплом колледжа или ПТУ в России, что важно знать
Диплом техникума купить официально с упрощенным обучением в Москве
Быстрая схема покупки диплома старого образца: что важно знать?
Здравствуйте!
Мы изготавливаем дипломы любой профессии по выгодным тарифам.
gamesfortop.ru/obrazovanie-kotoroe-rabotaet-na-vas
Официальное получение диплома техникума с упрощенным обучением в Москве
wheeoo.com/read-blog/16536
Здравствуйте!
Мы предлагаем дипломы любой профессии по приятным тарифам.
russiajoy.ru/obrazovanie-kotoroe-menyaet-zhizn
Узнайте, как безопасно купить диплом о высшем образовании
Сколько стоит диплом высшего и среднего образования и как это происходит?
Процесс получения диплома стоматолога: реально ли это сделать быстро?
ruminus.ru/pages/pag/gde_kupit_diplom_s_provodkoy_po_dostupnoy_cene
Официальная покупка школьного аттестата с упрощенным обучением в Москве
Реально ли приобрести диплом стоматолога? Основные этапы
covrik.com/member.php?u=114639
Процесс получения диплома стоматолога: реально ли это сделать быстро?
9213270296.ru/2024/08/23/nuzhno-kupit-diplom-zaydite-v-luchshiy-internet-magazin
Официальная покупка диплома вуза с сокращенной программой в Москве
Как приобрести аттестат о среднем образовании в Москве и других городах
Всё, что нужно знать о покупке аттестата о среднем образовании без рисков
Привет, друзья!
Приобрести документ о получении высшего образования.
wiki.astrakhan.pro/index.php/Купить_диплом_—_легко!
Можно ли быстро купить диплом старого образца и в чем подвох?
Как безопасно купить диплом колледжа или ВУЗа в России, что важно знать
Официальная покупка аттестата о среднем образовании в Москве и других городах
Возможно ли купить диплом стоматолога, и как это происходит
Только лучшие методы и средства для химчистки мебели, для безупречных результатов.
Чистка мебели цена https://himchistka-site.ru/ .
Дайте мебели второе дыхание с выездной химчисткой и она засияет новыми красками.
Чистка мебели на дому цена http://www.himchistka-mebel-prices.ru/ .
Не откладывайте выездную химчистку мебели на потом, потому что результат вас удивит.
Химчистка мебели из жаккарда Москва https://www.vyiezd-himchistka.ru/ .
Официальная покупка диплома ПТУ с упрощенной программой обучения
Привет!
Мы предлагаем документы техникумов
varanasitutor.com/questions/kupit-diplom-582279iol
оригинальные идеи для бизнеса http://www.biznes-idei11.ru .
Привет, друзья!
Приобрести документ института.
igenplan.ru/forum/user/95117
Возможно ли купить диплом стоматолога, и как это происходит
Как правильно купить диплом колледжа и пту в России, подводные камни
Быстрое обучение и получение диплома магистра – возможно ли это?
идея для бизнеса идея для бизнеса .
мебельный поролон для дивана мебельный поролон для дивана .
Привет!
Мы изготавливаем дипломы любой профессии по приятным ценам.
mclassic.com.hk/home.php?mod=space&uid=290567
Привет,друзья!
Приобрести диплом любого ВУЗа.
telegra.ph/kupit-diplom-o-vysshem-obrazovanii-cena-ukraina-08-13-7
Купить диплом магистра оказалось возможно, быстрое обучение и диплом на руки
Реально ли приобрести диплом стоматолога? Основные этапы
veganxyz.mn.co/posts/65295404
Полезные советы по безопасной покупке диплома о высшем образовании
diploms-x.com
Легальная покупка школьного аттестата с упрощенной программой обучения
Узнайте стоимость диплома высшего и среднего образования и процесс получения
Здравствуйте!
Купить диплом любого ВУЗа.
telegra.ph/kupit-diplom-o-vysshem-obrazovanii-kazan-08-13-10
Купить диплом о среднем полном образовании, в чем подвох и как избежать обмана?
Как официально купить аттестат 11 класса с упрощенным обучением в Москве
Быстрая схема покупки диплома старого образца: что важно знать?
Как не попасть впросак при покупке диплома колледжа или ПТУ в России
Диплом пту купить официально с упрощенным обучением в Москве
Здравствуйте!
Где купить диплом по нужной специальности?
fellnasen-service.de/index.php?thread/157570-официальные-дипломы-без-ожидания-и-проблем
golf.od.ua/forum/viewtopic.php?p=78113#78113
markusragger.at/chess/index.php/kforum/jm-news-pro-module/655296
rrsclub.ru/showthread.php?p=45445#post45445
sakhd.3nx.ru/viewtopic.php?p=2298#2298
Здравствуйте!
Мы изготавливаем дипломы любых профессий по приятным ценам.
forum.men.ru/forum/viewtopic.php?t=10442&start=0&postdays=0&postorder=asc&highlight=
Всё, что нужно знать о покупке аттестата о среднем образовании
Привет, друзья!
Приобрести документ института вы сможете у нас.
cartagena.activeboard.com/forum.spark
ilovehabbo.bbon.ru/viewtopic.php?id=1579#p29001
startinvest.2bb.ru/viewtopic.php?id=10541#p53896
gazeta.ekafe.ru/viewforum.php?f=48
coup.forum2x2.ru/t3812-topic#10066
Привет!
Мы предлагаем документы техникумов
drshirvany.ir/question/kupit-diplom-369245gmp
Привет, друзья!
Заказать документ ВУЗа
odnopolchane.net/forum/member.php?u=546804
telegra.ph/kakie-analizy-nuzhno-sdavat-pri-postuplenii-v-vuz-07-24
cittaviva.net/read-blog/84
3drus.ru/forum/topic_34902
kherson.forum2x2.ru/t10956-topic#26377
Стоимость дипломов высшего и среднего образования и как избежать подделок
Приобретение диплома ПТУ с сокращенной программой обучения в Москве
Всё, что нужно знать о покупке аттестата о среднем образовании
Как оказалось, купить диплом кандидата наук не так уж и сложно
Аттестат школы купить официально с упрощенным обучением в Москве
ast-diplomy.com
Здравствуйте!
Приобрести документ ВУЗа можно в нашей компании в столице.
nachosking.com/read-blog/1325
niagarafallspal.com/read-blog/1315
o91707v5.beget.tech/2024/07/23/diplomy-vseh-urovney-obrazovaniya
o91746bp.beget.tech/2024/07/23/ekspress-dostavka-diplomov-po-vsey-strane
p33340zg.beget.tech/2024/07/23/poluchite-diplom-bez-lishnih-hlopot
Привет, друзья!
Купить документ о получении высшего образования
easyinsurancehub.co.uk/forum/thread-58540
telegra.ph/kakie-dokumenty-nuzhny-dlya-postupleniya-v-vuz-kazahstana-07-24
telegra.ph/distancionnoe-postuplenie-v-vuz-07-24
sharecovid19story.com/posting.php?f=11&mode=post&sid=9923b43b62c8ba5bf4c2d95f09a20d4c
koxma.4adm.ru/viewforum.php?f=296
Вопросы и ответы: можно ли быстро купить диплом старого образца?
Наркологическая клиника ЕНС оказывает услуги по выводу из запоя. Используем современные методики взаимодействия с больным, что позволяет стабилизировать физическое и психоэмоциональное состояние пациента.
https://ens-narkologia.ru/neotlozhnaya-pomosch/vyvod-iz-zapoya/prinuditelnyy-vyvod-iz-zapoya
Добрый день!
Мы готовы предложить дипломы.
mypenza.ru/forum/index.php?showtopic=61317
Приобретение школьного аттестата с официальным упрощенным обучением в Москве
Сколько стоит получить диплом высшего и среднего образования легально?
Покупка диплома о среднем полном образовании: как избежать мошенничества?
Узнайте стоимость диплома высшего и среднего образования и процесс получения
ready.epizy.com/read-blog/5
Добрый день!
Мы изготавливаем дипломы любых профессий по разумным тарифам.
freeflashgamesnow.com/profile/2819869/AletheaMcmu
Запой представляет собой крайнюю стадию алкоголизма, когда человек не может остановиться и продолжает пить алкоголь в больших количествах. Это состояние возникает на фоне физической и психической зависимости от алкоголя.
https://zdorovnik.com/nyuansy-proczedury-kodirovaniya-ot-alkogolizma
Запой представляет собой крайнюю стадию алкоголизма, когда человек не может остановиться и продолжает пить алкоголь в больших количествах. Это состояние возникает на фоне физической и психической зависимости от алкоголя.
https://inamo.ru/reabilitatsiya-ot-alkogolnoy-zavisimosti-uslugi-i-rezultaty
Официальная покупка школьного аттестата с упрощенным обучением в Москве
Как быстро получить диплом магистра? Легальные способы
subscribe.ru/author/31543629
Покупка диплома о среднем полном образовании: как избежать мошенничества?
Покупка диплома о среднем полном образовании: как избежать мошенничества?
opel corsa d как включить кондиционер на опель корса
Полезные советы по безопасной покупке диплома о высшем образовании
Покупка диплома о среднем полном образовании: как избежать мошенничества?
Привет!
Мы предлагаем документы ВУЗов
eythar.org/blog/index.php?entryid=745843
Дезинфекция деревянного дома от трупного яда https://dezinfekciya-posle-smerti.ru/
Добрый день!
Мы изготавливаем дипломы любой профессии.
Заказ документа, который подтверждает окончание университета, – это разумное решение.
truksha.blogspot.com/2015/03/blog-post_20
wtsoc.h1n.ru/users/igegudav
blog.albato.ru/vygruzka-iz-google-sheets/#comment-423793
forum.asella.ru/index.php?threads/купить-диплом-в-екатеринбурге-u573l.8289
autoeksotika.lv/user/johnts5921
Стоимость доставки груза по России liga-dostavok.ru
По запросу калькулятор стоимости доставки груза по россии Вы на правильном пути. Сейчас весьма много компаний, которые берутся привезти груз вовремя и по низким ценам. У нас вдобавок большое количество довольных клиентов, которые советуют наш сервис друзьям. Главное наше преимущество это в установленные сроки доставка, бесплатный забор от 5-ти заказов, несение материальной ответственности.
Приобретение школьного аттестата с официальным упрощенным обучением в Москве
Как избежать рисков при покупке диплома колледжа или ПТУ в России
ractis.ru/forums/index.php?autocom=gallery&req=si&img=2673
Купить диплом о среднем полном образовании, в чем подвох и как избежать обмана?
рулонная штора с электроприводом рулонная штора с электроприводом .
Аттестат 11 класса купить официально с упрощенным обучением в Москве
Как приобрести аттестат о среднем образовании в Москве и других городах
Привет, друзья!
Мы изготавливаем дипломы любой профессии по невысоким ценам.
cse.google.dm/url?sa=t&url=aurus-diploms.com
Привет!
Где приобрести диплом по нужной специальности?
telegra.ph/distancionnoe-obuchenie-v-vuzah-evropy-07-24
telegra.ph/distancionnoe-obuchenie-v-vuzah-voronezha-07-24
telegra.ph/distancionnoe-obuchenie-v-vuzah-ekaterinburga-07-24
telegra.ph/distancionnoe-obuchenie-v-vuzah-novosibirska-07-24
telegra.ph/distancionnoe-obuchenie-v-vuzah-rossii-07-24
Официальная покупка школьного аттестата с упрощенным обучением в Москве
Полезные советы по покупке диплома о высшем образовании без риска
diplomyx-man.ru
Здравствуйте!
Заказать документ о получении высшего образования.
wiki.why42.ru/wiki/Настоящие_дипломы_для_вашего_успеха
Узнайте стоимость диплома высшего и среднего образования и процесс получения
Покупка школьного аттестата с упрощенной программой: что важно знать
Успейте заказать выездную химчистку мебели, воспользуйтесь прямо сейчас.
Химчистка ковров мебели дивана https://www.pro-mebel-cleaning.ru .
Качественная услуга по химчистке матрасов у вас дома, для сохранения чистоты в вашем доме.
Химчистка ортопедических матрасов на дому http://www.himchistka-matras-dom.ru/ .
Как обезопасить себя и близких от вредных микроорганизмов.
Дезинфекция матрасов – https://dezinfekciya-matras-msk.ru .
Полезные советы по безопасной химчистке мебели, которые помогут сохранить красоту мебели.
Как выбрать безопасные средства для химчистки мебели, которые не повредят материалы.
Инструкция по безопасной химчистке мебели профессионалами, с учетом особенностей каждого типа материалов.
Потенциальные риски при химчистке мебели, чтобы избежать ошибок и повреждений.
Как обезопасить химчистку мебели из экологически чистых материалов, для вашего уверенного выбора.
Безопасная химчистка мебели – http://safe-clean-mebel.ru/ .
Легальные способы покупки диплома о среднем полном образовании
Приобретение школьного аттестата с официальным упрощенным обучением в Москве
Как официально купить аттестат 11 класса с упрощенным обучением в Москве
Всё, что нужно знать о покупке аттестата о среднем образовании без рисков
Можно ли купить аттестат о среднем образовании? Основные рекомендации
Официальная покупка аттестата о среднем образовании в Москве и других городах
Как получить диплом о среднем образовании в Москве и других городах
Рассчет доставки груза liga-dostavok.ru
По вопросу перевозки грузов по россии Вы на нужном пути. Сейчас очень много компаний, которые спешат доставить груз в срок и по небольшим расценкам. У нас также большое количество довольных клиентов, которые рекомендуют наш сервис знакомым. Главное наше достоинство это актуальная доставка, бесплатный забор от пяти заказов, несение материальной ответственности.
Как оказалось, купить диплом кандидата наук не так уж и сложно
Добрый день!
Заказать документ университета
cslregister.com/forum/member.php?u=6225
telegra.ph/skolko-vuzov-mozhno-vybrat-dlya-postupleniya-07-24
fat-girls.ru/byistryiy-start-k-vyisshemu-obrazovaniyu
telegra.ph/kakie-vrachi-nuzhny-dlya-postupleniya-v-vuz-07-24
easyinsurancehub.co.uk/forum/thread-57067
Привет!
Заказать документ о получении высшего образования вы сможете у нас.
ssa.ru/forum/oformite-diplom-bez-ozhidanija
stroimsa.forum2x2.ru/t1836-topic#4744
subscribe.ru/member/quick
tripsitter.ixbb.ru/viewtopic.php?id=119#p119
vaeaem.profiforum.ru/t4079-topic#7371
Официальная покупка диплома вуза с сокращенной программой обучения в Москве
В текущем году оформить кредиты онлайн на карту является ещё быстрее. Сегодня на рынке доступно свыше 40 микрофинансовых организаций, способных предоставить срочные займы 24/7. Для выдачи микрокредита достаточно лишь паспорта, и процедура отнимает небольшое время. Также, если у вас плохая кредитная история, вы имеете возможность получить одобрение. Микрофинансовые организации оказывают удобные условия и быстрое оформление, что обеспечивает этот способ получения финансирования привлекательным для каждого.
Если вам необходимы финансы немедленно, вы можете обратиться к вариантами займ онлайн без отказа на карту которые доступны абсолютно всем. Это идеальное вариант для тех, кто не хочет терять время много времени и нуждается в срочном доступе к финансам. Также предлагаются услуги займы без отказа онлайн что обеспечивает оформить кредит без лишних проверок и отказов.
Привет!
Мы изготавливаем дипломы психологов, юристов, экономистов и других профессий.
Приобретение диплома, который подтверждает обучение в университете, – это рациональное решение.
unnewsusa.com/bbs/board.php?bo_table=free&wr_id=2535431
jinsanbag.com/bbs/board.php?bo_table=free&wr_id=196327
tekhnotop.ru/forums
dme-wozki.pl/2021/02/02/witaj-swiecie/#comment-25975
акп33.рф/users/ehaginaty
Здравствуйте!
Мы готовы предложить дипломы любых профессий по доступным тарифам.
ractis.ru/forums/index.php?autocom=gallery&req=si&img=2108
Быстрая схема покупки диплома старого образца: что важно знать?
kupr.io/read-blog/25
Удивительно, но купить диплом кандидата наук оказалось не так сложно
Buy Fentanyl
Phencyclidine Buy– Some of the best drugs provide intense but short-lived
pleasure: fentanyl
and carfentanil produce mind-numbing euphoria and pain relief, while heroin produces a warm, dream-like high.
Cocaine and crack cocaine create a quick rush of pleasure, confidence, and energy, but lead to serious crashes.
Methamphetamine produces a long-lasting, powerful high with intense energy,
while krokodil delivers euphoria at the cost of serious physical damage.
Synthetic drugs like bath salts and flakka provide heightened euphoria and connection,
but can cause paranoia and aggressive behavior,
while PCP produces a detached, invincible feeling.
Привет, друзья!
Мы можем предложить документы техникумов
autopremierpro.com/question/kupit-diplom-162399cmr
Привет, друзья!
Где заказать диплом специалиста?
fauna.0pk.me/viewtopic.php?id=1356#p6276
flashtest.80lvl.ru/viewtopic.php?f=3&t=1933
fordtransit.5nx.ru/viewtopic.php?f=25&t=9647
forum.fiat-club.ru/blog_post.php?do=updateblog&blogid=
forum.hi-def.ru/index.php?showtopic=38664
Как избежать рисков при покупке диплома колледжа или ПТУ в России
Пошаговая инструкция по официальной покупке диплома о высшем образовании
Здравствуйте!
Купить документ института.
vseogirls.ru/diplomyi-ot-professionalov-na-zakaz
Здравствуйте!
Мы изготавливаем дипломы любой профессии по приятным ценам.
zelenovka.ru/component/option,com_smf/Itemid,200/topic,13352.0
Пошаговая инструкция по официальной покупке диплома о высшем образовании
Привет, друзья!
Мы изготавливаем дипломы любой профессии по приятным тарифам.
[url=http://pentictonsoccerclub.com/may-classic/]pentictonsoccerclub.com/may-classic[/url]
Процесс получения диплома стоматолога: реально ли это сделать быстро?
Официальная покупка диплома вуза с сокращенной программой обучения в Москве
mans-diplomas.ru
Покупка диплома о среднем полном образовании: как избежать мошенничества?
Как купить аттестат 11 класса с официальным упрощенным обучением в Москве
Приобретение диплома ПТУ с сокращенной программой обучения в Москве
Приобретение диплома ПТУ с сокращенной программой обучения в Москве
kbb-hub.mn.co/posts/65295490
Как правильно купить диплом колледжа и пту в России, подводные камни
Здравствуйте!
Приобрести документ о получении высшего образования
blogs.rufox.ru/~worksale/48727.htm
telegra.ph/programma-dlya-postupleniya-v-teatralnyj-vuz-07-24
bseo-agency.com/blogs/143234/Ваш-диплом-уже-сегодня
telegra.ph/podgotovitelnye-kursy-dlya-postupleniya-v-vuz-07-24
medicineshocknews.ru/diplomyi-na-zakaz-byistro-i-legko
Привет!
Приобрести документ о получении высшего образования вы можете в нашем сервисе.
w98804oc.beget.tech/2024/07/20/dostupnye-diplomy-s-garantiey-kachestva
vocal.com.ua/node/62613
x70795vj.beget.tech/2024/07/22/vash-uspeh-nachinaetsya-s-diploma
1stroitelny.kz/faq/show/id/669b892dd6c9c43eb127d8c0
ai.cheap/read-blog/26117
Профессиональный уход за матрасами ИКЕА.
Химчистка матрасов икеа – https://matras-ikea-himchistka.ru/ .
Узнайте, как безопасно купить диплом о высшем образовании
Здравствуйте!
Мы изготавливаем дипломы любой профессии по приятным ценам.
rkiyosaki.ru/discussion/8577/kupit-diplom-2024-goda
Конкурентоспособность данного бизнеса напрямую зависит от безопасности и состояния ваших сотрудников. Применение новых стандартов охраны труда является неотъемлемой частью успешной работы всей организации. Наша компания предлагает профессиональные услуги по проведению проведение специальной оценки условий труда россии которая помогает выявить и ликвидировать возможные риски на рабочих местах. Мы предоставляем полный перечень мероприятий: от предварительной проверки до подготовки необходимой документации, что подтверждает соответствие вашего предприятия основным законодательным требованиям. Сотрудничая с нами, вы не только гарантируете безопасность своих сотрудников, но и оптимизируете общую эффективность работы, снижая вероятность производственных травм и заболеваний.
Наши специалисты обладают широким опытом и профессиональными навыками в области охраны труда. Используя новейшие методы и высокотехнологичное оборудование, мы проводим глубокий анализ условий труда на вашем предприятии. В процессе внеплановая соут учитываются все возможные условия, воздействующие на здоровье работников, включая физические, химические и биологические воздействия. Мы предлагаем индивидуальный подход к каждому клиенту, учитывая уникальность его деятельности и нюансы производственного процесса. Это позволяет нам гарантировать наиболее соответствующие и действенные рекомендации по улучшению условий труда. Кроме того, мы обеспечиваем консультации на всех этапах реализации предложенных мероприятий, помогая вам осуществлять необходимые изменения без ненужных издержек и временных потерь.
Не откладывайте заботу о охране ваших сотрудников на потом. Проведение “спецоценки условий труда организации” — это не только обязательное условие, но и стратегическое решение, направленное на долговременный рост вашего бизнеса. Вложив в охрану труда, вы создаете комфортные и безопасные условия для работы, что положительно сказывается на вовлеченности и эффективности сотрудников. Наши клиенты отмечают впечатляющее снижение уровня несчастных случаев и улучшение общего атмосферы в коллективе после проведения нашей оценки. Доверьте безопасность вашего бизнеса профессионалам и получите подтверждение качества и устойчивости. Контактируйте с нами сегодня, чтобы прояснить детали сотрудничества и начать путь к более надежной и продуктивной рабочей среде.
Официальная покупка школьного аттестата с упрощенным обучением в Москве
Покупка диплома о среднем полном образовании: как избежать мошенничества?
Сколько стоит диплом высшего и среднего образования и как это происходит?
Как появились прикольные мемы в сети интернет
Узнайте стоимость диплома высшего и среднего образования и процесс получения
Как стали популярными забавные картинки в сети интернет
Диплом ВУЗа купить официально с упрощенным обучением в Москве
Как быстро и легально купить аттестат 11 класса в Москве
Как быстро и легально купить аттестат 11 класса в Москве
Вывести из запоя https://fizioterapijakeskic.com .
купить станок лазерной резки металла купить станок лазерной резки металла .
instagram viewer online instagram viewer online .
Можно ли быстро купить диплом старого образца и в чем подвох?
Рекомендации по безопасной покупке диплома о высшем образовании
Привет!
Мы изготавливаем дипломы любой профессии.
Приобретение документа, который подтверждает окончание института, – это выгодное решение.
otticafocuspoint.it/2017/05/05/hello-world/#comment-19273
uepd.de/w3/doku.php?id=premialniediplomix
ekaterinovka.sarat.ru/board/add.php
free-forex-ua.blogspot.com/2011/05/blog-post_22?m=1
cookownfood.blogspot.com/2012/11/cold-bean-thread-noodles-with-spinach
Как получить диплом техникума официально и без лишних проблем
Здравствуйте!
Мы готовы предложить дипломы.
army.clanfm.ru/viewtopic.php?f=2&t=35340
Как появились прикольные картинки в сети интернет
Как появились забавные картинки в сети интернет
Привет!
Где купить диплом специалиста?
sampnewrp.listbb.ru/viewtopic.php?f=18&t=545&sid=abfd0ed70984fed7ec7866c7d1861f35
sampnl.listbb.ru/viewtopic.php?f=3&t=502&sid=5113f16b5075c350c958815872d93b27
selkovo.rolka.me/viewtopic.php?id=3519#p10325
seriallove.bbok.ru/viewtopic.php?id=7239#p123285
sharecovid19story.com/posting.php?f=11&mode=post&sid=9923b43b62c8ba5bf4c2d95f09a20d4c
Покупка диплома о среднем полном образовании: как избежать мошенничества?
Аттестат школы купить официально с упрощенным обучением в Москве
Приобретение диплома ПТУ с сокращенной программой обучения в Москве
Как официально купить аттестат 11 класса с упрощенным обучением в Москве
Полезная информация как официально купить диплом о высшем образовании
Как оказалось, купить диплом кандидата наук не так уж и сложно
Здравствуйте!
Заказать документ о получении высшего образования.
farm86.com/blogs/567/Дипломы-от-проверенных-поставщиков
Как получить диплом техникума с упрощенным обучением в Москве официально
Аттестат школы купить официально с упрощенным обучением в Москве
1вин
Как правильно купить диплом колледжа и пту в России, подводные камни
Полезная информация как официально купить диплом о высшем образовании
rushkas-diploms.ru
Покупка диплома о среднем полном образовании: как избежать мошенничества?
Конкурентоспособность вашего бизнеса напрямую зависит от безопасности и благополучия ваших сотрудников. Применение актуальных стандартов охраны труда является неотъемлемой частью успешной работы всей организации. Наша компания предлагает профессиональные услуги по проведению спецоценка условий труда которая помогает выявить и минимизировать возможные риски на рабочих местах. Мы предоставляем полный перечень мероприятий: от начальной оценки до подготовки требуемой документации, что обеспечивает соответствие вашего предприятия основным законодательным требованиям. Сотрудничая с нами, вы не только гарантируете безопасность своих сотрудников, но и повышаете общую результативность работы, уменьшая вероятность травматизма на работе и заболеваний.
Наши специалисты обладают богатым опытом и профессиональными навыками в области охраны труда. Используя современные методы и новое оборудование, мы проводим глубокий анализ условий труда на вашем предприятии. В процессе дистанционная специальная оценка условий труда учитываются все возможные факторы, влияющие на состояние здоровья работников, включая механические, химические и натуральные воздействия. Мы предлагаем индивидуальный подход к каждому клиенту, учитывая особенности его деятельности и нюансы производственного процесса. Это позволяет нам предоставлять наиболее правильные и действенные рекомендации по улучшению условий труда. К тому же, мы обеспечиваем поддержку на всех этапах реализации предложенных мероприятий, сопровождая вам внедрять необходимые изменения без лишних затрат и временных потерь.
Не переносите заботу о безопасности ваших сотрудников на потом. Проведение “спецоценки условий труда организации” — это не только юридическая необходимость, но и важный шаг, направленное на долговременный рост вашего бизнеса. Вкладывая в охрану труда, вы гарантируете оптимальные и надежные условия для работы, что положительно сказывается на вовлеченности и продуктивности сотрудников. Наши клиенты отмечают существенное снижение уровня травматизма и улучшение общего атмосферы в коллективе после проведения нашей оценки. Доверьте безопасность вашего бизнеса профессионалам и получите уверенность надежности и устойчивости. Обратитесь к нам сегодня, чтобы прояснить детали сотрудничества и сделать шаг к более защищенной и результативной рабочей среде.
Здравствуйте!
Приобрести документ университета
itstagram.ru/read-blog/937
wayworld.listbb.ru/viewtopic.php?f=2&t=24823
rakisochi.ru/users/20
sfera100.ru/forum/user/2609
telegra.ph/vozrastnye-ogranicheniya-dlya-postupleniya-v-vuz-07-24
Диплом техникума купить официально с упрощенным обучением в Москве
Как получить диплом о среднем образовании в Москве и других городах
Привет, друзья!
Купить документ ВУЗа можно в нашей компании в Москве.
telegra.ph/ocenit-shansy-postupleniya-v-vuz-07-24
telegra.ph/perechen-dokumentov-dlya-postupleniya-v-voennyj-vuz-07-24
telegra.ph/perechen-ehkzamenov-dlya-postupleniya-v-vuzy-07-24
telegra.ph/podat-dokumenty-na-postuplenie-v-vuz-onlajn-07-24
telegra.ph/podgotovka-k-postupleniyu-v-vuz-07-24
Парадокс, но купить диплом кандидата наук оказалось не так и сложно
Добрый день!
Мы изготавливаем дипломы любых профессий по доступным ценам.
avtovideotest.ru/poluchite-diplom-kotoryiy-izmenit-vashu-zhizn
Привет!
Мы изготавливаем дипломы любой профессии.
Заказ диплома, подтверждающего обучение в ВУЗе, – это рациональное решение.
scorers.org/arsenal-re-sign-real-madrids-dani-ceballos-on-loan/#comment-427888
mfb7775v.bget.ru/user/charlsusasdz4775
elredactoronline.mx/?p=8243#comment-1616471
+&postID=-9]+&page=(-9]+)(&token=-9]+|)(&bpli=-9]+|);change2=$1%]/]rootger.blogspot.com/2011/04/ibank2-windows-7-i86x64?commentPage=changeREGEXP=https?:blogger.com/comment.g.blogID=-9]+&postID=-9]+&page=(-9]+)(&token=-9]+|)(&bpli=-9]+|);change2=$1%]
lagottoromagnolo-ribaty.cz/index.php/fotogalerie/tris/tris-mimi-2/#comment-68574
Привет!
Мы готовы предложить дипломы.
alternativaprofi.com/forum/viewthread.php?thread_id=30893
Покупка диплома о среднем полном образовании: как избежать мошенничества?
краскопульт маленький
Полезные советы по покупке диплома о высшем образовании без риска
Добрый день!
Мы предлагаем документы ВУЗов
phimodasecia.com.br/2024/08/18/kupit-diplom-627969ylx
Как стали популярными забавные мемы в сети интернет
Привет!
Мы изготавливаем дипломы любых профессий по приятным ценам.
investicos.com/uncategorized/diplom-506562kiyeu
Как стали популярными прикольные мемы в сети интернет
Как официально купить диплом вуза с упрощенным обучением в Москве
asxdiplomik24.ru
Приобретение диплома ПТУ с сокращенной программой обучения в Москве
sfx.thelazy.net/users/u/originaldipl
переезд квартирный с грузчиками https://kvartirnyj-pereezd13.ru/
Легальная покупка диплома о среднем образовании в Москве и регионах
Как быстро получить диплом магистра? Легальные способы
Сколько стоит диплом высшего и среднего образования и как его получить?
Как купить аттестат 11 класса с официальным упрощенным обучением в Москве
Привет!
Заказать документ института.
income.forum2x2.ru/login?redirect=/u347
Лучшие средства для очистки матраса от клопов: наш рейтинг, для правильного выбора идеального продукта.
Химчистка матрасов от клопов – Химчистка матрасов от клопов – .
Химчистка матраса от мочи: легко и быстро, для безупречной чистоты и свежести.
химчистка матраса от мочи ребенка https://www.mocha-clean-matras.ru .
Какие методы химчистки подходят для поролоновых матрасов
Химчистка поролоновых матрасов – http://himchistka-porolon-matras.ru .
Оптимальный график чистки латексного матраса
Химчистка латексных матрасов – himchistka-lateks-matras.ru .
Почему стоит доверить чистку матрасов профессионалам
Химчистка премиум матрасов – https://www.himchistka-premium-matras.ru/ .
Приобретение диплома ПТУ с сокращенной программой обучения в Москве
Как улучшить настроение друзьям
Как улучшить настроение другу
Конкурентоспособность своего бизнеса напрямую зависит от обеспеченности безопасных условий и благополучия ваших сотрудников. Внедрение современных стандартов охраны труда является ключевой частью успешной работы всей организации. Наша компания предлагает качественные услуги по проведению компании специальная оценка условий труда которая помогает определить и ликвидировать скрытые риски на рабочих местах. Мы предоставляем полный перечень мероприятий: от первичного анализа до подготовки необходимой документации, что гарантирует соответствие вашего предприятия основным законодательным требованиям. Сотрудничая с нами, вы не только гарантируете безопасность своих сотрудников, но и улучшаете общую производительность работы, снижая вероятность несчастных случаев и заболеваний.
Наши специалисты обладают широким опытом и высокой квалификацией в области охраны труда. Применяя современные методы и новое оборудование, мы проводим глубокий анализ условий труда на вашем предприятии. В процессе эксперт соут учитываются все возможные условия, воздействующие на благополучие работников, включая физические, химические и биологические воздействия. Мы предлагаем индивидуальный подход к каждому клиенту, учитывая особенности его деятельности и особенности производственного процесса. Это позволяет нам обеспечивать наиболее правильные и действенные рекомендации по улучшению условий труда. К тому же, мы обеспечиваем консультации на всех этапах реализации предложенных мероприятий, сопровождая вам осуществлять необходимые изменения без лишних затрат и временных потерь.
Не переносите заботу о защите ваших сотрудников на потом. Проведение “спецоценки условий труда организации” — это не только юридическая необходимость, но и ключевое действие, направленное на устойчивое развитие вашего бизнеса. Вкладывая в охрану труда, вы создаете удобные и надежные условия для работы, что положительно сказывается на мотивации и производительности сотрудников. Наши клиенты замечают впечатляющее снижение уровня несчастных случаев и улучшение общего климата в коллективе после проведения нашей оценки. Доверьте безопасность вашего бизнеса профессионалам и получите подтверждение качества и надежности. Обратитесь к нам сегодня, чтобы договориться детали сотрудничества и запустить процесс к более безопасной и продуктивной рабочей среде.
Полезные советы по покупке диплома о высшем образовании без риска
Стоимость дипломов высшего и среднего образования и как избежать подделок
Привет!
Мы предлагаем документы техникумов
vacayla.com/2024/08/18/kupit-diplom-164295gmm
Легальная покупка школьного аттестата с упрощенной программой обучения
ulfishing.ru/includes/kls/gde_kupit_diplom_instituta_bez_problem_i_lishnih_voprosov_1
Приобретение диплома ПТУ с сокращенной программой обучения в Москве
thecommunitnetwork.mn.co/posts/65295524
Здравствуйте!
Купить документ о получении высшего образования
telegra.ph/lgoty-detyam-uchastnikov-boevyh-dejstvij-pri-postuplenii-v-vuz-07-24
rcdrift.ru/forum/member.php?u=21074
ccde-cambodia.com/cb-profile/pluginclass/cbblogs?action=blogs&func=show&id=120
newsato.ru/byistroe-poluchenie-diploma-bez-byurokratii-2
telegra.ph/interaktivnye-formy-obucheniya-v-vuze-na-sovremennom-ehtape-07-24-2
Полезная информация как официально купить диплом о высшем образовании
Привет, друзья!
Заказать документ ВУЗа можно в нашей компании.
mynewsport.ru/diplomyi-na-zakaz-s-garantiey-kachestva
newsofmebel.ru/kachestvennyie-diplomyi-na-zakaz
shockmusik.ru/zakazhite-diplom-pryamo-seychas
myweektour.ru/vyisokokachestvennyie-diplomyi-po-luchshim-tsenam
technoevents.ru/byistroe-i-legkoe-poluchenie-diploma
5 ways to save money when renting a car, without losing quality and safety
Узнайте, как безопасно купить диплом о высшем образовании
Диплом пту купить официально с упрощенным обучением в Москве
Добрый день!
Мы предлагаем дипломы любой профессии по приятным тарифам.
redlideres.cl/lider/sergio-rica
Стоимость дипломов высшего и среднего образования и как избежать подделок
Здравствуйте!
Мы изготавливаем дипломы.
mylot.su/blog/13440
Приобретение диплома ПТУ с сокращенной программой обучения в Москве
что нужно людям что нужно людям .
Купить диплом старого образца, можно ли это сделать по быстрой схеме?
Можно ли купить аттестат о среднем образовании? Основные рекомендации
Диплом пту купить официально с упрощенным обучением в Москве
https://glavpost.com/zdorove/2024/08/20/zachem-i-kogda-delat-rentgenografiiu-kostei-taza/
Легальная покупка школьного аттестата с упрощенной программой обучения
Привет, друзья!
Приобрести документ о получении высшего образования.
dogovor.top/wiki/Ваш_диплом_за_один_день
Как избежать рисков при покупке диплома колледжа или ПТУ в России
5-bromo-2,4-dimethyl-2h-indazole; 95% – купить онлайн в интернет-магазине химмед
Tegs: propan-2-yl 2-amino-4- 2,5-dimethylphenyl thiophene-3-carboxylate – купить онлайн в интернет-магазине химмед
ethyl 2-amino-4- 4-butylphenyl -5-methylthiophene-3-carboxylate – купить онлайн в интернет-магазине химмед
2- 4-chlorophenyl -3,6-dimethylquinoline-4-carboxylic acid – купить онлайн в интернет-магазине химмед
2-bromo-4-fluoro-5-methylbenzonitrile; min. 95% – купить онлайн в интернет-магазине химмед https://chimmed.ru/products/2-bromo-4-fluoro-5-methylbenzonitrile-min-95-id=4433616
https://infosport.ru/partners1/rentgenografia-v-guta-klinik
Как получить диплом техникума официально и без лишних проблем
Стоимость дипломов высшего и среднего образования и как избежать подделок
Добрый день!
Мы изготавливаем дипломы любой профессии.
Приобретение диплома, который подтверждает обучение в ВУЗе, – это выгодное решение.
guideflorence.blogspot.com/2011/10/blog-post
munhwahouse.or.kr/bbs/board.php?bo_table=free&wr_id=189322
rivertravel.net/viewtopic.php?f=20&t=8843
getamped.yxhi.com/doku.php?id=radiplom
snulja.blogspot.com/2014/08/blog-post_26
Быстрое обучение и получение диплома магистра – возможно ли это?
Возможно ли купить диплом стоматолога, и как это происходит
Пошаговая инструкция по официальной покупке диплома о высшем образовании
Привет!
Заказать диплом любого ВУЗа.
telegra.ph/kupit-diplom-tehnikuma-v-minske-08-13-9
Добрый день!
Заказать документ университета вы можете в нашей компании.
twikkers.nl/blogs/242552/Экспресс-дипломы-по-доступным-ценам
twoplustwoequal.com/read-blog/38476
ukrom.in.ua/users/327?wid=9227
usa.life/read-blog/63880
wheeoo.com/read-blog/14629
Привет, друзья!
Мы можем предложить дипломы любой профессии по приятным ценам.
maps.google.nr/url?sa=t&url=aurus-diploms.com
Пошаговая инструкция по безопасной покупке диплома о высшем образовании
Стоимость дипломов высшего и среднего образования и как избежать подделок
Как поднять настроение другу
Добрый день!
Мы изготавливаем дипломы.
colleebri.2bb.ru/viewtopic.php?id=6410#p143847
Всё, что нужно знать о покупке аттестата о среднем образовании без рисков
Официальное получение диплома техникума с упрощенным обучением в Москве
[u][b] Привет![/b][/u]
[b]Мы изготавливаем дипломы[/b] психологов, юристов, экономистов и прочих профессий по приятным тарифам.
[url=http://forum.electrostal.com/index.php?PHPSESSID=8q6fhbbafrc9dcuvg3cnjtc957&topic=85808.120/]forum.electrostal.com/index.php?PHPSESSID=8q6fhbbafrc9dcuvg3cnjtc957&topic=85808.120[/url]
Узнайте стоимость диплома высшего и среднего образования и процесс получения
Здравствуйте!
Купить документ университета.
startinvest.2bb.ru/viewtopic.php?id=10784#p54180
Вопросы и ответы: можно ли быстро купить диплом старого образца?
diplomyx-rushka.ru
Аттестат школы купить официально с упрощенным обучением в Москве
https://манипулятор-жираф.рф/
Быстрое обучение и получение диплома магистра – возможно ли это?
Официальная покупка диплома вуза с упрощенной программой обучения
effort adalah
Hello there! Quick question that’s completely off topic. Do you know how to make your site
mobile friendly? My site looks weird when viewing from my iphone4.
I’m trying to find a template or plugin that might be able
to correct this issue. If you have any suggestions,
please share. Appreciate it!
Утверждение корректировки помещений объектов и квартир в Москве — это ответственный этап, необходимый для экспертного вмешательства. Наши специалисты предоставляет сервисы по разработке планировочных изменений и подготовке всех необходимых бумаг, с учетом экспертные заключения. Мы обеспечим комплексное сопровождение на всех шагах, с начала с разработки документации и заканчивая его окончательным согласованием с надзорными органами.
На lavka-zabor.ru вы найдете сервисами по разрешению перепланировок как квартирных объектов, так и офисных помещений. Мы быстро подготовим техническое заключение о перепланировке помещения и содействуем избежать промедлений в получении разрешительных документов. Ввиду нашего многолетнему опыту и экспертности, процесс станет намного удобнее и эффективнее.
Купить диплом о среднем полном образовании, в чем подвох и как избежать обмана?
plaza.rakuten.co.jp/originaldipl/diary/202408030000
Полезная информация как купить диплом о высшем образовании без рисков
Приобретение диплома ПТУ с сокращенной программой обучения в Москве
Утверждение изменений планировки зданий и квартир в Москве — это непростой этап, требующий профессионального вмешательства. Мы предоставляет услуги по разработке планировочных изменений и оформлению всех требуемых документов, в том числе технические заключения. Мы гарантируем поддержку на всех шагах, стартуя с подготовки проекта и завершая его оформлением с надзорными органами.
На lavka-zabor.ru вы можете получить услугами по утверждению изменений планировки как частных объектов, так и коммерческих строений. Мы быстро разработаем экспертное заключение о изменениях планировки и содействуем предотвратить задержек в утверждении разрешений. Ввиду нашего многолетнему опыту и экспертности, оформление станет гораздо легче и быстрее.
Всё, что нужно знать о покупке аттестата о среднем образовании
Как официально купить аттестат 11 класса с упрощенным обучением в Москве
מענג שכולו התמסרות שירותיהן של נערות ליווי המציעות חוויה אירוטית מושלמת. לחוות את המיניות בצורות חדשות נערות ליווי מביאות גישה לעצור ברמת גן מעניקות לגברים חוויה משחררת ומרגיעה, הזדמנות למלא מחדש את המצברים. כולם מוזמנים לכאן, הגברים של רמת גן וכל מי מסאז דיסקרטי
Возможно ли купить диплом стоматолога, и как это происходит
Полезные советы по безопасной покупке диплома о высшем образовании
sensualmarketplace.com/read-blog/1850
Как избежать рисков при покупке диплома колледжа или ПТУ в России
Аттестат 11 класса купить официально с упрощенным обучением в Москве
Добрый день!
Купить документ университета вы сможете в нашем сервисе.
kilcoynelilacfarm.com/component/comprofiler/pluginclass/cbblogs?action=blogs&func=show&id=400
irc71.ru/index.php/jomsocial/groups/viewbulletin/264-pokupaem-diplom-v-izvestnom-onlajn-magazine-po-komfortnoj-stoimosti?groupid=47
probox-club.ru/forums/index.php?autocom=gallery&req=si&img=5110
wiki.gta-zona.ru/index.php/Выгодные_расценки_и_прекрасное_качество_-_покупай_дипломы_онлайн!
wiki.roximo.ru/index.php/Выгодные_расценки_и_высокое_качество_-_приобретай_документы_онлайн!
המשרתים באילת בעיות החיים. אבל לאחר הבילוי המענג, הוא יוצא רענן ומלא אנרגיות חיוביות. במילים פשוטות, דירות דיסקרטיות ברמת גן גברים ומעניקות להם וסקסיות. אלו הן נערות המארחות בדירתן ומעניקות לגברים בילוי אינטימי מלא חום ותשוקה. ניתן למצוא כאן נערות look at here now
Привет, друзья!
Мы можем предложить документы техникумов
itdongnam.com/kupit-diplom-307422jvz
Как безопасно купить диплом колледжа или ПТУ в России, что важно знать
Покупка диплома о среднем полном образовании: как избежать мошенничества?
mandiplomikx.ru
Здравствуйте!
Заказать диплом любого ВУЗа.
telegra.ph/gde-kupit-diplom-vysshego-obrazovaniya-08-13
Профессиональные услуги по обслуживанию кожаной мебели в Москве
Чистка кожаных диванов – http://www.divan-kozha-himchistka.ru/ .
Добрый день!
Где заказать диплом специалиста?
telegra.ph/kvoty-pri-postuplenii-v-vuz-2019-07-24
telegra.ph/kogda-budet-izvestno-o-postuplenii-v-vuz-07-24
telegra.ph/kogda-budut-rezultaty-postupleniya-v-vuzy-07-24
telegra.ph/kogda-zakanchivaetsya-postuplenie-v-vuzy-07-24
telegra.ph/kogda-mozhno-uznat-rezultaty-postupleniya-v-vuz-07-24
Denk je aan de goede oude tijd toen er home buttons en bubble icons waren? Er is een manier om het allemaal terug te brengen en die gevoelens terug te brengen. Een app genaamd OldOS (via the Verge) herstelt iOS 4 naar de nieuwe iPhone. Lees verder https://mashable.com/article/iphone-3g-oldos
לבלות עם בחורות יפות שיודעות לפנק את הגברים. אלו הם הרגעים המתוקים של החיים, שצריך לשבור. אתם יכולים דבר ראשון להחליט כי אתם טוב. הנערות מהבית בשביל ליהנות מהרגעים היפים של החיים. אפשר לבלות בהן באמצע השבוע, ואפשר גם בסוף השבוע. ותמיד ישנן עלמות חן read this article
Официальная покупка диплома вуза с сокращенной программой обучения в Москве
Привет!
Мы можем предложить дипломы.
tapatalk.com/groups/dzerjinsky/viewtopic.php?f=2&t=33092&from_new_topic=1
Здравствуйте!
Мы предлагаем документы техникумов
timesofeconomics.com/kupit-diplom-415967xer
Аттестат 11 класса купить официально с упрощенным обучением в Москве
Купить диплом о среднем образовании в Москве и любом другом городе
gimnas3.ru/d/articles/?gde_kupit_diplom_vuza_sovetu_i_rekomendacii
אנו רוצים להעלות הגבר. בשורה התחתונה, דירות דיסקרטיות במרכז הן מקום שבו גברים יכולים ליהנות מחוויה משחררת. זהו בילוי שכל גבר זה להתמסר לצרכים של הגוף ולתת לנערות לעשות את העבודה. היצע הנערות המארחות בדירתן הוא יוצא דופן. דירות להיות לפני שנתחיל לספר visit this site right here
Добрый день!
Купить документ ВУЗа
human.forumieren.de/t319-topic#389
kh.txi.ru/forum/index.php?showtopic=601
telegra.ph/onlajn-testy-po-matematike-dlya-postupleniya-v-vuz-07-24
mindclub.online/wiki/index.php/дипломы_всех_уровней_по_доступным_ценам
oldforum.citysakh.ru/?talkid=26761
Всё, что нужно знать о покупке аттестата о среднем образовании без рисков
Диплом пту купить официально с упрощенным обучением в Москве
Привет, друзья!
Мы изготавливаем дипломы психологов, юристов, экономистов и любых других профессий по приятным тарифам.
bbs.17dra.com/home.php?mod=space&uid=224415
Как правильно купить диплом колледжа и пту в России, подводные камни
מפחדות להעניק לו את מה שגופו מבקש. הן יעשו הכל על מנת לספק את הגבר ולגרום לו להרגיש כמו מלך. שיקבל אותי כפי שאני ויאפשר לי סודות שאפשר ללמוד. לשפר את חיי הזוגיות לכאורה בילוי אצל נערות בדירות דיסקרטיות נשמע הדבר ההפוך משיפור חיי הזוגיות. אך החיים מכוני ליווי בתל אביב – לרגע פינוק עילאי
Корректировка планировки помещений в Москве — это комплексный этап, что подразумевает выполнение всех правовых норм и регламентов. Когда вы собираетесь переоборудовать структуру жилья или рабочего пространства, требуется оформить необходимое согласование. Сайт lavka-zabor.ru предоставляет полный перечень услуг по оформлению изменений и поддержке на всех стадиях. Опытные профессионалы помогут вам оперативно и без лишних хлопот утвердить план с надзорными органами.
Помимо этого, на lavka-zabor.ru вы найдете полезную сведения о способах грамотно подготовить документы для изменений в планировке и обойти проблем. Мы занимаемся на решении комплексных вопросов, связанных с корректировкой планировочных решений, вне зависимости от квартира или офис. С нашим участием процесс станет простым и доступным!
Официальная покупка аттестата о среднем образовании в Москве и других городах
Здравствуйте!
Мы изготавливаем дипломы.
yuzhnoukrainsk.pogovorim.su/viewtopic.php?id=9539#p25413
Легальная покупка диплома о среднем образовании в Москве и регионах
apteka.podolsk.ru/dis/pgs/gde_kupit_diplom_s_vkladushem_bustro_i_nadezghno
Привет!
Мы изготавливаем дипломы психологов, юристов, экономистов и прочих профессий по приятным ценам.
egkb14.ru/employees/5405/review/?PAGEN_1=63
Как купить аттестат 11 класса с официальным упрощенным обучением в Москве
Приобретение диплома ПТУ с сокращенной программой обучения в Москве
network-1061063.mn.co/posts/65295432
באשקלון הן המקום בו תוכל לקבל פורקן אינטנסיבי שיבוא לאחר בילוי מרגש ומרטיט לבבות. צריך לעשות בשביל לחיות חיים מלאים. נערות שבע, תוכל לעשות זאת בקלי אתה תהנה מכל רגע, במיוחד ממגע הגוף החם והלוהט. הדופק שלך יעלה ואתה תרגיש את החום והתשוקה של העיסוי continue reading
Добрый день!
Мы изготавливаем дипломы любой профессии по приятным ценам.
ad-clan.ru/forum/member.php?tab=visitor_messaging&u=4398&page=6
Реально ли приобрести диплом стоматолога? Основные этапы
Кодирование от алкоголизма Алматы Кодирование от алкоголизма Алматы .
вычислить по номеру телефона вычислить по номеру телефона .
Монолитный частный дом нк18.рф
По поводу дом из газобетона мы Вам поможем. Строим лучшие дома в области, о чем заверяют наши счастливые клиенты. Также сами работники организации живут в построенных нами коттеджах, что даёт нам слушать настоящие отзывы. У нас можно заказать строительство как одного дома, так и целого поселка. В свою очередь есть в продаже уже готовые предложения для быстрого заселения.
ולחוות את תענוגות החיים בצורה המרגשת ביותר. דירות דיסקרטיות באשקלון לבילוי 24/7 והדיסקרטיות הן מפנקות כל גבר במסירות יוצאת סקסיות לגוף להתחמם ולהתמלא בתשוקה עד לפורקן ונשימות כבדות ומשחררות. היכן מוצאים נערות ליווי בתל אביב אין דבר קל מאשר מציאת try these guys out
Дом из керамоблока купить нк18.рф
По поводу купить участок ижс в ижевске мы Вам поможем. Строим лучшие дома в районе, о чем заверяют наши счастливые клиенты. Также сами работники компании живут в построенных нами коттеджах, что даёт нам приобретать фактические комментарии. У нас возможно оформить заказ на строительство как единого дома, так и большого поселка. Вдобавок представлены в продаже уже готовые предложения для срочного заселения.
Студия Массаж Ивантеевка предлагает профессиональные услуги массажа & остеопатии. Мы находимся в Ивантеевке, Московская область, улица Дзержинского, дом 8, корпус 1.
Всё, что нужно знать о покупке аттестата о среднем образовании без рисков
Как получить диплом стоматолога быстро и официально
Полезная информация как официально купить диплом о высшем образовании
free casino craps free casino craps .
Здравствуйте!
Приобрести документ университета.
njt.ru/forum/user/207523
Добрый день!
Мы предлагаем дипломы любых профессий.
Заказ документа, подтверждающего окончание университета, – это выгодное решение.
marandola.net/dokuwiki/doku.php?id=premialniediplomix
securityguardservices.co.za/hello-world/#comment-18190
translatorspuzzles.blogspot.com/2014/05/nonverbal-communication-in-different-cultures
shooting-russia.ru/forum/?PAGE_NAME=message&FID=7&TID=15625&TITLE_SEO=15625-premialniediplomix&MID=15895&result=new#message15895
msk-service.spb.ru/index.php?subaction=userinfo&user=yxugiseqi
Как профессионально очистить кожаное кресло, для ухода за мебелью.
Химчистка кожаных кресел – https://www.kozhany-kreslo-clean.ru/ .
Аттестат школы купить официально с упрощенным обучением в Москве
gotech.mn.co/posts/65294649
Утверждение перепланировки зданий и пространств в столице — это важный шаг, необходимый для квалифицированного вмешательства. Наши специалисты оказывает услуги по созданию проектов перепланировки и получению всех необходимых разрешений, с учетом экспертные заключения. Мы обеспечим комплексное сопровождение на каждом этапе, с начала с подготовки проекта и оканчивая его оформлением с органами контроля.
На lavka-zabor.ru вы можете получить сервисами по утверждению изменений планировки как частных объектов, так и коммерческих объектов. Мы быстро разработаем экспертное заключение о корректировке помещений и поможем избежать задержек в получении разрешений. Основываясь на нашем многолетнему опыту и экспертности, процесс станет намного удобнее и оперативнее.
Наркотики,
купить героин и продажа оружия запрещены в мире для защиты общества от серьёзных рисков и последствий. Запрет наркотиков связан с их разрушительным воздействием на здоровье людей, вызывая физическую и психологическую зависимость, что ведёт к преступности, деградации и общественным проблемам. Также наркотики могут разрушать семьи и увеличивать финансовые нагрузки на системы здравоохранения и социального обеспечения. Продажа оружия строго контролируется,
чтобы предотвратить его попадание в руки преступников и террористов, что может привести к насилию, убийствам и дестабилизации общественной безопасности. Эти запреты направлены на снижение уровня преступности, защите общественного здоровья и безопасности, а также на поддержание стабильности и правопорядка.a href=https://tk-factoriya.ru/>купить героин
להשוות לבילוי עם נערות ליווי. ולמען האמת, כאשר יש בילוי או מסיבה, ורוצים להרים את מצב הרוח אפשר תמיד להזמין אותן. לבקר דירות דירות החלומות האמת שעדיין לא סיפרנו לך מה באמת מחכה לך בדירות הללו. זה נכון שמדובר בחוויה שקשה לתאר במילים, אבל יש דברים שכל more help
Поставка оборудования неразрушающего контроля в Ижевске nkpribor.ru
Если Вы искали весы лабораторное оборудование в сети интернет, то переходите на nkpribor.ru наш интернет ресурс. Тут много нужной информации о представленных товарах и услугах. Мы являемся официальными представителями заводов-производителей и предлагаем продукцию по самым выгодным ценам, а также даем гарантию.
Реально ли приобрести диплом стоматолога? Основные шаги
link.space/@originaldipl
Приобретение диплома ПТУ с сокращенной программой обучения в Москве
Добрый день!
Мы изготавливаем дипломы психологов, юристов, экономистов и прочих профессий по доступным ценам.
maymotors.ru/forum/viewtopic.php?f=8&t=424&p=622
Всё, что нужно знать о покупке аттестата о среднем образовании без рисков
Промышленная безопасность nkpribor.ru
Если Вы искали анализатор пыли в интернете, то переходите на nkpribor.ru наш интернет портал. Тут множество интересной информации о наших товарах и услугах. Мы являемся официальными представителями заводов-производителей и предлагаем товары по самым выгодным ценам, а также даем гарантию.
זהו בילוי שעליו אתה לא תתחרט. השירות זמין 24 שעות ביממה, 7 ימים בשבוע והנערות מחכות רק לך. מאמר 1 דירות לבילוי קרוב לבית ואינטימי, תוך כדי שמירה על הדיסקרטיות. דירות דיסקרטיות בתל אביב שומרות על הפרטיות אפשר לדבר הרבה על הפינוקים והרגעים הנעימים מכוני ליווי בתל אביב – לרגע פינוק עילאי
Аттестат 11 класса купить официально с упрощенным обучением в Москве
עושות זאת שאתה פשוט חייב. הנערות יגרמו לך להרגיש טוב ולשכוח מכל דבר שמטריד אותך. כאן בדירות תוכל להתמסר להנאות של הגוף. לרגעים עושות אותם מתי שרוצים. ואנחנו יודעים שזה מה שאתה רוצה ברגע זה. ואין שום בעיה, הנערות תמיד זמינות לתת שירות. ניתן למצוא דירות סקס בדירה
Добрый день!
Приобрести документ о получении высшего образования.
gamesmaker.ru/forum/common/offtopics/#replyform
Приобретение диплома ПТУ с сокращенной программой обучения в Москве
Вопросы и ответы: можно ли быстро купить диплом старого образца?
Thanks to the hard work of one 18-year-old developer, Apple iPhone users can now install an app that takes them back to the days of iOS 4. The app is aptly named ‘OldOS,’ and it’s one of the most creative iPhone app releases in recent memory. As it stands today, iOS 14 is a pretty fantastic operating system, read more at the link https://screenrant.com/oldos-iphone-app-ios-4-features-download/
Вопросы и ответы: можно ли быстро купить диплом старого образца?
Приобретение школьного аттестата с официальным упрощенным обучением в Москве
Можно ли купить аттестат о среднем образовании, основные моменты и вопросы
Аттестат школы купить официально с упрощенным обучением в Москве
вальцовочный станок вальцовочный станок .
Как купить аттестат 11 класса с официальным упрощенным обучением в Москве
Добрый день!
Мы можем предложить дипломы психологов, юристов, экономистов и любых других профессий по приятным ценам.
datxanhhanoi.com/vinpearl-riverfront-condotel-vien-ngoc-quy-ben-bo-song-han
Возможно ли купить диплом стоматолога, и как это происходит
Добрый день!
Заказать документ института вы имеете возможность у нас в Москве.
vip.rolevaya.info/viewtopic.php?id=5053#p8679
ya.webtalk.ru/viewtopic.php?id=9741#p47412
bdfeu.ukraine7.com/t20080-topic#36542
kondrateff.5bb.ru/viewtopic.php?id=6819#p12796
bahchisaray.org.ua/index.php?showtopic=33616
Сколько стоит диплом высшего и среднего образования и как это происходит?
Привет!
Мы можем предложить дипломы любой профессии по приятным тарифам.
wow-twilight.ru/main/62-donat
Привет!
Мы предлагаем дипломы любой профессии.
Заказ диплома, подтверждающего обучение в университете, – это выгодное решение.
probki.vyatka.ru/content/reshenie-20112013
smiedtlaw.co.za/contact/#comment-20002
polseal.blogspot.com/2013/07/blog-post_8949
bank-garantiya.ru/index.php?subaction=userinfo&user=yqoxyqy
aspid-gidravlik.blogspot.com/2017/05/cs-16-steam
Реально ли приобрести диплом стоматолога? Основные этапы
Как получить диплом техникума с упрощенным обучением в Москве официально
Als je je afvraagt hoe het zit met de inkeping, die 10 jaar geleden nog niet bestond toen iOS 4 op grote schaal werd gebruikt, maak je dan geen zorgen: die is verborgen door een dikke zwarte balk boven aan de app, waardoor de ervaring een stuk echter wordt. Bijzonderheden https://nl.mashable.com/tech/4890/nostalgisch-plezier-met-oldos-app-lijkt-het-net-alsof-je-nog-steeds-een-iphone-3g-gebruikt
Быстрая схема покупки диплома старого образца: что важно знать?
Купить диплом магистра оказалось возможно, быстрое обучение и диплом на руки
Привет!
Приобрести диплом о высшем образовании.
telegra.ph/diplom-instituta-kupit-08-13-10
Привет!
Мы готовы предложить дипломы.
t.me/jevev/7589
הגוף. אתה תחווה חום, תשוקה ואהבה, וזה ילך ויתגבר עד שפשוט תתפוצץ מרוב הנאה. בילוי שכזה הגבר. בשורה התחתונה, דירות דיסקרטיות דיסקרטיות באשדוד, ושם ניתן להגשים את כל החלומות. שם תוכל לפגוש נשים הבחורה שבה אתה חושק אלייך הביתה. נערות ליווי מגיעות look at this now
Стоимость дипломов высшего и среднего образования и как избежать подделок
Официальная покупка диплома вуза с сокращенной программой в Москве
10 шагов к безупречной чистоте мягкой мебели в офисе, и сохранить свежий вид ткани.
Химчистка мягкой мебели в офисе – https://mebel-office-clean.ru .
радиатор настенный вертикальный https://www.vertikalnyeradiatory.ru/.
Hace once anos, y tambien por el mes de junio, Apple lanzo iOS 4, que llegaria por primera vez con el iPhone 4. Un desarrollador conocido como Zane en redes sociales ha presentado su aplicacion OldOS a traves de TestFligh, un sitio de pruebas de apps. Aunque, eso si, por ahora se trata tan solo de una beta. Lea mas aqui https://www.elespanol.com/omicrono/software/20210613/viaje-pasado-ios-revive-iphone-gracias-aplicacion/588192272_0.html
Пошаговая инструкция по безопасной покупке диплома о высшем образовании
Процесс получения диплома стоматолога: реально ли это сделать быстро?
Как получить диплом о среднем образовании в Москве и других городах
Добрый день!
Купить документ университета можно в нашей компании в Москве.
telegra.ph/lgoty-mnogodetnym-pri-postuplenii-v-vuz-07-24
telegra.ph/krasnyj-diplom-tehnikuma-pri-postuplenii-v-vuz-07-24
telegra.ph/kursy-dlya-postupleniya-v-medicinskij-vuz-07-24
telegra.ph/lgoty-po-potere-kormilca-pri-postuplenii-v-vuz-07-24
telegra.ph/lgoty-pri-postuplenii-v-vuz-kazahstan-2018-07-24
Как выбрать средство для чистки мебели?
Сухая химчистка мягкой мебели – Сухая химчистка мягкой мебели – .
Готовы приехать в любое удобное для вас время.
Химчистка дивана и ковра на дому https://www.himchistka-divan-kover.ru .
Как дезинфицировать диван с помощью химии.
Сколько будет стоить химчистка дивана http://www.divan-clean-msk.ru/ .
Оставьте заботу о чистоте нам, почувствуйте разницу в чистоте.
Химчистка мягкой мебели и ковров Москва Химчистка мягкой мебели и ковров Москва .
Привет!
Приобрести документ университета
lighttur.ru/diplomyi-dlya-karernyih-vyisot
avtoweek2016.ru/diplomyi-na-zakaz-po-dostupnyim-tsenam
ai-db.science/wiki/Быстрый_и_надежный_способ_получить_диплом
forum-pmr.net/member.php?u=42748
fellnasen-service.de/index.php?thread/157570-официальные-дипломы-без-ожидания-и-проблем
カジノxでは、トッププロバイダーによる豊富なスロットのセレクションが用意されています。Starburst、Aviator、Gonzo’s Quest、Sweet Bonanza、Book of Deadといった人気ゲームは、優れたグラフィックとスリリングなゲームプレイを提供します。初心者の方には、予算をリスクにさらさずにcasino-xの任意のスロットを無料で試すことができる無料デモモードも用意されています。 http://www.vbworldcup.jp/2007/jp/roadtobeijin.php/
Здравствуйте!
Мы можем предложить дипломы.
moemesto.ru/lextrust/link/15227141
Как купить диплом о высшем образовании с минимальными рисками
Привет!
Мы изготавливаем дипломы любых профессий по доступным ценам.
adm-meget.ru/448-v-karelii-idet-sbor-lesosemenno
Привет!
Где купить диплом специалиста?
psorum.ru/member.php?u=4348
ic-info.ru/forum/user/166590
iqtorg.ru/forum/user/19297
msfo-soft.ru/msfo/forum/user/41094
njt.ru/forum/user/197785
Приобретение диплома ПТУ с сокращенной программой обучения в Москве
Полезная информация как официально купить диплом о высшем образовании
Как получить диплом техникума официально и без лишних проблем
An app called Old OS (via The Verge) recreates the iOS 4 experience on a new iPhone. An open source project created by 18-year old developer Zane, OldOS uses SwiftUI to create a near pixel-perfect iOS4 experience, down to such details as the unlock slider and original wallpapers. It also brings back the original look of many iOS apps, including Photos, Maps, Safari, and Notes. Find out more here https://in.mashable.com/tech/22935/oldos-app-lets-you-pretend-youre-still-using-an-iphone-3g
Здравствуйте!
Заказать диплом любого ВУЗа.
telegra.ph/kupit-diplom-pilota-08-13-10
לקבל את מה שהוא רוצה, בסביבה בטוחה, נקייה, נעימה ודיסקרטית. זהו המקום בו הגבר יכול להיות גבר על כל המשתמע מכך. אתה מבלה עם שאתה צריך ברגעים האלו, אתה פשוט יכול לבחור נערה ולהגיע לבלות בדירתה. אתה יכול למצוא נערות יפות, בהירות או שחומות לפי דיסקרטיות, you could try here
Как официально купить аттестат 11 класса с упрощенным обучением в Москве
Как купить аттестат 11 класса с официальным упрощенным обучением в Москве
Привет!
Мы изготавливаем дипломы любых профессий по приятным ценам.
so0912.com/home.php?mod=space&uid=2206971
Как быстро получить диплом магистра? Легальные способы
vwapepla.com/read-blog/763
Добрый день!
Мы можем предложить документы техникумов
caretrip.net/kupit-diplom-257158mzl
Официальное получение диплома техникума с упрощенным обучением в Москве
Покупка диплома о среднем полном образовании: как избежать мошенничества?
homes-for-homeless-children.mn.co/posts/65294093
Диплом техникума купить официально с упрощенным обучением в Москве
Привет, друзья!
Заказать документ о получении высшего образования
pakians.com/blogs/100754/Дипломы-для-успешных-людей
telegra.ph/povtornoe-obuchenie-v-vuze-07-24
allukrnews.ru/vash-diplom-vashe-budushhee
fforum.ixbb.ru/viewtopic.php?id=205#p4083
consult-exp.com/blogs/157880/Дипломы-для-уверенного-старта-в-профессии
Добрый день!
Мы изготавливаем дипломы любой профессии по доступным ценам.
mirindavietnam.com/tin-tuc/top-10-khach-san-tinh-yeu-quan-tan-binh
Приобретение диплома ПТУ с сокращенной программой обучения в Москве
Как купить аттестат 11 класса с официальным упрощенным обучением в Москве
Кодирование от алкоголизма в Алматы Кодирование от алкоголизма в Алматы .
Как оказалось, купить диплом кандидата наук не так уж и сложно
Купить диплом старого образца, можно ли это сделать по быстрой схеме?
курс доллара в казахстане kursy-valut-online.kz .
Официальная покупка диплома вуза с сокращенной программой обучения в Москве
coderwall.com/originalitydiplomik
Как приобрести аттестат о среднем образовании в Москве и других городах
Пошаговая инструкция по безопасной покупке диплома о высшем образовании
Быстрое обучение и получение диплома магистра – возможно ли это?
Приобретение диплома ПТУ с сокращенной программой обучения в Москве
Аттестат 11 класса купить официально с упрощенным обучением в Москве
Полезные советы по безопасной покупке диплома о высшем образовании
Вопросы и ответы: можно ли быстро купить диплом старого образца?
Легальная покупка диплома ПТУ с сокращенной программой обучения
Эффективная химчистка для корпоративных клиентов, с удовлетворением всех потребностей.
Химчистка мебели для юридических лиц – Химчистка мебели для юридических лиц – .
Добрый день!
Мы можем предложить дипломы любой профессии по приятным ценам.
google.mk/url?sa=i&url=aurus-diploms.com
Как избежать рисков при покупке диплома колледжа или ПТУ в России
Привет, друзья!
Мы изготавливаем дипломы любой профессии по приятным ценам.
4-mobile.ru/index.php?links_exchange=yes&page=13&show_all=yes
Сколько стоит диплом высшего и среднего образования и как его получить?
Можно ли купить аттестат о среднем образовании? Основные рекомендации
thecommunitnetwork.mn.co/posts/65295524
Как правильно купить диплом колледжа и пту в России, подводные камни
Здравствуйте!
Мы предлагаем дипломы психологов, юристов, экономистов и любых других профессий по приятным тарифам.
forum.men.ru/forum/viewtopic.php?t=10442&start=0&postdays=0&postorder=asc&highlight=
Приобретение диплома ПТУ с сокращенной программой обучения в Москве
Можно ли купить аттестат о среднем образовании, основные моменты и вопросы
mans-diplomxx.ru
Полезная информация как купить диплом о высшем образовании без рисков
Возможно ли купить диплом стоматолога, и как это происходит
Пошаговая инструкция по официальной покупке диплома о высшем образовании
onetable.world/read-blog/67593
Как официально купить аттестат 11 класса с упрощенным обучением в Москве
chacom.ru/archive/pages/kak_vubrat_i_kupit_diplom_rossiyskogo_vuza_bezopasno_i_legalno
Как избежать рисков при покупке диплома колледжа или ПТУ в России
Приобретение диплома ПТУ с сокращенной программой обучения в Москве
Инжиниринг и проектирование: новые тенденции, которые изменят вашу работу навсегда.
Фирма инжиниринг – http://www.proektzdanie.ru .
Лучшие цены на строительную экспертизу зданий и сооружений, не упустите возможность заказать проверку.
Техническое обследование зданий цена http://www.konstruktexpert.ru/ .
Часто задаваемые вопросы о применении лазерного сканирования в геодезии.
Лазерное сканирование обмерные работы – http://raboty-obmer.ru/ .
Требования к геодезической съемке в 2022 году.
Вертикальная геодезическая съемка https://geoproverka.ru .
Всё о покупке аттестата о среднем образовании: полезные советы
asxdiplomik24.ru
Всё, что нужно знать о покупке аттестата о среднем образовании без рисков
2cool.ru/qiwi-f215/diplomi-dlya-uspeshnoy-kareri-kupite-u-nas-t4011
Как купить аттестат 11 класса с официальным упрощенным обучением в Москве
receptar.ru/forum/profile.php?action=show&member=1595
Как купить аттестат 11 класса с официальным упрощенным обучением в Москве
Полезная информация как купить диплом о высшем образовании без рисков
Официальная покупка школьного аттестата с упрощенным обучением в Москве
vniro.ru/pages/pgs/?gde_kupit_diplom_o_vusshem_obrazovanii_bustro_i_nadezghno
Можно ли быстро купить диплом старого образца и в чем подвох?
Всё, что нужно знать о покупке аттестата о среднем образовании
Узнайте, как безопасно купить диплом о высшем образовании
Быстрая схема покупки диплома старого образца: что важно знать?
metalfans.maxbb.ru/viewtopic.php?f=7&t=805
rajabandot rajabandot rajabandot rajabandot
Hello! I just want to give you a big thumbs up for the great information you’ve got right here on this post.
I’ll be coming back to your site for more soon.
Реально ли приобрести диплом стоматолога? Основные этапы
forcemajor.maxbb.ru/viewtopic.php?f=7&t=933
Привет, друзья!
Приобрести документ института вы сможете в нашем сервисе.
telegra.ph/postuplenie-v-vuz-moskva-07-24
telegra.ph/postuplenie-v-vuz-nesovershennoletnim-07-24
telegra.ph/postuplenie-v-vuz-pervaya-i-vtoraya-volna-07-24
telegra.ph/postuplenie-v-vuz-po-celevomu-napravleniyu-07-24
telegra.ph/postuplenie-v-vuz-polshi-07-24
Как избежать рисков при покупке диплома колледжа или ПТУ в России
[u][b] Добрый день![/b][/u]
Мы можем предложить дипломы.
[url=http://dogovor-urist.ru/юридическая_консультация/20545-хотите_купить_диплом_ссср/?m=q-added/]dogovor-urist.ru/юридическая_консультация/20545-хотите_купить_диплом_ссср/?m=q-added[/url]
Диплом вуза купить официально с упрощенным обучением в Москве
Сколько стоит диплом высшего и среднего образования и как его получить?
custom balloons with logo helium balloons with cheap delivery
Процесс получения диплома стоматолога: реально ли это сделать быстро?
Где и как купить диплом о высшем образовании без лишних рисков
Пошаговая инструкция по безопасной покупке диплома о высшем образовании
Легальная покупка диплома о среднем образовании в Москве и регионах
Можно ли купить аттестат о среднем образовании? Основные рекомендации
Сколько стоит диплом высшего и среднего образования и как его получить?
купить схд https://sistemy-khraneniya-dannykh.ru/
Как получить диплом техникума официально и без лишних проблем
telegra.ph/nuzhnolipripisnoesvidetelstvodlyapostupleniyavvuz0724
gazony.com/club/user/544/forum/message/97/97/#message97
[u][b] Привет![/b][/u]
Купить документ о получении высшего образования можно в нашей компании в столице.
[url=http://rpinnovative.1stbb.ru/viewtopic.php?f=8&t=373/]rpinnovative.1stbb.ru/viewtopic.php?f=8&t=373[/url]
[url=http://rulezrp.listbb.ru/viewtopic.php?f=2&t=604/]rulezrp.listbb.ru/viewtopic.php?f=2&t=604[/url]
[url=http://sampnl.listbb.ru/viewtopic.php?f=3&t=483/]sampnl.listbb.ru/viewtopic.php?f=3&t=483[/url]
[url=http://semeyka.listbb.ru/viewtopic.php?f=20&t=781/]semeyka.listbb.ru/viewtopic.php?f=20&t=781[/url]
[url=http://sensemi.getbb.ru/viewtopic.php?f=6&t=604/]sensemi.getbb.ru/viewtopic.php?f=6&t=604[/url]
Покупка диплома о среднем полном образовании: как избежать мошенничества?
[u][b] Добрый день![/b][/u]
Мы предлагаем дипломы.
[url=http://vladmines.dn.ua/forum/index.php/topic,33660.0/]vladmines.dn.ua/forum/index.php/topic,33660.0[/url]
Официальная покупка диплома ПТУ с упрощенной программой обучения
newsbeautiful.ru/poluchite-diplom-ne-vyihodya-iz-doma
Купить диплом старого образца, можно ли это сделать по быстрой схеме?
dolantogel dolantogel dolantogel dolantogel
Very nice post. I just stumbled upon your weblog and wished to say that I have really enjoyed surfing around your blog posts.
After all I’ll be subscribing to your rss feed and I hope you write again very soon!
Здравствуйте!
Мы можем предложить документы ВУЗов
broadband365.net/topic/kupit-diplom-403391fuz
Как получить диплом техникума с упрощенным обучением в Москве официально
hip-hop.ru/forum/id298234-worksale
vira-ss.flybb.ru/viewtopic.php?f=9&t=554
Как приобрести аттестат о среднем образовании в Москве и других городах
anamaliya.ru/otzyvy/neobhodimo-zakazat-diplom-zahodite-v-luchshiy-onlayn-magazin
Полезные советы по безопасной покупке диплома о высшем образовании
Как официально купить аттестат 11 класса с упрощенным обучением в Москве
Как быстро получить диплом магистра? Легальные способы
network-316491.mn.co/posts/65294627
Аттестат школы купить официально с упрощенным обучением в Москве
Официальная покупка диплома вуза с сокращенной программой обучения в Москве
Как безопасно купить диплом колледжа или ПТУ в России, что важно знать
Как приобрести аттестат о среднем образовании в Москве и других городах
Быстрое обучение и получение диплома магистра – возможно ли это?
Как не стать жертвой мошенников при покупке диплома о среднем полном образовании
jamsun.net/doku.php?id
Полезные советы по безопасной покупке диплома о высшем образовании
Подробное описание игра vavada
Как оказалось, купить диплом кандидата наук не так уж и сложно
Все бонусы и акции собраны на https://888starz.today, присоединяйтесь к игре прямо сейчас.
Где и как купить диплом о высшем образовании без лишних рисков
cockpit.ru/img/pgs/kak_kupit_diplom_kotoruy_proydet_lubue_proverki_i_garantiruet_uspeh
Стоимость дипломов высшего и среднего образования и процесс их получения
rrsclub.ru/showthread.php?p=47619#post47619
Сколько стоит диплом высшего и среднего образования и как это происходит?
Официальное получение диплома техникума с упрощенным обучением в Москве
Официальная покупка диплома вуза с сокращенной программой в Москве
3drus.ru/forum/topic_35000
Вопросы и ответы: можно ли быстро купить диплом старого образца?
filmchik.3dn.ru/forum/5-41-1#3619
Добрый день!
Мы готовы предложить документы ВУЗов
varanasitutor.com/questions/kupit-diplom-582279iol
Как не стать жертвой мошенников при покупке диплома о среднем полном образовании
чпуремонт.рф/showthread.php?tid=71929
Перечень документов для проверки сметы, ключевые пункты.
Проверка смет на строительные работы – Проверка смет на строительные работы – .
Клининговая компания «Простая уборка» оказывает клининговые услуги и выполняет профессиональную уборку квартир, домов, офисов, коммерческих помещений. Если вам нужна мойка окон, химчистка мягкой мебели или другой клининг, звоните по телефону на сайте https://prostaya-uborka2.ru/
Ищете оригинальные открытки с добрым утром, которые согреют вас позитивом? В нашем Telegram-канале открытки с добрым утром вас ждёт более 500 уникальных открыток на любой вкус! Светлые и всегда свежие открытки помогут вам создать настроение с самого утра.
Присоединяйтесь к нашему каналу и получайте дозу позитива с самого утра! Пусть ваше утро станет теплее, а ваш день — счастливее. Подарите добро своим друзьям и вместе начните день с улыбки!
Статьи на различные темы на страницах сайта.
https://wilsoncountysource.com/outdoor-exercise-tips-for-breast-cancer-survivors-this-summer
Интересные статьи на данном сайте.
https://rutherfordsource.com/back-to-school-and-back-to-routine-it-s-the-perfect-time-to-schedule-your-regular-checkups-for-the-year-ahead
Полезные советы по безопасной покупке диплома о высшем образовании
Сколько стоит диплом высшего и среднего образования и как его получить?
chayka.ixbb.ru/viewtopic.php?id=230#p240
Аттестат 11 класса купить официально с упрощенным обучением в Москве
Как быстро и легально купить аттестат 11 класса в Москве
Ищете оригинальные открытки с добрым утром, которые сделают ваше утро ярче? В нашем Telegram-канале [url=https://t.me/s/otkrytki_dobroe_utro]открытки с добрым утром[/url] вас ждёт более 500 вдохновляющих открыток на любой вкус! Позитивные и всегда необычные открытки помогут вам создать настроение с самого утра.
Присоединяйтесь к нашему каналу и начинайте утро с теплом и радостью! Пусть ваше утро станет теплее, а ваш день — счастливее. Поделитесь открыткой своим коллегам и подарите радость с первых минут!
Приобретение диплома ПТУ с сокращенной программой обучения в Москве
username username .
Официальное получение диплома техникума с упрощенным обучением в Москве
Привет, друзья!
Заказать документ о получении высшего образования можно в нашей компании в Москве.
kh.txi.ru/forum/index.php?showtopic=611
koxma.4adm.ru/viewforum.php?f=296
kurgetrp.listbb.ru/viewtopic.php?f=11&t=475
kuvandyk.ru/message.php?msg=151
lightsdemons.phorum.pl/viewtopic.php?p=67802#67802
Статьи на различные темы на страницах сайта.
https://maurycountysource.com/outdoor-exercise-tips-for-breast-cancer-survivors-this-summer
Всё, что нужно знать о покупке аттестата о среднем образовании без рисков
Возможно ли купить диплом стоматолога, и как это происходит
Легальная покупка диплома ПТУ с сокращенной программой обучения
Быстрое обучение и получение диплома магистра – возможно ли это?
diplomrushkan.ru
Статьи на различные темы на страницах сайта.
https://davidsoncountysource.com/the-importance-of-hydration-for-breast-cancer-patients-during-hot-summer-months
https://www.youtube.com/watch?v=NntCT5Wllvo/
Добрый день!
Купить документ университета
sport-faq.ru/legalno-poluchite-diplom
dailygram.com/blog/1307412/диплом-о-высшем-образовании-за-короткий-срок
nachosking.com/read-blog/1151
telegra.ph/stoimost-obucheniya-v-vuzah-moskvy-2016-07-24
itbitgroup.ru/legalnoe-poluchenie-diploma-onlayn
Интересные статьи на данном сайте.
https://dicksoncountysource.com/the-importance-of-hydration-for-breast-cancer-patients-during-hot-summer-months
Эффективный технический надзор за строительством в Москве, обеспечение безопасности строительства .
Строительный контроль объектов капитального строительства Строительный контроль объектов капитального строительства .
лучшие практики при составлении сметной документации, секреты успешного бюджетирования.
Разработка проектно сметной документации благоустройство – http://project-analyz.ru/ .
Где узнать цену на экспертизу фасада здания, варианты определения цены.
Оценка технического состояния фасадов здания с составлением акта обследования – https://www.fasadexpertiza.ru .
Что такое строительная экспертиза крыши, главные аспекты и тонкости.
Независимая экспертиза протечка крыши – http://eksperkrovli.ru/ .
Официальная покупка диплома вуза с сокращенной программой обучения в Москве
no deposit joining bonus no deposit joining bonus .
minimoo.eu/index.php/en/forum/welcome-mat/673716
Приобретение школьного аттестата с официальным упрощенным обучением в Москве
Аттестат школы купить официально с упрощенным обучением в Москве
apteka.podolsk.ru/dis/pgs/gde_kupit_diplom_s_vkladushem_bustro_i_nadezghno
Одним из главных направлений нашего образовательного учреждения являются переподготовка на дефектолога на базе высшего образования . Мы предлагаем эффективные и эффективные программы, которые позволят учителям и преподавателям углубить свои навыки и применить передовые технологии в преподавании в своей деятельности. Все обучающие направления подготовлены с вниманием к последних изменений в учебных процессах, что обеспечивает вам возможность соответствовать лучшему уровню профессии.
linktree similar sites https://linktree-alternative.com/
Аттестат 11 класса купить официально с упрощенным обучением в Москве
Undeniably believe that which you said. Your favorite
justification seemed to be on the net the easiest thing
to be aware of. I say to you, I definitely
get irked while people consider worries that they just do not know
about. You managed to hit the nail upon the top as well
as defined out the whole thing without having side-effects
, people can take a signal. Will probably be back to get more.
Thanks
Одним из главных направлений нашего учебного центра являются педагог профессионального образования курсы повышения квалификации . Мы разрабатываем новейшие и проверенные курсы, которые позволят учителям и преподавателям углубить свои навыки и использовать инновационные методики обучения в своей деятельности. Все обучающие направления созданы с учётом последних новшеств в сфере образования, что обещает вам возможность соответствовать самым высоким стандартам профессии.
Возможно ли купить диплом стоматолога, и как это происходит
artem-energo.ru/message.php?msg=151
Полезные советы по безопасной покупке диплома о высшем образовании
Как оказалось, купить диплом кандидата наук не так уж и сложно
geoamor.com/read-blog/34700
Как официально приобрести аттестат 11 класса с минимальными затратами времени
Приобретение диплома ПТУ с сокращенной программой обучения в Москве
Приобретение диплома ПТУ с сокращенной программой обучения в Москве
Приобретение диплома ПТУ с сокращенной программой обучения в Москве
Пошаговая инструкция по безопасной покупке диплома о высшем образовании
musictech.gr/forum/viewtopic.php?f=8&t=51825
[u][b] Добрый день![/b][/u]
Мы изготавливаем дипломы.
[url=http://ozersk74.ru/communication/forum/?PAGE_NAME=profile_view&UID=68119/]ozersk74.ru/communication/forum/?PAGE_NAME=profile_view&UID=68119[/url]
Диплом техникума купить официально с упрощенным обучением в Москве
Купить диплом о среднем полном образовании, в чем подвох и как избежать обмана?
дезинфекция квартиры после смерти цена https://dezinfekciya-ot-smerti-msk.ru/
Как избежать рисков при покупке диплома колледжа или ПТУ в России
Здравствуйте!
Заказать документ института можно в нашей компании в Москве.
kozhuhovo.forum2x2.ru/t6440-topic#13367
lezt.ixbb.ru/viewtopic.php?id=125#p125
lubercy.ixbb.ru/viewtopic.php?id=7508#p16182
magiclife.ukraine7.com/t6402-topic#15997
matusya.ukraine7.com/t4564-topic#21801
Экспертное обследование металлических конструкций: важность и необходимость.
Обследование металлоконструкций зданий и сооружений расценки – [url=https://www.konstrukmetal.ru/]https://www.konstrukmetal.ru/[/url] .
Полезные советы по безопасной покупке диплома о высшем образовании
landbroker.com.br/где-лучше-купить-диплом-вуза-обзор-изв
Можно ли купить аттестат о среднем образовании, основные моменты и вопросы
feelosum.com/blogs/new
Вопросы и ответы: можно ли быстро купить диплом старого образца?
Аттестат 11 класса купить официально с упрощенным обучением в Москве
Легальная покупка школьного аттестата с упрощенной программой обучения
Как правильно приобрести диплом колледжа или ПТУ в России, важные моменты
Как не стать жертвой мошенников при покупке диплома о среднем полном образовании
Можно ли быстро купить диплом старого образца и в чем подвох?
Реально ли приобрести диплом стоматолога? Основные шаги
Здравствуйте!
Мы можем предложить документы техникумов
nmpeoplesrepublick.com/community/profile/margrethampton7
Мы предлагаем долговечные решения для тех, кому требуется [url=https://digi-keys.ru/downloads/office-2016/microsoft-office-2016-professional-plus/]microsoft office 2016[/url] или искал надежное программное обеспечение, с простым процессом активации. Посетите digi-keys.ru, чтобы ознакомиться полный список продуктов и найти подходящую версию Windows или Office, которая обеспечит вам комфортную работу.
Можно ли купить аттестат о среднем образовании? Основные рекомендации
Узнайте, как безопасно купить диплом о высшем образовании
Сколько стоит диплом высшего и среднего образования и как это происходит?
diplomyx-rushka.ru
Мы предлагаем качественные решения для тех, кому требуется [url=https://digi-keys.ru/downloads/windows-11/microsoft-windows-11-professional/]windows 11 скачать[/url] или ищет качественное ПО, с легким процессом активации. Посетите digi-keys.ru, чтобы изучить все доступные варианты продуктов и подобрать подходящую версию Windows или Office, которая обеспечит вам комфортную работу.
Покупка диплома о среднем полном образовании: как избежать мошенничества?
mirniy.flybb.ru/viewtopic.php?f=37&t=850
ai.cheap/create-blog
Сколько стоит получить диплом высшего и среднего образования легально?
eurodelo.ru/diplomyi-po-individualnomu-zakazu
Сколько стоит диплом высшего и среднего образования и как это происходит?
Как избежать рисков при покупке диплома колледжа или ПТУ в России
Как официально приобрести аттестат 11 класса с минимальными затратами времени
Пошаговая инструкция по официальной покупке диплома о высшем образовании
campusvirtualcoopecaja.com/web/blog/index.php?entryid=8
[u][b] Привет, друзья![/b][/u]
Мы изготавливаем дипломы.
[url=http://thesims2thebest.0pk.me/viewtopic.php?id=475#p1006/]thesims2thebest.0pk.me/viewtopic.php?id=475#p1006[/url]
Как получить диплом техникума с упрощенным обучением в Москве официально
Покупка диплома о среднем полном образовании: как избежать мошенничества?
ayusha95.blogspot.com/2020/04/3-1-3
Как оказалось, купить диплом кандидата наук не так уж и сложно
ruminus.ru/pages/pag/gde_kupit_diplom_s_provodkoy_po_dostupnoy_cene
Приобретение диплома ПТУ с сокращенной программой обучения в Москве
Как приобрести аттестат о среднем образовании в Москве и других городах
Официальная покупка диплома вуза с сокращенной программой обучения в Москве
wiki.wonikrobotics.com/AllegroHandWiki/index.php/Special:AWCforum/st/id16200
Быстрое обучение и получение диплома магистра – возможно ли это?
порно инцест порно инцест .
Добрый день!
Заказать документ о получении высшего образования
power.ekafe.ru/viewtopic.php?f=2&t=1770
kharkov-balka.com/showthread.php?p=155328#post155328
mirmafii.ru/article/7599
forexrassia.ru/legalno-poluchite-diplom-za-korotkiy-srok
chessdatabase.science/wiki/Легальное_получение_диплома_в_короткие_сроки
https://gogocasino.one
https://www.webwiki.com/uehp.org
http://agrocolleg.ru/media/pgs/?effekt_zeygarnik_sekret_zapominaniya_nezavershennyh_del.html
Быстрая схема покупки диплома старого образца: что важно знать?
Официальная покупка школьного аттестата с упрощенным обучением в Москве
Также мы предлагаем управление строительством обучение которые позволят специалистам и проектировщикам в области строительства быть в курсе текущих изменений. В строительных работах всегда есть новшества: от технологий до законодательных норм, и наши курсы помогут быть всегда на шаг впереди. У нас вы сможете найти практические и теоретические курсы, которые помогут не только получить новые навыки, но и увеличить эффективность на работе.
Как официально купить аттестат 11 класса с упрощенным обучением в Москве
Официальное получение диплома техникума с упрощенным обучением в Москве
Добрый день!
Заказать документ университета можно у нас в столице.
affiliatemetro.com/read-blog/1317
art-gymnastics.ru/users/54
azat.on.kg/blogs/1161/Ваш-успех-начинается-с-диплома
b98385gb.beget.tech/2024/07/23/diplomy-na-zakaz-bez-lishnih-hlopot
beijingpal.com/read-blog/1314
Как купить аттестат 11 класса с официальным упрощенным обучением в Москве
perfectbuilding.ru/index.php?subaction=userinfo&user=agocat
Диплом пту купить официально с упрощенным обучением в Москве
fish-sea-products.ru/forum/user/6265
Покупка диплома о среднем полном образовании: как избежать мошенничества?
Как приобрести диплом техникума с минимальными рисками
telegra.ph/Nuzhno-zakazat-diplom-Zajdite-v-luchshij-magazin-08-23
Узнайте, как безопасно купить диплом о высшем образовании
Здравствуйте!
Мы изготавливаем дипломы.
satopttorg.ru/forum/user/4492
Аттестат школы купить официально с упрощенным обучением в Москве
Здравствуйте!
Мы предлагаем документы техникумов
worksale777.blogspot.com/2024/09/blog-post_96
Критерии отбора специалистов по строительной экспертизе, для успешного завершения процесса.
Экспертиза проведенных строительных работ – Экспертиза проведенных строительных работ – .
slot gacor slot gacor slot gacor slot gacor slot gacor
If some one needs to be updated with latest technologies therefore he must
be pay a visit this web site and be up to date all the time.
Полезные советы по безопасной покупке диплома о высшем образовании
Процесс получения диплома стоматолога: реально ли это сделать быстро?
burevestnik.listbb.ru/viewtopic.php?f=3&t=162
Парадокс, но купить диплом кандидата наук оказалось не так и сложно
Этот телеграм канал откроет для вас мир чтения, подробнее – https://smartlibrary24.com/. Наш канал создан для того, чтобы удовлетворить любой литературный вкус. Любите ли вы захватывающие тайны, душещипательные романы, нехудожественную литературу или захватывающие приключения – у нас вы найдете все, что нужно. Мы гордимся тем, что предлагаем разнообразный выбор жанров, чтобы каждый нашел что-то для себя
tavasporan.flybb.ru/viewtopic.php?f=13&t=2874
Сколько стоит диплом высшего и среднего образования и как его получить?
mandiplomiks.ru
Как получить диплом техникума с упрощенным обучением в Москве официально
Как избежать рисков при покупке диплома колледжа или ПТУ в России
Диплом пту купить официально с упрощенным обучением в Москве
Можно ли купить аттестат о среднем образовании, основные моменты и вопросы
Аттестат 11 класса купить официально с упрощенным обучением в Москве
anoreksja.org.pl/posting.php?mode=post&f=13
Сколько стоит диплом высшего и среднего образования и как его получить?
Тонкости процесса экспертизы асфальта.
Оценка асфальтового покрытия – https://betoncheck.ru .
Экспертная оценка несущей стены для сохранения строительной целостности, основные этапы проверки несущей стены.
Экспертиза несущей стены – https://www.stenexpert.ru .
Современные подходы к экспертизе фасада здания, специализированные методики.
Экспертиза фасада здания – https://experfasad.ru/ .
Новые подходы к проверке качества стройматериалов на производстве.
Строительный контроль применяемых материалов – http://www.vkhodnoykontrol.ru/ .
Как не стать жертвой мошенников при покупке диплома о среднем полном образовании
vsetutonline.com/forum/member.php?u=76509
Всё о покупке аттестата о среднем образовании: полезные советы
montrealpal.com/read-blog/2317
Вопросы и ответы: можно ли быстро купить диплом старого образца?
прокапаться после запоя на дому https://alconetmos.ru/
Добрый день!
Заказать документ о получении высшего образования
telegra.ph/kak-napisat-avtobiografiyu-dlya-postupleniya-v-voennyj-vuz-07-24
golf.od.ua/forum/viewtopic.php?p=78102#78102
politictoday.ru/oformlenie-diplomov-bez-posrednikov
master39.net/forum/user/5156
office.listbb.ru/viewtopic.php?f=2&t=4534
Здравствуйте!
Мы изготавливаем дипломы.
arandarp.forumex.ru/viewtopic.php?f=11&t=104
Диплом техникума купить официально с упрощенным обучением в Москве
Полезная информация как купить диплом о высшем образовании без рисков
Здравствуйте!
Мы можем предложить документы техникумов
ukrevent.ru/vash-diplom-s-garantiey-kachestva
Реально ли приобрести диплом стоматолога? Основные шаги
d91652pj.beget.tech/2024/09/24/gotovyy-diplom-bez-lishnih-hlopot
Возможно ли купить диплом стоматолога, и как это происходит
zavalinka.listbb.ru/viewtopic.php?f=3&t=2977
Возможно ли купить диплом стоматолога, и как это происходит
Привет!
Приобрести документ о получении высшего образования вы имеете возможность у нас в Москве.
domovou.3nx.ru/viewtopic.php?p=7092#7092
doremichildcarecentre.com/index.php/forum/welcome-mat/191415
dp.getbb.ru/viewtopic.php?f=3&t=774
driveme.rusff.me/viewtopic.php?id=2188#p105244
ekonomimvmeste.ukrbb.net/viewtopic.php?f=8&t=60683
Сколько стоит диплом высшего и среднего образования и как это происходит?
financeokey.ru/kupit-diplom-vashe-luchshee-reshenie
olxtoto login olxtoto login olxtoto login olxtoto login olxtoto login
It’s going to be end of mine day, except before finish I am reading this great piece of writing to increase my know-how.
Следует вызвать врача, рассказать о настораживающих симптомах, описать, что предшествовало их появлению. На основании полученной от пациента или его родственников информации нарколог посоветует, что можно предпринять на дому до его приезда.
Разобраться лучше – Вызов нарколога на дом
На портале digi-keys.ru вы обнаружите широкий выбор лицензионного программного обеспечения от Microsoft, включая системы Windows и офисные программы. Мы предлагаем доступные решения для тех, кто нуждается в надежное и легальное ПО для работы или домашнего применения. На странице представлены версии как для бизнеса, так и для домашних пользователей, например, Windows 10 Pro и Microsoft Office 2021 Professional Plus, с подробными инструкциями по инсталляции и запуску.
Если вам необходимо скачать виндовс 10 с официального сайта на флешку то у нас вы сможете получить лицензионную копию напрямую с источника. Кроме того, вы найдете пошаговые указания по настройке системы на свое устройство. Благодаря доступным лицензиям и системным обновлениям, ваши устройства будут функционировать надежно и безопасно.
Мы предлагаем долговечные решения для тех, кто ищет качественное ПО, с простым процессом лицензирования. Посетите digi-keys.ru, чтобы изучить полный список продуктов и подобрать подходящую версию Windows или Office, которая позволит вам продуктивную работу.
together-19.com/read-blog/41412
Купить диплом о среднем образовании в Москве и любом другом городе
Вопросы и ответы: можно ли быстро купить диплом старого образца?
Официальная покупка диплома вуза с сокращенной программой обучения в Москве
Процесс получения диплома стоматолога: реально ли это сделать быстро?
Как правильно купить диплом колледжа и пту в России, подводные камни
testforum.1stbb.ru/posting.php?mode=post&f=3
allows you to watch instagram http://www.anonstoryinst.com .
Инструкция по проведению экспертизы асфальта.
Экспертиза асфальтобетонного покрытия – betoncheck.ru .
Почему необходимо проводить экспертизу несущей стены, как выбрать компетентного специалиста, лучшие практики экспертизы несущей стены.
Экспертиза стен – http://stenexpert.ru/ .
Какие документы нужны для экспертизы фасада, экспертное мнение.
Экспертиза фасадов – https://www.experfasad.ru .
Оптимизация процесса входящего контроля строительных материалов.
Контроль качества строительных материалов – Контроль качества строительных материалов – .
ムーンプリンセス princess]は、RTP 96.5%と高いボラティリティを特徴とするPlay’n GOの魅力的なスロットです。5×5のグリッドで展開され、カスケード型の勝利が印象的な賞金をもたらす可能性があります。3人のプリンセス – LOVE, STAR, STORM – の魔法が特別な機能と倍率を活性化し、勝利のチャンスを高めます。moonprincessでのスキルフルなプレイと運の組み合わせにより、プレイヤーは初期ベットの最大5000倍を獲得する可能性があります。高いボラティリティは、ムーンプリンセス スロットでの勝利が頻繁ではないものの、かなり大きな額になる可能性があることを意味し、これが世界中の冒険好きなプレイヤーを引き付けています。 http://www.tokuteicorpus.jp/dist/modules/system/modules/menu/main.php?page_id=3463&op=change_page/
Быстрая схема покупки диплома старого образца: что важно знать?
zarabotok.forumrpg.ru/viewtopic.php?id=70886#p154167
Как получить диплом техникума с упрощенным обучением в Москве официально
Приобретение диплома ПТУ с сокращенной программой обучения в Москве
Можно ли купить аттестат о среднем образовании, основные моменты и вопросы
Привет, друзья!
Мы предлагаем документы ВУЗов
pitstopwheels.ru/forum/?PAGE_NAME=profile_view&UID=2938
Полезные советы по безопасной покупке диплома о высшем образовании
Приобретение диплома ПТУ с сокращенной программой обучения в Москве
diploms-man.ru
Как получить диплом техникума с упрощенным обучением в Москве официально
Покупка диплома о среднем полном образовании: как избежать мошенничества?
avtovladelez.ru/diplom-na-zakaz-dostupno-i-nadezhno
Приобретение диплома ПТУ с сокращенной программой обучения в Москве
0daymusic serves as a global platform for disseminating exclusive music to Radio DJs, Club DJs.
Music private service list: https://0daymusic.org/FTPtxt/
Server’s capacity: 418 TB MP3, FLAC, Labels, LIVESETS, Music Videos.
Support FTP, FTPS (File Transfer Protocol Secure), SFTP and HTTP, HTTPS.
More 16 years Of archives.
Easy to use: Most of genres are sorted by days.
Быстрая схема покупки диплома старого образца: что важно знать?
franko-trading-enterprise.mn.co/posts/65294938
Можно ли купить аттестат о среднем образовании, основные моменты и вопросы
Узнайте стоимость диплома высшего и среднего образования и процесс получения
Покупка школьного аттестата с упрощенной программой: что важно знать
wdbos wdbos wdbos wdbos wdbos
What’s Happening i am new to this, I stumbled upon this
I have discovered It positively useful and it has helped me out loads.
I am hoping to give a contribution & help different customers like its helped me.
Great job.
Привет, друзья!
Купить документ о получении высшего образования можно в нашей компании в столице.
mosfo.getbb.ru/viewtopic.php?f=12&t=930
msfo-soft.ru/msfo/forum/messages/forum24/topic10501/message301185/?result=new#message301185
naturetour.ru/club/user/186/blog/1664
odesit.com/fm.php
panther.80lvl.ru/index.php
Диплом пту купить официально с упрощенным обучением в Москве
Привет, друзья!
Заказать документ о получении высшего образования
twoplustwoequal.com/read-blog/39088
weekinato.ru/realnyie-diplomyi-dlya-realnyih-uspehov
ls.co-x.ru/2024/07/18/zakazhite-diplom-pryamo-seychas
telegra.ph/kakuyu-medkomissiyu-nado-prohodit-dlya-postupleniya-v-vuz-07-24
telegra.ph/kakie-stranicy-attestata-nuzhno-kopirovat-dlya-postupleniya-v-vuz-07-24
vv.flybb.ru/viewtopic.php?f=23&t=2407
Легальные способы покупки диплома о среднем полном образовании
Легальные способы покупки диплома о среднем полном образовании
Как быстро получить диплом магистра? Легальные способы
forum.zone-game.info/album.php?albumid=116&pictureid=852&commentid=518
Всё, что нужно знать о покупке аттестата о среднем образовании без рисков
Привет, друзья!
Мы готовы предложить документы ВУЗов
simplemachines.org/about/smf/stats.php
Как правильно купить диплом колледжа и пту в России, подводные камни
Купить диплом о среднем полном образовании, в чем подвох и как избежать обмана?
Комплексное обследование строительных объектов, гибкая система скидок.
Бюро строительных экспертиз – http://www.kvalstroi.ru .
Как получить диплом техникума с упрощенным обучением в Москве официально
academy4elements.mybb.ru/viewtopic.php?id=1028#p3101
Диплом техникума купить официально с упрощенным обучением в Москве
Всё, что нужно знать о покупке аттестата о среднем образовании
Стоимость дипломов высшего и среднего образования и процесс их получения
vnuci.listbb.ru/viewtopic.php?f=2&t=667
Как приобрести аттестат о среднем образовании в Москве и других городах
topnewsgadget.ru/vash-diplom-nasha-zabota-o-vashem-budushhem
Покупка диплома о среднем полном образовании: как избежать мошенничества?
w98804oc.beget.tech/2024/09/26/kupite-diplom-nikakih-ekzamenov-i-lekciy
mandala77 mandala77 mandala77
Good write-up. I definitely love this site. Stick with it!
Как получить диплом техникума с упрощенным обучением в Москве официально
Официальная покупка диплома вуза с сокращенной программой обучения в Москве
gti-club.ru/forum/member.php?u=23001
best wow carry service
Быстрое обучение и получение диплома магистра – возможно ли это?
Легальные способы покупки диплома о среднем полном образовании
Приобретение школьного аттестата с официальным упрощенным обучением в Москве
kpktoto kpktoto kpktoto kpktoto kpktoto kpktoto
kpktoto
Thanks in support of sharing such a pleasant thought,
paragraph is good, thats why i have read it completely
Как правильно приобрести диплом колледжа или ПТУ в России, важные моменты
Всё, что нужно знать о покупке аттестата о среднем образовании
alah-my.blogspot.com/2013/02/microsoft-sql-server-odbc-ubuntu-1204
Как получить диплом техникума официально и без лишних проблем
lsfiredept.listbb.ru/viewtopic.php?f=2&t=468
Пошаговая инструкция по безопасной покупке диплома о высшем образовании
Процесс получения диплома стоматолога: реально ли это сделать быстро?
israelafrica.mn.co/posts/66197929
Как оказалось, купить диплом кандидата наук не так уж и сложно
Приобретение диплома ВУЗа с сокращенной программой обучения в Москве
guiltyworld.getbb.ru/viewtopic.php?f=3&t=3893
Подробный анализ строительной экспертизы.
Компания строительная экспертиза – https://www.material-check.ru .
Выбор правильной компании по экспертизе строительства, что важно учесть?.
Агентство строительной экспертизы – prozdaniemon.ru .
Экспертная оценка строительства: безопасность вашего объекта в приоритете.
Эксперт строй инжиниринг – Эксперт строй инжиниринг – .
Информация о строительной экспертизе для всех.
Эксперт строительной экспертизы – https://www.diagnostikastroi.ru .
pragmatic demo pragmatic demo pragmatic demo pragmatic demo
pragmatic demo
My brother suggested I might like this website.
He was entirely right. This post actually made my
day. You cann’t imagine simply how much time I had spent for this information!
Thanks!
Здравствуйте!
Заказать документ о получении высшего образования
place-e.ru/index.php/Дипломы,_которые_приводят_к_успеху
korrespondentweek.ru/diplomyi-na-lyuboy-vkus-i-byudzhet
silich.ru/forum/member.php?u=4810
academy4elements.mybb.ru/viewtopic.php?id=966#p2100
recept-food.ru/diplomyi-s-garantiey-kachestva
Купить диплом о среднем полном образовании, в чем подвох и как избежать обмана?
Как быстро получить диплом магистра? Легальные способы
Как купить аттестат 11 класса с официальным упрощенным обучением в Москве
m9-com.ru/forums/viewtopic.php?f=3&t=25544
Полезная информация как купить диплом о высшем образовании без рисков
krok.biz/forum/posting.php?mode=post&f=7
power bank power bank .
Официальная покупка диплома вуза с сокращенной программой в Москве
blogsfere.com/viewtopic.php?t=195166
росгвардия охрана дома московская область росгвардия охрана дома московская область .
evakuator-mow.ru http://www.evakuator-mow.ru .
Как безопасно купить диплом колледжа или ПТУ в России, что важно знать
Сколько стоит диплом высшего и среднего образования и как его получить?
Аттестат 11 класса купить официально с упрощенным обучением в Москве
Пошаговая инструкция по официальной покупке диплома о высшем образовании
telegra.ph/rekomendaciyanapostuplenievvuzposlearmii0724
Где и как купить диплом о высшем образовании без лишних рисков
Пошаговая инструкция по официальной покупке диплома о высшем образовании
medvozerniy.flybb.ru/viewtopic.php?f=14&t=13630
Узнайте стоимость диплома высшего и среднего образования и процесс получения
Можно ли быстро купить диплом старого образца и в чем подвох?
moust.lv/read-blog/448
Купить диплом старого образца, можно ли это сделать по быстрой схеме?
Как получить диплом техникума официально и без лишних проблем
impressiverp.listbb.ru/viewtopic.php?f=16&t=1178
Hellcase.com is a popular platform for opening cases with in-game items, including CS skins. In Germany, the HellCase actively engages with users through its official social media channels, such as Instagram, Twitter, and Facebook. This helps players stay updated on new promotions, contests, and updates, as well as participate in giveaways and receive exclusive bonuses – hellcase cs in Germany
Надежные строительные консультанты, готовы помочь решить любые строительные проблемы.
Агентство строительной экспертизы – https://proekty-prom.ru .
Официальная покупка диплома вуза с сокращенной программой в Москве
blogger-mania.mn.co/posts/65294501
Смешные шутки. Короткие шутки.
Зума
Всё, что нужно знать о покупке аттестата о среднем образовании
Привет!
Мы изготавливаем дипломы.
msfo-soft.ru/msfo/forum/user/44990
appleincub.ru/ofitsialnyie-diplomyi-s-garantiey-kachestva-2
Официальная покупка школьного аттестата с упрощенным обучением в Москве
netcs.ru/forum/member.php?u=4834
Официальная покупка школьного аттестата с упрощенным обучением в Москве
Диплом пту купить официально с упрощенным обучением в Москве
Всё, что нужно знать о покупке аттестата о среднем образовании
Процесс получения диплома стоматолога: реально ли это сделать быстро?
msfo-soft.ru/msfo/forum/user/43105
Здравствуйте!
Мы можем предложить документы ВУЗов
wegug.in/blogs/2925/Ваш-диплом-без-лишних-ожиданий
Диплом техникума купить официально с упрощенным обучением в Москве
Пошаговая инструкция по безопасной покупке диплома о высшем образовании
Стоимость дипломов высшего и среднего образования и как избежать подделок
Всё о покупке аттестата о среднем образовании: полезные советы
казино 7к
Покупка диплома о среднем полном образовании: как избежать мошенничества?
Диплом техникума купить официально с упрощенным обучением в Москве
[u][b] Привет![/b][/u]
Приобрести документ института
[url=http://telegra.ph/prohodnoj-ball-egeh-2019-dlya-postupleniya-v-vuz-07-24/]telegra.ph/prohodnoj-ball-egeh-2019-dlya-postupleniya-v-vuz-07-24[/url]
[url=http://telegra.ph/process-postupleniya-v-vuz-2019-07-24/]telegra.ph/process-postupleniya-v-vuz-2019-07-24[/url]
[url=http://telegra.ph/spravka-dlya-postupleniya-v-vuz-forma-07-24/]telegra.ph/spravka-dlya-postupleniya-v-vuz-forma-07-24[/url]
[url=http://telegra.ph/testy-po-istorii-dlya-postupleniya-v-vuz-s-otvetami-07-24/]telegra.ph/testy-po-istorii-dlya-postupleniya-v-vuz-s-otvetami-07-24[/url]
[url=http://telegra.ph/testy-po-matematike-dlya-postupleniya-v-vuz-s-otvetami-skachat-07-24/]telegra.ph/testy-po-matematike-dlya-postupleniya-v-vuz-s-otvetami-skachat-07-24[/url]
Официальное получение диплома техникума с упрощенным обучением в Москве
csexpert.4adm.ru/viewtopic.php?f=70&t=2162
Купить диплом магистра оказалось возможно, быстрое обучение и диплом на руки
Как получить диплом техникума с упрощенным обучением в Москве официально
Вопросы и ответы: можно ли быстро купить диплом старого образца?
Как получить диплом техникума официально и без лишних проблем
Всё, что нужно знать о покупке аттестата о среднем образовании
dog-ola.ru/viewtopic.php?f=28&t=7878
abroad.ekafe.ru/posting.php?mode=post&f=5&sid=6c92035f7544c1d3a0e9d1089864666f
Официальная покупка аттестата о среднем образовании в Москве и других городах
Как не стать жертвой мошенников при покупке диплома о среднем полном образовании
Как избежать рисков при покупке диплома колледжа или ПТУ в России
worksale777.blogspot.com/2024/07/blogpost20
Легальная покупка диплома ПТУ с сокращенной программой обучения
indianapal.com/read-blog/2322
Легальная покупка школьного аттестата с упрощенной программой обучения
silich.ru/forum/member.php?u=4810
Вопросы и ответы: можно ли быстро купить диплом старого образца?
Здравствуйте!
Мы можем предложить документы ВУЗов
zekond.com/read-blog/77315
Официальная покупка школьного аттестата с упрощенным обучением в Москве
Купить диплом магистра оказалось возможно, быстрое обучение и диплом на руки
alcoclubs.ru/gde-kupit-krasnii-diplom-vigodno-i-bistro
Покупка диплома о среднем полном образовании: как избежать мошенничества?
Приобретение диплома ПТУ с сокращенной программой обучения в Москве
Пошаговая инструкция по официальной покупке диплома о высшем образовании
Приобретение диплома ПТУ с сокращенной программой обучения в Москве
doctorsforum.ru/viewtopic.php?f=193&t=39855
Полезные советы по безопасной покупке диплома о высшем образовании
irishpal.com/read-blog/2325
лучшие капперы россии лучшие капперы россии .
лучшие капперы мира лучшие капперы мира .
Аттестат 11 класса купить официально с упрощенным обучением в Москве
instagram profile checker https://www.anoninststories.com .
Как официально купить аттестат 11 класса с упрощенным обучением в Москве
Лучшие практики обследования строительных конструкций здания, для обеспечения безопасности и надежности здания.
Техническое обследование состояния строительных конструкций здания – https://konstruktest.ru/ .
Наша сайт тк Карго-Мувинг обеспечивает не только стандартные решения, но и специальные логистические схемы, которые обеспечат вам доставить груз как по России, так и за её пределы. Мы сотрудничаем с автомобильными, поездными, водными и воздушными перевозками, чтобы ваш груз доставили в нужное место вовремя. Для нас нет трудных задач — будь то срочная доставка или продолжительные проекты.
Официальная покупка аттестата о среднем образовании в Москве и других городах
ukrom.in.ua/users/327#google_vignette
Клининговая компания “Простая уборка” в Нижнем Новгороде. Цены на клининг на сайте: https://prostaya-uborka1.ru
Покупка диплома о среднем полном образовании: как избежать мошенничества?
Риобет
Как отличить технический осмотр от строительной экспертизы, преимущества профессиональной строительной экспертизы.
Агентство строительной экспертизы – https://rabotest.ru .
Как сэкономить время и деньги при проведении строительной экспертизы, не упустите возможность.
Компания строительная экспертиза – proauditstroi.ru .
Какие нюансы важны при осмотре полов и лестниц.
Обследование помещений зданий сооружений участков местности – http://www.dom-build.ru/ .
Экспертиза строительства: знание и опыт в каждом проекте, безопасность и надежность.
Эксперт строй инжиниринг – http://www.doksmet.ru/ .
Стоимость дипломов высшего и среднего образования и как избежать подделок
Как купить диплом о высшем образовании с минимальными рисками
ttartisan.ru/forum/user/4430
Приобретение диплома ПТУ с сокращенной программой обучения в Москве
Как официально приобрести аттестат 11 класса с минимальными затратами времени
Как приобрести диплом о среднем образовании в Москве и других городах
Полезная информация как купить диплом о высшем образовании без рисков
Уборка квартиры после затопления канализацией https://klining-posle-zaliva-moskva.ru/
Отмыв квартиры после пожара https://uborka-posle-pozhara-495.ru/
Диплом вуза купить официально с упрощенным обучением в Москве
Клининговая компания “Простая уборка” в Нижнем Новгороде. Цены на клининг на сайте: https://prostaya-uborka1.ru
Приобретение школьного аттестата с официальным упрощенным обучением в Москве
bn.tobase.ru/viewtopic.php?f=30&t=3456
Сколько стоит диплом высшего и среднего образования и как это происходит?
crtdu-kras.ru/communication/forum/user/261735
Как получить диплом техникума с упрощенным обучением в Москве официально
Сколько стоит диплом высшего и среднего образования и как это происходит?
forumklassika.ru/showthread.php?t=130449&p=1859336#post1859336
Наша сайт компании Карго-Мувинг обеспечивает не только стандартные решения, но и персонализированные логистические схемы, которые позволят вам доставить груз как по России, так и за её пределы. Мы сотрудничаем с автомобильными, поездными, мореплавательными и воздушными перевозками, чтобы ваш груз прибыл в нужное место точно в срок. Для нас нет сложных задач — будь то быстрая доставка или затяжные проекты.
Good day
I will write automation templates for the browser and websites, for Android applications, and collect data
I will write automation and data collection from Android applications
Web scraping of data from any website
I will automate any actions in the browser, I will provide a script. I will write an automatic bot for the browser and websites
Create online stores with your supplier’s content and products. Creation and filling of online stores and catalog sites. Automatic transfer of your supplier’s product catalog to your online store.
(I work with sites of any complexity, with copy protection and captcha) Retrieving data from copy-protected websites, solving captcha and recaptcha.
And data processing in CSV, Excel.
I have ten years of experience.
Transfer of catalogs of online stores, catalogs of company phones.
Automate the collection and publication of content on websites.
I work with web automation and parsing software
ZennoPoster, BrowserAutomationStudio, ZennoDroid
I am doing web scraping, data cleaning, data collection, data extraction, web page crawling. I am developing web bots. I am a web scraping consultant and data engineer. Development and automation of custom bots
Contacts:
https://www.linkedin.com/in/anatoliy-barsukov-52194bb4/
Tel/Viber/WhatsApp:
+79818525114
Skype anato27
Диплом техникума купить официально с упрощенным обучением в Москве
Admiral
Как получить диплом техникума с упрощенным обучением в Москве официально
sport-faq.ru/nastoyashhie-diplomyi-na-zakaz-garantiruem-kachestvo
Процесс получения диплома стоматолога: реально ли это сделать быстро?
Официальная покупка аттестата о среднем образовании в Москве и других городах
Азино
Официальная покупка диплома вуза с сокращенной программой в Москве
leksimage.ru
Легальная покупка школьного аттестата с упрощенной программой обучения
islgaming.community/read-blog/178
Официальное получение диплома техникума с упрощенным обучением в Москве
сайты по копирайтингу
MegaText – интеллектуальный инструмент, который подстраивается к вам. Автоматическое создание и корректировка текстов для маркетинговых кампаний. Это не просто продукт — это ваш партнер по бизнесу!
Source:
– https://megatext.pro
Генеральная уборка складов СПб https://uborka-sklada-spb.ru/
Можно ли купить аттестат о среднем образовании, основные моменты и вопросы
beijingpal.com/read-blog/2886
Покупка диплома о среднем полном образовании: как избежать мошенничества?
Аттестат школы купить официально с упрощенным обучением в Москве
Клининговая компания “Простая уборка” в Нижнем Новгороде. Цены на клининг на сайте: https://prostaya-uborka1.ru
Как безопасно купить диплом колледжа или ПТУ в России, что важно знать
asg-amt.phorum.pl/viewtopic.php?p=33341#33341
Как приобрести диплом о среднем образовании в Москве и других городах
Можно ли купить аттестат о среднем образовании, основные моменты и вопросы
gemawiraclub.com/blogs/49815/Оформление-диплома-без-посещений
Сколько времени требуется на строительную экспертизу, делаем выводы.
Заказать строительную экспертизу – [url=http://engineerocenka.ru/]http://engineerocenka.ru/[/url] .
купить ткань оптом в москве https://kupit-tkan-optom.ru/
Как безопасно купить диплом колледжа или ВУЗа в России, что важно знать
Как избежать рисков при покупке диплома колледжа или ПТУ в России
Покупка диплома о среднем полном образовании: как избежать мошенничества?
kick.gain.tw/space.php?uid=4747813
Полезные советы по безопасной покупке диплома о высшем образовании
Официальная покупка диплома вуза с сокращенной программой в Москве
forum.ll2.ru/member.php?1255487-donnamiduath
Как официально купить аттестат 11 класса с упрощенным обучением в Москве
twittx.live/read-blog/4701
Discovered an article that will definitely interest you – don’t miss the chance to familiarize yourself https://rt.ruletka18.com/
Как купить аттестат 11 класса с официальным упрощенным обучением в Москве
sparktv.net/read-blog/43116
Как быстро получить диплом магистра? Легальные способы
wiki.mdomtv.net/index.php?title
Покупка школьного аттестата с упрощенной программой: что важно знать
Подготовка к Единому Государственному Экзамену — это ключевой момент в жизни школьников. Рекомендую этот сайт варианты ОГЭ. Успешная подготовка требует планомерных усилий и правильного тайм-менеджмента. Использование тренировочными заданиями, анализ ошибок и советы от учителей помогут подготовиться максимально эффективно.
Приобретение диплома ПТУ с сокращенной программой обучения в Москве
Официальная покупка диплома ПТУ с упрощенной программой обучения
facial546.mn.co/posts/65295053
Вопросы и ответы: можно ли быстро купить диплом старого образца?
yexanin202.ixbb.ru/viewtopic.php?id=219#p219
Покупка диплома о среднем полном образовании: как избежать мошенничества?
forum.l2star.net/member.php?u=18316
Здравствуйте. Увеличу посещаемость и доходность вашего сайта, решу все имеющиеся на сайте проблемы. При этом рост посещаемости будет идти за счет притока целевых посетителей из поисковых систем, что для вас максимально выгодно и перспективно. Умеренные цены. Гарантия. При необходимости готов работать по договору.
Краткая информация обо мне. Специалист в области создания, доработки и продвижения сайтов. Имею знания и опыт в некоторых смежных областях. Начинал работу в 2004 году. Максимально хорошо разбираюсь в продвижении сайтов в поисковых системах.
Некоторые иные направления моей деятельности: настройка рекламных кампаний, работа с отзывами (удаляю плохие, создаю и продвигаю хорошие), работа с группами в соц. сетях и ютубом.
Пишите на мою основную почту: sozdaniesaytow@gmail.com
Быстрая покупка диплома старого образца: возможные риски
Официальная покупка диплома вуза с упрощенной программой обучения
Клининговая компания “Простая уборка” в Нижнем Новгороде. Цены на клининг на сайте: [url=https://prostaya-uborka1.ru]https://prostaya-uborka1.ru[/url]
spletninews.ru/vash-diplom-mechtyi-byistro-prosto-i-bez-stressa
Приобретение школьного аттестата с официальным упрощенным обучением в Москве
Легальная покупка диплома ПТУ с сокращенной программой обучения
магазин ткани интернет магазин https://kupit-tkan-v-moskve.su/
Мытье квартиры после возгорания https://ubiraem-posle-pozhara-moskva.ru/
Узнайте, как безопасно купить диплом о высшем образовании
Вопросы и ответы: можно ли быстро купить диплом старого образца?
Приобретение диплома ПТУ с сокращенной программой обучения в Москве
Сравнение различных методов экспертизы строительных материалов: плюсы и минусы.
Экспертиза качества строительных материалов – [url=http://www.stroymaterialpro.ru/]http://www.stroymaterialpro.ru/[/url] .
Анализ плюсов и минусов различных техник проверки качества бетона, чтобы выбрать оптимальный вариант.
Испытание бетона неразрушающим методом [url=http://www.betontestlab.ru]http://www.betontestlab.ru[/url] .
На что обратить внимание при проведении экспертизы, опытные советы по улучшению результатов.
Земельная экспертиза для суда – [url=https://www.landexpertiza.ru]https://www.landexpertiza.ru[/url] .
Покупка диплома о среднем полном образовании: как избежать мошенничества?
vip.rolevaya.info/viewtopic.php?id=5049#p8669
primer-8
linux.listbb.ru/viewtopic.php?f=2&t=587
Приобретение диплома ПТУ с сокращенной программой обучения в Москве
Уборка гаража после пожара https://ubiraem-posle-pozhara-moskva.ru/
Как не попасть впросак при покупке диплома колледжа или ПТУ в России
netl.free.fr/index.php?file=Members&op=detail&autor=edibyh
Покупка диплома о среднем полном образовании: как избежать мошенничества?
Как купить аттестат 11 класса с официальным упрощенным обучением в Москве
Узнайте стоимость диплома высшего и среднего образования и процесс получения
diplomj-irkutsk.ru/gde-kupit-diplom-Vuza-legalno-i-bezopasno
Пошаговая инструкция по официальной покупке диплома о высшем образовании
forcemajor.maxbb.ru/viewtopic.php?f=7&t=933
Клининговая компания “Простая уборка” в Нижнем Новгороде. Цены на клининг на сайте: [url=https://prostaya-uborka1.ru]https://prostaya-uborka1.ru[/url]
Вопросы и ответы: можно ли быстро купить диплом старого образца?
Привет!
Мы предлагаем дипломы.
kuvandyk.ru/users.php?m=auth&redirect=L2ZvcnVtcy1tLW5ld3RvcGljLXMtMTEuaHRtbA==
Привет, друзья!
Мы можем предложить документы техникумов
bogatbeden.listbb.ru/viewtopic.php?f=3&t=660
Качественное строительство: надежные технологии для вашего будущего дома. строительство под ключ
Аттестат школы купить официально с упрощенным обучением в Москве
diplom-insti.ru/kak-priobresti-diplom-vuza-zakonno
Клининговая компания “Простая уборка” в Нижнем Новгороде. Цены на клининг на сайте: [url=https://prostaya-uborka1.ru]https://prostaya-uborka1.ru[/url]
Как купить аттестат 11 класса с официальным упрощенным обучением в Москве
Как не попасть впросак при покупке диплома колледжа или ПТУ в России
vip.7bb.ru/viewtopic.php?id=3283#p7605
Топовый поставщик техники от Microsoft, которому можно доверять.
https://best-lip-filler.com/ [url=http://best-lip-filler.com]http://best-lip-filler.com[/url] .
Процесс получения диплома стоматолога: реально ли это сделать быстро?
Официальная покупка школьного аттестата с упрощенным обучением в Москве
dragonlivers.ixbb.ru/viewtopic.php?id=221#p221
Как приобрести диплом техникума с минимальными рисками
socialsnug.net/read-blog/305
Привет, друзья!
Мы изготавливаем дипломы.
blogsfere.com/viewtopic.php?t=194489
Клининговая компания “Простая уборка” в Нижнем Новгороде. Цены на клининг на сайте: https://prostaya-uborka1.ru
Пошаговая инструкция по официальной покупке диплома о высшем образовании
Узнайте стоимость диплома высшего и среднего образования и процесс получения
l-avt.ru/support/dialog/?PAGE_NAME=profile_view&UID=77114
“Maybe his dad is right.” He thinks to himself as he continues with his intense fondling of his fiery red cock. sex porn mom “That is your cock, son.” His father, says. “…but it does not make you a man. It only makes you a boy with a hard cock in his hand.”
Официальная покупка аттестата о среднем образовании в Москве и других городах
изготовление номеров на машину https://gos-nomerov.ru/
Вопросы и ответы: можно ли быстро купить диплом старого образца?
беспроводная пожарная сигнализация https://pozhsig.ru/
Как купить диплом о высшем образовании с минимальными рисками
His father steps into the shower, turning on the water. As he soaks and lathers himself up under the lukewarm stream of water, he fondles his cock and balls. His cock soon mimics that of his son. https://arturzasada.pl/ – sex porn mom “It was intense. Really intense. We ran so many drills. I am exhausted.” He explains.
Клининговая компания “Простая уборка” в Нижнем Новгороде. Цены на клининг на сайте: https://prostaya-uborka1.ru
“Yes! Yes! I know you understand.” His father proudly exclaims. sex porn mom After I serve daddy’s left one, I was about to move to the right foot. While He stopped me, stood up, and walked towards the couch, he said “Crawling right after me.” I followed daddy. My nose was where daddy’s ass was. I was staring at that crotch while I was crawling, and I didn’t realize daddy stopped one of a sudden in front of the bathroom. My nose is slightly right into that dreaming ass crack.
Парадокс, но купить диплом кандидата наук оказалось не так и сложно
Диплом вуза купить официально с упрощенным обучением в Москве
ジョイカジノの最大の利点の一つは、迅速な出金です。ゲームに勝利した後、プレイヤーは、カード、電子ウォレット、暗号通貨など、サポートされている多くの支払いシステムを利用して、迅速に賞金を受け取ることができます。joycasinoでは、出金リクエストの処理が迅速に行われ、プレイヤーにとって最大限の快適さが提供されます。 ジョイカジノ 公式
https://kudago.com/all/news/ob-aktualnosti-sluzhb/
オンラインカジノjoyカジノは、スロットのプレイをエキサイティングな競技に変えます!毎月開催される豪華な賞品が用意された定期的なトーナメントが、さらなるスリルと大金獲得のチャンスを提供します。最新のガジェットからエキゾチックな旅行、そして最新の自動車に至るまでの豪華賞品が当たるテーマ別の宝くじが毎月開催されます。ほとんどのトーナメントへの参加は、すべてのアクティブプレイヤーに無料です。公式サイトjoycasino.comの「トーナメント」セクションをチェックして、「ジョイカジノ」での素晴らしい勝利のチャンスを逃さないようにしましょう。 joyカジノ
Купить диплом старого образца, можно ли это сделать по быстрой схеме?
maxima.2ua.in.ua/ucp.php?mode=login&sid=f9725543e2c8d7690cebbb70b008089d
Как быстро получить диплом магистра? Легальные способы
Узнайте, как приобрести диплом о высшем образовании без рисков
изготовление дубликатов номерных знаков https://gos-nomerov.ru/
Накопились неожиданные счета за коммунальные услуги, а времени на оформление кредита в банке совсем не было. В поисках решения я нашёл список МФО, которые дают деньги онлайн на карту без отказа до 30 000 рублей всем подряд, без лишних проверок. Оформление заняло буквально несколько минут, и деньги сразу поступили на счёт. Эти кредит на карту без отказа выручили меня и помогли не попасть в долговую яму!
Как официально купить диплом вуза с упрощенным обучением в Москве
forum.stockholdergame.com/user-83021
Полезные советы по покупке диплома о высшем образовании без риска
Официальная покупка диплома вуза с упрощенной программой обучения
disqus.com/by/iygorefremmv/about
“Was it because of that?” His dad asks as he points a finger towards him. And his midsection. [url=https://arturzasada.pl/]sex porn mom[/url] Daddy gave me a look implying his shoes are needed to be removed. “Can I take off your loafers, daddy ?” I asked so quietly. He looked at me and nodded. I took off both his loafers and put them away neatly in front of me. Daddy then raised his right leg and stepped on my forehead, pushing me down into his loafers. It is a mixed smell with sweat, testosterone, and leather. I couldn’t help but take a big whiff every time I breathed. “Hands-on the floor” he commanded. He moved his feet from my head to my hands. “Kiss them and make the stink goes away using only your fag tongue.” “Yes sir.”
Официальная покупка диплома ПТУ с упрощенной программой обучения
Как приобрести аттестат о среднем образовании в Москве и других городах
Покупка диплома о среднем полном образовании: как избежать мошенничества?
vip.7bb.ru/viewtopic.php?id=3286#p7608
Быстрая покупка диплома старого образца: возможные риски
Как приобрести аттестат о среднем образовании в Москве и других городах
jonitogel jonitogel jonitogel
This site truly has all of the information I wanted about this subject and didn’t know who
to ask.
Полезная информация как официально купить диплом о высшем образовании
adminka.getbb.ru/viewtopic.php?f=2&t=572
Stumbled upon an interesting article – I suggest you take a look https://rt.ruletka18.com/
Клининговая компания “Простая уборка” в Нижнем Новгороде. Цены на клининг на сайте: [url=https://prostaya-uborka1.ru]https://prostaya-uborka1.ru[/url]
стоимость новых номеров https://dublikat-gosznak.ru/
Пошаговая инструкция по безопасной покупке диплома о высшем образовании
188.17.148.172/forum/profile.php?action=show&member=3793
SEO продвижение сайтов в интернете включает оптимизацию как внутреннюю, так и внешнюю. Работа с качественными внешними ссылками помогает повысить авторитет сайта в глазах поисковых систем. Продвижение сайтов должно быть направлено на привлечение качественного трафика и увеличение времени, которое пользователи проводят на сайте.
Как купить аттестат 11 класса с официальным упрощенным обучением в Москве
akademe.mn.co/posts/65287700
Сколько стоит диплом высшего и среднего образования и как это происходит?
region-standart.ru/guestbook/?1707835084
Как быстро получить диплом магистра? Легальные способы
ムーンプリンセス [moon princess]は、RTP 96.5%と高いボラティリティを特徴とするPlay’n GOの魅力的なスロットです。5×5のグリッドで展開され、カスケード型の勝利が印象的な賞金をもたらす可能性があります。3人のプリンセス – LOVE, STAR, STORM – の魔法が特別な機能と倍率を活性化し、勝利のチャンスを高めます。moonprincessでのスキルフルなプレイと運の組み合わせにより、プレイヤーは初期ベットの最大5000倍を獲得する可能性があります。高いボラティリティは、ムーンプリンセス スロットでの勝利が頻繁ではないものの、かなり大きな額になる可能性があることを意味し、これが世界中の冒険好きなプレイヤーを引き付けています。 ムーンプリンセス
Этот телеграм канал откроет для вас мир чтения, подробнее – https://smartlibrary24.com/. Наш канал создан для того, чтобы удовлетворить любой литературный вкус. Любите ли вы захватывающие тайны, душещипательные романы, нехудожественную литературу или захватывающие приключения – у нас вы найдете все, что нужно. Мы гордимся тем, что предлагаем разнообразный выбор жанров, чтобы каждый нашел что-то для себя
Клининговая компания “Простая уборка” в Нижнем Новгороде. Цены на клининг на сайте: [url=https://prostaya-uborka1.ru]https://prostaya-uborka1.ru[/url]
изготовить новые номера https://dublikat-gosznak.ru/
Как приобрести аттестат о среднем образовании в Москве и других городах
pedcollege.ru/question
familyportal.forumrom.com/viewtopic.php?id=26072#p65532
Вопросы и ответы: можно ли быстро купить диплом старого образца?
Официальная покупка школьного аттестата с упрощенным обучением в Москве
hotbookmarkings.com/story17378919/снится-получить-диплом
Привет, друзья!
Мы предлагаем дипломы.
telegra.ph/Kupit-diplom-legko-i-bystro-09-24
Покупка диплома о среднем полном образовании: как избежать мошенничества?
Привет!
Мы готовы предложить документы ВУЗов
epicit.ru/gde-mozhno-byistro-kupit-diplom
Привет, мне нужны твои записи по списку что ты обещал, ты же пишешь статьи?тема Знакомства с женихом, Знакомства Москва, Знакомства Россия, Знакомства рядом, другие тематики, твои умелые руки нужны.
Знакомства Рутити скинь на почту свои заметки
Увидимся!
Полезная информация как официально купить диплом о высшем образовании
Диплом техникума купить официально с упрощенным обучением в Москве
Клининговая компания “Простая уборка” в Нижнем Новгороде. Цены на клининг на сайте: https://prostaya-uborka1.ru
Приобретение диплома ПТУ с сокращенной программой обучения в Москве
beijingpal.com/read-blog/2324
Легальная покупка диплома о среднем образовании в Москве и регионах
Покупка диплома о среднем полном образовании: как избежать мошенничества?
active-style.ru/gde-kupit-diplom-kandidata-nauk-nedorogo-i-bistro
Всё, что нужно знать о покупке аттестата о среднем образовании
b98385gb.beget.tech/2024/09/26/kupite-diplom-i-zabudte-o-problemah-s-obrazovaniem
https://milsaver.com/members/persontrout8/activity/317657/ http://www.heidewebster18.livejournal.com/profile/ .
Полезная информация как купить диплом о высшем образовании без рисков
uapa.com.hk/forum/home.php?mod=space&uid=291739&do=profile
Всё, что нужно знать о покупке аттестата о среднем образовании без рисков
Как правильно купить диплом колледжа и пту в России, подводные камни
Аттестат 11 класса купить официально с упрощенным обучением в Москве
Ивенты в выставочных залах подарят вам впечатляющие восторг. Шоу-программы раскрывают получить заряд бодрости. Музыкальные вечера в динамичной атмосфере дарят эмоции. Готовьтесь к мероприятию для восхитительных ивентов в дружеской компании!
Забронировать билеты на вечерние постановки
Как официально купить аттестат 11 класса с упрощенным обучением в Москве
feelosum.com/blogs/1849
Официальная покупка аттестата о среднем образовании в Москве и других городах
arantoe.com/kupit-diplom-951422iagco
Всё, что нужно знать о покупке аттестата о среднем образовании без рисков
Nissan P0500
Как правильно купить диплом колледжа и пту в России, подводные камни
hristianka.ru/forum/r/prev_loaded/1
выездная тарировка тахографа https://tachocards.ru/
Как избежать рисков при покупке диплома колледжа или ПТУ в России
you could try this out https://42468595256874454.com/
Диплом ВУЗа купить официально с упрощенным обучением в Москве
oldforum.citysakh.ru/?talkid=27324
монтаж пожарной системы цена https://sispozhbez.ru/
Легальная покупка диплома о среднем образовании в Москве и регионах
монтаж пульта управления https://sispozhbez.ru/
Привет, друзья!
Мы изготавливаем дипломы.
safdfpb.ixbb.ru/viewtopic.php?id=263#p263
Как не попасть впросак при покупке диплома колледжа или ПТУ в России
карта водителя для тахографа в москве https://tachocards.ru/
Легальная покупка школьного аттестата с упрощенной программой обучения
a63.flybb.ru/viewtopic.php?f=16&t=3518
ds avtotrade
Полезные советы по покупке диплома о высшем образовании без риска
Привет, друзья!
Мы предлагаем документы техникумов
rcdrift.ru/forum/member.php?u=21074
myworldavto.ru/bolshe-nikakih-trudnostey-na-puti-k-diplomu
Как приобрести диплом о среднем образовании в Москве и других городах
Официальное получение диплома техникума с упрощенным обучением в Москве
Полезные советы по покупке диплома о высшем образовании без риска
Аттестат 11 класса купить официально с упрощенным обучением в Москве
Алкогольная зависимость развивается в течение трех стадий. На первом этапе заболевание сложно отличить от бытового пьянства. Но человек уже является алкоголиком и нуждается в медицинской помощи. По мере прогрессирования появляются запои, соматические и психические осложнения.
Получить дополнительные сведения – клиника лечения алкоголизма
Полезные советы по безопасной покупке диплома о высшем образовании
Приобретение диплома ПТУ с сокращенной программой обучения в Москве
c904581v.beget.tech/2024/07/21/vyssheeobrazovaniebezlishnihhlopot
Алкоголизм, к сожалению, проблема, которая была, есть и будет всегда преследовать человечество. Однако на сегодняшний день продолжают разрабатываться эффективные подходы к лечению алкоголизма в Вологде.
Подробнее тут – вывод из запоя цена
Полезная информация как купить диплом о высшем образовании без рисков
Электровелосипеды купить на velosiped-magazin.ru
Если Вы искали где выбрать велосипед в Москве, то звоните уже сейчас. Номер телефона +7(495)128-48-26 для связи и предоставлению консультации. Наши менеджеры помогут с выбором и оформят Вам заказ с доставкой по Московской области.
проститутки проверенные москва проститутки проверенные москва .
Шоссейные велосипеды купить velosiped-magazin.ru
По запросу купить велосипед в москве Вы пришли по правильному адресу. Наш онлайн магазин является официальным дилером знаменитых брендов, которые изготавливают лучшие модели великов. После приобретения функционирует гарантия и предлагается хранение велосипедов в Москве на холодный период.
Посетите в течение мир отличного и обольщенья с нашей свежеиспеченною рекламой! Ваша милость готовы уйти в течение незабываемый опыт, который поджидает вам честь имею кланяться чуть одну звонком? Позвоните нам в течение Роль моделей-операторов секс ру телефоне в психологической поддержке мужчин и самое приятное удовольствие от вирта в реале и вскройте дверь в самые заветные источники удовольствия! Встречайте нашу с тобой самую горячую равно соблазнительную мероприятие: экономичный шведский секс числом телефону!
Ты да я понимаем, яко время – сугубо щедрый энергоресурс любого с нас. Поэтому пишущий эти строки создали чтобы вам возможность посвятить себя в течение мир услады ясно из уютной ситуации вашего дома. Якобы, что фантазия без- видит мер, а также автор этих строк подкрепляем данную правду! Наша команда опытных профессионалов готова предложить для вас самые разнородные сценарии (а) также представления, чтоб ваши фантазии принялись реальностью.
Искусство чувственного обследования: навигация по нашей подвижной платформе.
Окунитесь в царствование бесконечного наслаждения с нашей подвижной платформой Куни секс телефон номер, где эстрада любострастного осмотры развлекает первое место. Окунитесь во чертова гибель романических фоток равно ютуб чтобы взрослых, тщательно поджатых, чтобы разжечь ваши вожделения равно провоцировать ваши чувства. Благодаря свободным полномочиям просмотра да спокойной загрузке воплотить в юдоль собственные фантазии Яркая блондинка в кожаной портупее трахается за деньги, порно грубое бдсм видео, следовательно хоть проще. Навестите выше- магазин, в течение котором показан широкий выбор игрушек для старших, сделанных для этого, чтобы сделать лучше ваши тесные эмоция и прибавить границы удовольствия. Знайтесь с превосходнейшими модификациями с всего тест со через наших условных услуг для старших, кае каждая явка адаптирована ко вашим желаниям. Присоединяйтесь для нам в нашем поездке чувственных открытий, где утоление безлюдный (=малолюдный) видит границ.
Подготовьтесь буква незабываемому поездке в юдоль скорби увлечения (а) также желания. Наши двухлетний, иметь в распоряжении телесными голосами да бесстыдными причудами Дженифер Джейн любит быструю анальную долбежку, ожидают вашего звонка. Они знают, яко раздуть в течение вам огонь конька и еще презентовать незабываемые молниеносно удовольствия. Вы чистяком погрузитесь в атмосферу, словно город находятся ухо к уху раз-два вами, подбрасывая невероятное наслаждение.
Я предлагаем для вас максимально уютные тарифы, чтоб ваша милость имели возможность кейфовать прекрасным общением сверх разного напряжения. Нет нужды стесняться чи праздновать труса осуждения – наши девушки позаботятся что касается вашей конфиденциальности и приложат все усилия для вашего удовольствия. Всякая беседа с нами – это эвентуальность упиться да позволять себе так, что касается чем ваша милость спервоначалу только мечтали.
Увеличивая близость: получите и распишитесь ферза сверху свой в доску мобильном устройстве.
Отправьтесь в экспедиция числом заповедным проведение исследования немного нашей спокойной для подвижных узлов платформой с мобильного МТС а тоже Билайн +7-809-505-6850, специально оптимизированное чтобы телефонов а также подвижных приспособлений, кае удовольствие ожидает вы на кончиках пальцев. Окунитесь в течение юдоль скорби амурных снимок а также ютуб чтобы взрослых, ювелирно подобранных, чтоб растолкать ваши жажды а также возжечь вашу страсть. Любителе сладкого огонь ваша милость сольные игры чи кебые встречи, в течение нашей собрании отыщется что-то на энный вкус. Навестите выше- этношоп, шаровой игрушек для взрослых, призванных укрепить ваши любострастные чувства равно осуществлять в течение юдоль ваши самые заповедные фантазии. Воспользуйтесь условными услугами для старших капля добрейшими модификациями с честь имею кланяться мира, где всякое взаимодействие приспособлено ко вашим желаниям. СО нашей платформой Как работа в секс-колл центре влияет на личную жизнь: откровения девушек-моделей из Ростова-на-Дону и Екатеринбурга. Телефоны порно секс женщин товарищество принимает новое ценность, что-что утоление гарантировано.
Приставки не- упускайте шанс сыграть свои самые смелые также плотские фантазии. Нашей рекламой наш брат призываем вы чистяком получить удовольствие собственной сексуальностью и обратить внимание на себя. Автор создали фон, коим разрешат для вас расслабиться, избавляться через бытовых забот и позволить себе настоящий яблочный спас страсти.
По утрачивайте минуты на долгие раздумья – наши операторы ожидают вашего звонка прямо сейчас! Позвоните нам да распахните для себя невероятный юдоль скорби наслаждения и экстаза. Мы обеспечиваем, яко всякое ваше якшание с нами будет незабвенным (а) также покинет живописные воспоминания.
Открытие желания: экспедиция по нашей подвижной платформе Секс махачкала телефоны .
Отправьтесь в течение экспедиция открытий один-другой через нашей мобильной платформы, где эрекция маловыгодный быть в курсе границ. Погрузитесь на юдоль скорби эротических карточек и видео чтобы старших, ювелирно равносильных, чтоб дразнить ваши сантименты и пробуждать страсть. Случайно от того, привлекают ли вы сольные кончик или интенсивные встречи, наша энотека предлагает множество разновидностей чтобы изучения. Приедете в свой магазин, на что презентованы проказа чтобы старших, коим представят для вас чище блаженства а также раскроют свежеиспеченные сфера возбуждения. Якшайтесь раз-другой топ-моделями со всего тест с подмогою наших воображаемых услуг чтобы старших, кае любое взаимодействие приспособлено буква вашим желаниям. Приобщайтесь ко нам в течение странствовании изучений также удовольствий, кае удовлетворение ожидает за любыми углом.
Покупка диплома о среднем полном образовании: как избежать мошенничества?
sociomixr.com/blogs/231/Ваш-диплом-без-лишних-проблем
Приобретение диплома ПТУ с сокращенной программой обучения в Москве
p99946c6.beget.tech/2024/08/23/neobhodimo-kupit-diplom-posetite-luchshiy-internet-magazin
Как правильно купить диплом колледжа и пту в России, подводные камни
Алкогольная зависимость развивается в течение трех стадий. На первом этапе заболевание сложно отличить от бытового пьянства. Но человек уже является алкоголиком и нуждается в медицинской помощи. По мере прогрессирования появляются запои, соматические и психические осложнения.
Получить дополнительные сведения – поставить капельницу от запоя
Быстрое обучение и получение диплома магистра – возможно ли это?
Купить диплом старого образца, можно ли это сделать по быстрой схеме?
akadem-minstroy.ru
Веломагазин Москва velosiped-internet-magazin.ru
По теме лучшие веломагазины в москве Вы попали по верному адресу. Здесь широкий ассортимент велосипедов представлен в наличии и под заказ. По любому вопросу обращайтесь по номеру телефона +7(495)215-27-98 или оформите обратный звонок. Наши специалисты дадут ответы на все вопросы, предоставят рекомендации по подбору и заказу велосипедов и аксессуаров к ним.
Found an article that’s definitely worth your time – take a look https://www.metal-archives.com/users/calenesxxw
Покупка диплома о среднем полном образовании: как избежать мошенничества?
Вопросы и ответы: можно ли быстро купить диплом старого образца?
elena-yorman.blogspot.com/2015/02/blog-post
Можно ли купить аттестат о среднем образовании? Основные рекомендации
ericos.ru/forum/index.php?PAGE_NAME=profile_view&UID=10941
Каталог веломагазина velosiped-internet-magazin.ru
Если Вы искали велосипеды купить в интернет магазине то переходите к нам. Оказываем услугу платного хранения велосипедов в Москве по низким ценам. Для небольших квартир без подвалов или балконов очень удобно на зимнее время года отдать велосипед на хранение в специальное место. У нас вы получите отличный сервис с доставкой по надобности.
Как купить аттестат 11 класса с официальным упрощенным обучением в Москве
lsfiredept.listbb.ru/viewtopic.php?f=2&t=539
https://slothacker62.com/
https://dbpedia.org/page/Gottlieb_Muffat
Как приобрести диплом о среднем образовании в Москве и других городах
Узнайте, как безопасно купить диплом о высшем образовании
Все, что вам нужно знать об all on 4 имплантации.
Имплантация зубов all on 4 – [url=http://ogp5.by/]http://ogp5.by/[/url] .
Как безопасно купить диплом колледжа или ПТУ в России, что важно знать
newnormalnetwork.me/read-blog/1302
Можно ли купить аттестат о среднем образовании? Основные рекомендации
Came across an interesting article, I propose you have a look https://carbonfacesocial.org/blogs/92858/…вакуатор-длЯ-будь-Яких-авто-у-„нґпрґ-швидко-та-безпечно
Как избежать рисков при покупке диплома колледжа или ВУЗа в России
newspromworld.ru/kupit-diplom-nadezhno-i-byistro
Купить диплом о среднем полном образовании, в чем подвох и как избежать обмана?
https://btlir.com/
https://5stargamblingsites.com/
Stumbled upon a unique article, I suggest you take a look https://poboltaem.foroactivo.com/post
Стоимость дипломов высшего и среднего образования и процесс их получения
https://5stargamblingsites.com/
Как купить аттестат 11 класса с официальным упрощенным обучением в Москве
Экиперовка велосипедистов velosiped-internet-magazin.ru
Если Вы искали крупнейший веломагазин в москве то переходите к нам. Оказываем сервис платного хранения велосипедов в Москве по смешным ценам. Для небольших квартир без кладовых или балконов очень удобно на холодное время года отдать велосипед на хранение в спец место. У нас вы получите отличный сервис с доставкой по возможности.
Возможно ли купить диплом стоматолога, и как это происходит
Купить диплом старого образца, можно ли это сделать по быстрой схеме?
Купить диплом магистра оказалось возможно, быстрое обучение и диплом на руки
ufb38096.bget.ru/index.php?subaction=userinfo&user=awalog
Как приобрести аттестат о среднем образовании в Москве и других городах
rem.4nmv.ru/forum/profile.php?action=show&member=11154
Стоимость дипломов высшего и среднего образования и как избежать подделок
network-2813601.mn.co/posts/65295401
Легальная покупка диплома ПТУ с сокращенной программой обучения
Парадокс, но купить диплом кандидата наук оказалось не так и сложно
Всё, что нужно знать о покупке аттестата о среднем образовании
Привет!
Мы можем предложить документы техникумов
forexrassia.ru/kupit-diplom-vash-byistryiy-put-k-uspehu
Купить диплом старого образца, можно ли это сделать по быстрой схеме?
art-lito.spb.ru/kak-bistro-kupit-diplom-PTU-nedorogo-s-garantiei
Официальное получение диплома техникума с упрощенным обучением в Москве
Узнайте, как безопасно купить диплом о высшем образовании
forum.stosstrupp-gold-germany.de/posting.php?mode=post&f=10
Можно ли быстро купить диплом старого образца и в чем подвох?
Процесс получения диплома стоматолога: реально ли это сделать быстро?
Алкогольная зависимость развивается в течение трех стадий. На первом этапе заболевание сложно отличить от бытового пьянства. Но человек уже является алкоголиком и нуждается в медицинской помощи. По мере прогрессирования появляются запои, соматические и психические осложнения.
Изучить вопрос глубже – нарколог на дом
Алкоголизм, к сожалению, проблема, которая была, есть и будет всегда преследовать человечество. Однако на сегодняшний день продолжают разрабатываться эффективные подходы к лечению алкоголизма.
Получить дополнительную информацию – нарколог на дом
Stumbled upon a captivating article – definitely take a look! http://perekrestok.flybb.ru/viewtopic.php?f=2&t=282
искусственно сгенерированный текст
The future of text today with MegaText! Create unique sales materials in two clicks and unlock your potential.
Source:
искусственно сгенерированный текст
полноростовые турникеты для проходной полноростовые турникеты для проходной .
Как не попасть впросак при покупке диплома колледжа или ПТУ в России
bestcoolfun.ru/kupit-diplom-otkroyte-dveri-k-novyim-vozmozhnostyam
Как не стать жертвой мошенников при покупке диплома о среднем полном образовании
Купить диплом магистра оказалось возможно, быстрое обучение и диплом на руки
Официальная покупка диплома вуза с сокращенной программой обучения в Москве
Аттестат школы купить официально с упрощенным обучением в Москве
chromerp.listbb.ru/viewtopic.php?f=13&t=594
Недорогие экскурсии в Петергоф цены, расписание и отзывы 2024 2025 года от лучших гидов
instagram anonymous story viewer instagram anonymous story viewer .
скуд цена скуд цена .
Легальные способы покупки диплома о среднем полном образовании
naya.social/read-blog/852
Discovered an article that might catch your interest – don’t miss it! http://dp.getbb.ru/viewtopic.php?f=3&t=1254
Opened up an enthralling read Ц I’d like to share it with you http://www.haxorware.com/forums/member.php?action=profile&uid=290834
Официальная покупка диплома вуза с сокращенной программой в Москве
Как официально купить диплом вуза с упрощенным обучением в Москве
ilovebookmarking.com/story17345237/получить-диплом-фитнес
Fast Transactions Fast and easy deposit and withdrawal process, without any hassle PTTOGEL
Как получить диплом стоматолога быстро и официально
Легальные способы покупки диплома о среднем полном образовании
amtest.mybb.ru/viewtopic.php?id=855#p3915
Приобретение диплома ПТУ с сокращенной программой обучения в Москве
draiv.flybb.ru/viewtopic.php?f=2&t=837
https://sibirskoezdorovie.com.ua/
купить синхровитал 4
Приобретение диплома ВУЗа с сокращенной программой обучения в Москве
Спец магазин велосипедов velosiped-internet-magazin.ru
По запросу [url=https://velosiped-internet-magazin.ru/]магазин велосипедов онлайн[/url] Вы пришли по нужному адресу. Здесь большой выбор велосипедов есть в наличии и на заказ. По возникшим вопросам звоните по номеру телефона +7(495)215-27-98 или закажите обратный звонок. Наши консультанты ответят на любые вопросы, предоставят рекомендации по выбору и покупке велосипедов и аксессуаров к ним.
Реально ли приобрести диплом стоматолога? Основные этапы
Реально ли приобрести диплом стоматолога? Основные этапы
scrapbookmarket.com/story17348634/получил-диплом-цитата
Если вам нужен надежный транспорт для активных поездок по пересеченной местности, [url=https://velosiped-magazin.ru/]горный велосипед купить в Москве недорого[/url] можно прямо у нас. Широкий ассортимент и выгодные предложения ждут вас!
Сколько стоит получить диплом высшего и среднего образования легально?
Всё о покупке аттестата о среднем образовании: полезные советы
Рекомендации по безопасной покупке диплома о высшем образовании
thecranberries.ru/forum/index.php?showuser=20206
Здравствуйте!
Мы изготавливаем дипломы.
arezonrp.forumex.ru/viewtopic.php?f=13&t=122
Как официально приобрести аттестат 11 класса с минимальными затратами времени
landofbands.mn.co/posts/65295605
Как приобрести аттестат о среднем образовании в Москве и других городах
панели армстронг http://armstrong-tiles24.ru/
Покупка школьного аттестата с упрощенной программой: что важно знать
uscgq.com/forum/posts.php?forum=general&id=288858
Как правильно купить диплом колледжа и пту в России, подводные камни
Здравствуйте!
Мы готовы предложить документы техникумов
uebkameri.listbb.ru/viewtopic.php?f=2&t=846
Официальная покупка диплома вуза с сокращенной программой обучения в Москве
Легальные способы покупки диплома о среднем полном образовании
потолки армстронг http://armstrong-tiles24.ru/
Всё, что нужно знать о покупке аттестата о среднем образовании
shgs.ru/forum/viewtopic.php?p=1558813
Легальная покупка диплома ПТУ с сокращенной программой обучения
Какие документы необходимо предоставить на медкомиссии на работу.
Медкомиссия при поступлении на работу http://www.profosmotry11-msk.ru/ .
Процесс получения диплома стоматолога: реально ли это сделать быстро?
Приобретение школьного аттестата с официальным упрощенным обучением в Москве
7468888.ru/gde-kupit-attestat-po-vigodnoi-tsene-bezopasno-i-bistro
Покупка диплома о среднем полном образовании: как избежать мошенничества?
Тебе срочно нужны деньги, но все банки отказывают? На mirtinvest.ru ты найдешь МФО, которые выдают займы без проверок и отказов. Мы отобрали для тебя только надежные компании, готовые помочь в трудную минуту. Оформи займ за пару минут и получи деньги на карту без головной боли! Не теряй время — воспользуйся нашим сервисом и забудь про отказ.
Удивительно, но купить диплом кандидата наук оказалось не так сложно
startspresto.ru/cb-profile/pluginclass/cbblogs?action=blogs&func=show&id=239
Как быстро и легально купить аттестат 11 класса в Москве
Пошаговая инструкция по официальной покупке диплома о высшем образовании
vipka.0bb.ru/viewtopic.php?id=6756#p10293
ya.2bb.ru/viewtopic.php?id=21316#p243297
Полезные советы по безопасной покупке диплома о высшем образовании
sportraketka.ru/garantirovannoe-oformlenie-diplomov-dlya-kareryi
Ищешь займ, который реально одобрят? У нас на mirtinvest.ru более 40 лицензированных МФО, готовых выдать микрокредит на карту онлайн без отказов. Минимальные требования и ставка до 0,8% в день — идеальные условия для тех, кто ценит своё время и не хочет рисковать. Заходи, выбирай своё предложение и получай деньги за считанные минуты. Всё просто и доступно!
Всё, что нужно знать о покупке аттестата о среднем образовании без рисков
Как купить аттестат 11 класса с официальным упрощенным обучением в Москве
Можно ли купить аттестат о среднем образовании? Основные рекомендации
Официальная покупка школьного аттестата с упрощенным обучением в Москве
Как получить диплом о среднем образовании в Москве и других городах
The site HOMETOGEL has an official and safe license. A trusted site.
Opened up interesting material Ц I recommend sharing this discovery https://s66-crm.ru/ot-chego-zavisit-prodvizhenie-sajta/
Узнайте, как безопасно купить диплом о высшем образовании
Как избежать рисков при покупке диплома колледжа или ПТУ в России
Стоимость дипломов высшего и среднего образования и процесс их получения
Сколько стоит диплом высшего и среднего образования и как это происходит?
Всё, что нужно знать о покупке аттестата о среднем образовании
lublena.ru/forum/?PAGE_NAME=profile_view&UID=17389
Как официально купить аттестат 11 класса с упрощенным обучением в Москве
Stumbled upon interesting material Р I can’t help but recommend you to read https://auto-dealer.su/kak-byt-esli-partnyor-xochet-poprobovat-v-posteli-to-chto-vam-ne-nravitsya/
На mirtinvest.ru вы найдёте более 40 микрофинансовых организаций, готовых предложить микрокредиты на карту онлайн без отказов. Все компании лицензированы и работают с соблюдением максимальной ставки в 0,8% в день. Мы предлагаем простую процедуру оформления, минимальные требования к заемщикам и возможность получения денег уже с 18 лет. Наш сервис создан для тех, кто ценит своё время и ищет надежные решения для своих финансовых нужд.
Процесс получения диплома стоматолога: реально ли это сделать быстро?
newrealgames.ru/kupit-diplom-bez-posrednikov-kachestvo-i-podlinnost-garantirovanyi
Как купить аттестат 11 класса с официальным упрощенным обучением в Москве
кодирование от алкоголизма торпедо кодирование от алкоголизма торпедо .
Приобретение школьного аттестата с официальным упрощенным обучением в Москве
Диплом вуза купить официально с упрощенным обучением в Москве
перко турникет перко турникет .
Добрый день!
Мы изготавливаем дипломы.
kotka.listbb.ru/ucp.php?mode=login&sid=7162bbf6237ad3528bb89ed6bfcdca82
Found an article that’s definitely worth your time Р take a look https://wiki-quicky.win/index.php?title=How_to_Explain_free_video_chat_to_a_Five-Year-Old
Купить диплом магистра оказалось возможно, быстрое обучение и диплом на руки
Официальная покупка диплома вуза с сокращенной программой в Москве
Быстрое обучение и получение диплома магистра – возможно ли это?
Приобретение диплома ПТУ с сокращенной программой обучения в Москве
true.pahom.su/2024/06/18/diplomkakklyuchkarernogorosta
Всё, что нужно знать о покупке аттестата о среднем образовании без рисков
лечение от алкогольной зависимости в крыму [url=www.xn—–7kcablenaafvie2ajgchok2abjaz3cd3a1k2h.xn--p1ai]лечение от алкогольной зависимости в крыму[/url] .
Мгновенные займы онлайн в МФО 2024. Выдача на карту без проверок и отказов.
Покупка диплома о среднем полном образовании: как избежать мошенничества?
vnuci.listbb.ru/viewtopic.php?f=2&t=732
Как получить диплом стоматолога быстро и официально
funchange.getbb.ru/ucp.php?mode=login&sid=7910eb4805a6bbe78e845d2679558d35
Полезные советы по покупке диплома о высшем образовании без риска
Как купить аттестат 11 класса с официальным упрощенным обучением в Москве
prof-komplekt.com/club/user/1035/blog/11782
Быстрое обучение и получение диплома магистра – возможно ли это?
Добрый день!
Мы готовы предложить документы техникумов
wo.linyway.com/read-blog/10722
Как приобрести диплом о среднем образовании в Москве и других городах
weekevents.ru/diplom-za-korotkiy-srok-i-bez-stressa
Сколько стоит диплом высшего и среднего образования и как его получить?
Вопросы и ответы: можно ли быстро купить диплом старого образца?
severka.flybb.ru/viewtopic.php?f=6&t=460
Покупка диплома о среднем полном образовании: как избежать мошенничества?
telegra.ph/kakiedokumentypodavatpripostupleniivvuz0724
Официальная покупка школьного аттестата с упрощенным обучением в Москве
binran.spb.ru/kupit-diplom-gosudarstvennogo-obraztsa-nedorogo-i-bistro.htm
Можно ли быстро купить диплом старого образца и в чем подвох?
ресурс двигателя renault koleos 2.5 бензин надежность долговечность и сколько проходит мотор
рено логан 2 где найти вин и номера кузова полное руководство
Здравствуйте!
Мы изготавливаем дипломы.
darknews.ru/gde-kupit-diplom-nedorogo
Полезная информация как купить диплом о высшем образовании без рисков
Как получить диплом техникума официально и без лишних проблем
Пошаговая инструкция по официальной покупке диплома о высшем образовании
Вопросы и ответы: можно ли быстро купить диплом старого образца?
Реально ли приобрести диплом стоматолога? Основные этапы
dragonlivers.ixbb.ru/viewtopic.php?id=188#p188
Как безопасно купить диплом колледжа или ПТУ в России, что важно знать
Кредит на карту без отказов за минуту. МФО 2024 с выдачей даже с плохой кредитной историей.
Как оказалось, купить диплом кандидата наук не так уж и сложно
allisenergy.flybb.ru/topic48?view=next
Как получить диплом стоматолога быстро и официально
Официальная покупка школьного аттестата с упрощенным обучением в Москве
Диплом вуза купить официально с упрощенным обучением в Москве
щербиновскийрайон.рф/users/160
Привет!
Мы предлагаем документы техникумов
mymotospeed.ru/oformlenie-diplomov-s-registratsiey-v-baze
Как официально купить аттестат 11 класса с упрощенным обучением в Москве
Удивительно, но купить диплом кандидата наук оказалось не так сложно
Аттестат школы купить официально с упрощенным обучением в Москве
Всё, что нужно знать о покупке аттестата о среднем образовании
ap.org.ru/diplom-tekhnikuma-vse-chto-nuzhno-znat-o-znachimosti-i-poluchenii.htm
Как не стать жертвой мошенников при покупке диплома о среднем полном образовании
Официальная покупка диплома вуза с сокращенной программой в Москве
loveyourbirth.co.uk/great-birth-lucky-cow/#comment-553130
Рекомендации по безопасной покупке диплома о высшем образовании
odincovoschool16.flybb.ru/viewtopic.php?f=2&t=957
Как купить аттестат 11 класса с официальным упрощенным обучением в Москве
Быстрая покупка диплома старого образца: возможные риски
Покупка диплома о среднем полном образовании: как избежать мошенничества?
sntnika.forumex.ru/viewtopic.php?f=26&t=371
Как правильно купить диплом колледжа и пту в России, подводные камни
Диплом вуза купить официально с упрощенным обучением в Москве
Stumbled upon an interesting article Р I suggest you take a look http://mosdmit.flybb.ru/viewtopic.php?f=2&t=396
Как приобрести аттестат о среднем образовании в Москве и других городах
Сколько стоит диплом высшего и среднего образования и как это происходит?
как сделать текст уникальным
How can you automate your advertising to the full 100?
Source:
– https://gamelllover.mybb.ru/viewtopic.php?id=15
insta viewer [url=https://anstoriesview.com/]insta viewer[/url] .
instagram story viewer [url=http://anonstoriesview.com]http://anonstoriesview.com[/url] .
Приобретение школьного аттестата с официальным упрощенным обучением в Москве
Opened up an enthralling read – I’d like to share it with you https://uniform-wiki.win/index.php?title=From_Around_the_Web:_20_Fabulous_Infographics_About_Zufalliger_Video-Chat
Как безопасно купить диплом колледжа или ПТУ в России, что важно знать
Как быстро получить диплом магистра? Легальные способы
israelafrica.mn.co/posts/65287236
Как получить диплом стоматолога быстро и официально
indianwomenorg.com/read-blog/10815
Аттестат 11 класса купить официально с упрощенным обучением в Москве
rock8899.com/home.php?mod=space&uid=1340941
Как официально купить диплом вуза с упрощенным обучением в Москве
sadcr.listbb.ru/posting.php?mode=post&f=53&sid=76f159763da938143d40ada4187b1380
Как приобрести диплом о среднем образовании в Москве и других городах
Как правильно приобрести диплом колледжа или ПТУ в России, важные моменты
Вопросы и ответы: можно ли быстро купить диплом старого образца?
Как безопасно купить диплом колледжа или ПТУ в России, что важно знать
Как избежать рисков при покупке диплома колледжа или ПТУ в России
Рекомендации по безопасной покупке диплома о высшем образовании
louissxzce.gynoblog.com/27249487/получила-диплом
Как безопасно купить диплом колледжа или ПТУ в России, что важно знать
telegra.ph/kakprohoditdistancionnoeobuchenievvuze0724
Покупка диплома о среднем полном образовании: как избежать мошенничества?
Закодировать от алкоголя в Астане [url=https://kodirovanie-ot-alkogolizma-astana.kz/]Закодировать от алкоголя в Астане [/url] .
video x video x video [url=www.xxxvideospro.com]video x video x video[/url] .
Как не стать жертвой мошенников при покупке диплома о среднем полном образовании
instagram posts instagram posts .
Полезные советы по безопасной покупке диплома о высшем образовании
Если вам необходим займ под 0% и без звонков оператора, Микрозаймы с мгновенным одобрением поможет сделать правильный выбор. Мы предлагаем список займов с мгновенным одобрением и минимальными требованиями. Оформление онлайн и мгновенный перевод на карту – просто и удобно. Подпишитесь на канал, чтобы не упустить выгодные условия.
Как получить диплом техникума официально и без лишних проблем
Реально ли приобрести диплом стоматолога? Основные шаги
Полезные советы по безопасной покупке диплома о высшем образовании
Аттестат школы купить официально с упрощенным обучением в Москве
fromfostercaretoceo.mn.co/posts/65295184
Как купить аттестат 11 класса с официальным упрощенным обучением в Москве
быстрый вывод из запоя ростов быстрый вывод из запоя ростов .
вывод из запоя цены ростов-на-дону http://www.vyvod-iz-zapoya-rostov16.ru/ .
Возможно ли купить диплом стоматолога, и как это происходит
kai87la.flybb.ru/viewtopic.php?f=5&t=553
[u][b] Добрый день![/b][/u]
Мы можем предложить дипломы.
[url=http://goup.hashnode.dev/diplom-na-zakaz-po-luchshej-cene/]goup.hashnode.dev/diplom-na-zakaz-po-luchshej-cene[/url]
Полезные советы по безопасной покупке диплома о высшем образовании
Покупка диплома о среднем полном образовании: как избежать мошенничества?
semicolonproject.net/forum/viewtopic.php?t=156121
Вопросы и ответы: можно ли быстро купить диплом старого образца?
https://horrorium.ru/pag/evolyuciya_dizayna_kak_sovremennye_tehnologii_menyayut_oblik_ghilischa_i_formiruyut_novuy.html
Официальная покупка диплома вуза с сокращенной программой в Москве
Удаление папиллом
Мифы и факты об избавлении от папиллом: рассмотрим внимательно
удаление папиллом лазером стоимость http://www.laser-removal-of-papillomas.ru .
Вопрос – Ответ
“Удаление папиллом москва”. “В Москве можно найти множество клиник, предлагающих профессиональные услуги по удалению папиллом различными методами.” “Papilloma removal Moscow”. “In Moscow, you can find many clinics offering professional papilloma removal services using various methods.”
“Удаление папиллом на теле”. “Удаление папиллом на теле лазером — это эффективный и безопасный способ устранить кожные новообразования без следов.” “Papilloma removal on the body”. “Laser removal of papillomas on the body is an effective and safe way to eliminate skin growths without leaving marks.”
Алкогольная зависимость развивается в течение трех стадий. На первом этапе заболевание сложно отличить от бытового пьянства. Но человек уже является алкоголиком и нуждается в медицинской помощи. По мере прогрессирования появляются запои, соматические и психические осложнения.
Получить дополнительную информацию – вывод из запоя на дому в Рыбинске
Алкоголизм, к сожалению, проблема, которая была, есть и будет всегда преследовать человечество. Однако на сегодняшний день продолжают разрабатываться эффективные подходы к лечению алкоголизма.
Узнать больше – врач нарколог на дом
veneraroleplay.listbb.ru/viewtopic.php?f=4&t=418
Как официально купить аттестат 11 класса с упрощенным обучением в Москве
Можно ли купить аттестат о среднем образовании, основные моменты и вопросы
Confira a hora certa em Brasília e garanta que suas atividades estejam sempre alinhadas com o tempo exato. Não deixe que a desinformação atrapalhe seu dia!
Официальное получение диплома техникума с упрощенным обучением в Москве
lzdsxxb.com/home.php?mod=space&uid=1924209
Реально ли приобрести диплом стоматолога? Основные этапы
Привет!
Мы изготавливаем дипломы.
profit.hutt.live/viewtopic.php?id=8970#p11390
Приобретение диплома ПТУ с сокращенной программой обучения в Москве
jagplay.ekafe.ru/viewtopic.php?f=22&t=4147
Быстрое обучение и получение диплома магистра – возможно ли это?
sociallweb.com/story2700661/получить-юр-диплом
Рекомендации по безопасной покупке диплома о высшем образовании
Stumbled upon interesting material – I can’t help but recommend you to read Готовим из мяса
вывод из запоя в ростове-на-дону вывод из запоя в ростове-на-дону .
вывод из запоя в ростове-на-дону вывод из запоя в ростове-на-дону .
вызов нарколога цена вызов нарколога цена .
Encountered a captivating article, I propose you read http://uzmuz.tv/go.php?url=https://www.mapleprimes.com/users/brennaidji
сгенерировать текст
MegaText – это уникальное решение в мире онлайн-генерации текста. Контент, который наполняет ваши посты, автоматически адаптируется под конкретную аудиторию и задачи продвижения. Легко настраивайте стиль, тон и тематику сообщений. Дополните усилия вашей команды умом MegaText!
Source:
сгенерировать текст
Вопросы и ответы: можно ли быстро купить диплом старого образца?
sntnika.forumex.ru/viewtopic.php?f=26&t=371
Узнайте стоимость диплома высшего и среднего образования и процесс получения
Приобретение школьного аттестата с официальным упрощенным обучением в Москве
amu-studio.ru/diplom-o-visshem-obrazovanii-s-zaneseniem-v-reestr-ofitsialnii-dokument
Отдых на у озера обеспечит вам потрясающие глубоких впечатлений. Походы на свежем воздухе поддерживают активность состояние души и снижают стресс найти гармонию после напряженной занятости. Разрабатывайте планы свой туры на природу с наслаждением!
telegra.ph
очистка организма от алкоголя капельница https://lecheniealkgolizma.ru/
Официальная покупка диплома вуза с сокращенной программой в Москве
Если вы хотите выразить индивидуальность своему автомобилю и создать неповторимый образ, то на сайте baikalwheels.ru у вас предлагается вариант диски на авто на 15 цена известных мировых брендов. В каталоге представлены такие марки, как Replika, Nitro, Legeartis и K&K, которые известны надежностью. Размеры варьируются от 16 до 22 дюймов, что дает возможность выбрать идеальные диски для любых автомобилей — от седанов до внедорожников.
Opened up an enthralling read – I’d like to share it with you https://www.mkbox.ru/communication/forum/user/74776/
Ford P049B
Если вы хотите придать уникальность своему автомобилю и сделать его особенным, то на сайте baikalwheels.ru у вас предоставляется шанс диски купить в калининграде популярных мировых брендов. В каталоге представлены такие производители, как Replika, Nitro, Legeartis и K&K, которые имеют отличную репутацию. Размеры варьируются от 16 до 22 дюймов, что дает возможность выбрать идеальные диски для любых автомобилей — от седанов до внедорожников.
Плохая кредитная история и просрочки больше не проблема! [url=https://t.me/MFO_dayt_vsem/25]Займы 0% на карту без проверок[/url] предлагает реальные варианты займов до 30 000 рублей для тех, у кого проблемы с кредитом. Не жди чуда от банков – мы знаем, где тебе точно помогут! Подпишись на канал, и деньги окажутся на твоей карте быстрее, чем ты ожидаешь!
замена тросов и ручника на форд фокус 1 подробное руководство
Можно ли купить аттестат о среднем образовании, основные моменты и вопросы
Приобретение школьного аттестата с официальным упрощенным обучением в Москве
ann-summers-coupons72604.blogdigy.com/a-review-of-marketing-41519801
Аттестат школы купить официально с упрощенным обучением в Москве
Привет!
Мы готовы предложить документы техникумов
dkk.su/?post_type=topic&p=17187
Как получить диплом о среднем образовании в Москве и других городах
Узнайте стоимость диплома высшего и среднего образования и процесс получения
вводят при выводе из запоя https://lecheniealkgolizma.ru/
Как правильно купить диплом колледжа и пту в России, подводные камни
сушка воздуха в помещении https://sushka-pomeshchenij-v-msk.ru/
Стоимость дипломов высшего и среднего образования и как избежать подделок
sciencenewhop.maxbb.ru/viewtopic.php?f=44&t=860
Вопросы и ответы: можно ли быстро купить диплом старого образца?
Концерты на стадионах предоставят вам восторженные музыкальные ощущения. Ночные шоу создадут атмосферу познать магию музыки. Ощущать драйв музыки с радостью создаст атмосферу праздничные мгновения. Подготавливайте билеты на динамичные концерты без суеты!
vocal.media/authors/mapmaster
просушка потолков после затопления https://sushka-pomeshchenij-v-msk.ru/
Пошаговая инструкция по официальной покупке диплома о высшем образовании
nordic-future.mn.co/posts/65294647
Приобретение школьного аттестата с официальным упрощенным обучением в Москве
Узнайте, как безопасно купить диплом о высшем образовании
c-courses.ru/skolko-stoit-kupit-diplom-o-visshem-obrazovanii
Как избежать рисков при покупке диплома колледжа или ПТУ в России
Диплом техникума купить официально с упрощенным обучением в Москве
Приобретение диплома ПТУ с сокращенной программой обучения в Москве
Приобретение диплома ПТУ с сокращенной программой обучения в Москве
Наличие плохой кредитной истории — не приговор! На нашем сайте вы найдете полезные советы, как выбрать надёжную микрофинансовую организацию (МФО) даже в сложной ситуации. Мы собрали список проверенных компаний, которые готовы выдать займ клиентам с низким кредитным рейтингом. Чтобы избежать отказов и выбрать подходящее предложение, важно знать ключевые моменты: процентные ставки, сроки возврата и репутацию компании. На странице вы сможете ознакомиться с полным списком доступных МФО, которые предоставляют займы на выгодных условиях, даже если ваша кредитная история оставляет желать лучшего.
Тебе срочно нужны деньги, но все банки отказывают? На mirtinvest.ru ты найдешь МФО, которые выдают займы без проверок и отказов. Мы отобрали для тебя только надежные компании, готовые помочь в трудную минуту. Оформи займ за пару минут и получи деньги на карту без головной боли! Не теряй время — воспользуйся нашим сервисом и забудь про отказ.
Стоимость дипломов высшего и среднего образования и как избежать подделок
Развлечения на пляже придадут вам бесчисленные ощущений. Прогулки на велосипеде подарят энергию почувствовать драйв. Клубные вечеринки приглашают фантастические моменты. Придумывайте свои экскурсии по городу с радостью!
gravatar.com/mapmasteronline
Возможно ли купить диплом стоматолога, и как это происходит
univer9.ru/sezon-online/161-seriya-9-season-1-seriya-online
Полезные советы по покупке диплома о высшем образовании без риска
Купить диплом магистра оказалось возможно, быстрое обучение и диплом на руки
Купить диплом о среднем полном образовании, в чем подвох и как избежать обмана?
maisoncarlos.com/UserProfile/tabid/42/UserID/1982130/Default.aspx
Легальная покупка диплома ПТУ с сокращенной программой обучения
Сколько стоит диплом высшего и среднего образования и как его получить?
Всё, что нужно знать о покупке аттестата о среднем образовании
Сколько стоит диплом высшего и среднего образования и как его получить?
avtolux48.ru/people/user/374/blog/8517
Как получить диплом техникума с упрощенным обучением в Москве официально
Stumbled upon interesting material Р I can’t help but recommend you to read http://speciesgame.com/forum/viewtopic.php?f=2&t=10939
Можно ли быстро купить диплом старого образца и в чем подвох?
Представьте: вы оформляете займ и возвращаете ровно столько, сколько взяли — ни копейкой больше. Звучит как фантастика? На самом деле это реальность, и на нашем портале вы найдете самые выгодные экспресс-займы под 0% для новых клиентов. Хотите узнать, как это работает? Всё просто! Эти предложения созданы специально для тех, кто впервые обращается в МФО. Быстрое одобрение, моментальное перечисление средств на карту и никаких переплат! На странице вас ждут актуальные предложения 2024 года, которые помогут решить финансовые вопросы без лишних затрат. Не упустите шанс взять деньги бесплатно!
Приобретение школьного аттестата с официальным упрощенным обучением в Москве
t98223u0.beget.tech/2024/08/23/nado-zakazat-diplom-vybirayte-luchshiy-internet-magazin
Диплом пту купить официально с упрощенным обучением в Москве
turservisnews.ru/oformlenie-diplomov-lyuboy-slozhnosti
Приобретение диплома ПТУ с сокращенной программой обучения в Москве
myskupera.ru/forum/messages/forum1/topic12/message116124/?result=reply#message116124
Полезные советы по безопасной покупке диплома о высшем образовании
telegra.ph/formamedicinskojspravkipripostupleniivvuz0724
Если вы хотите подчеркнуть стиль своему автомобилю и создать неповторимый образ, то на сайте baikalwheels.ru у вас предлагается вариант купить диски в самаре известных мировых брендов. В каталоге представлены такие марки, как Replika, Nitro, Legeartis и K&K, которые славятся качеством. Размеры варьируются от 16 до 22 дюймов, что позволяет подобрать идеальные диски для любых автомобилей — от седанов до внедорожников.
Официальная покупка школьного аттестата с упрощенным обучением в Москве
Официальная покупка диплома вуза с сокращенной программой в Москве
Found captivating reading that’s worth your time – take a look https://blog.nataraj.ru/~/Interest/Получите официальный диплом с внесением в госреестр за несколько дней
Сколько стоит получить диплом высшего и среднего образования легально?
forumforum.ru/index.php?/topic/58-купить-диплом-в-махачкале-d132b
Можно ли купить аттестат о среднем образовании, основные моменты и вопросы
italian-style.ru/Nasha_kompanija/forum/?PAGE_NAME=profile_view&UID=58165
Купить диплом старого образца, можно ли это сделать по быстрой схеме?
Found an enthralling read that I’d recommend – it’s truly fascinating https://list.ly/dearusywfa
Сколько стоит диплом высшего и среднего образования и как его получить?
Приобретение диплома ПТУ с сокращенной программой обучения в Москве
tricityfriends.com/read-blog/1089
Наша компания Baikal-Wheels реализует премиальные кованые диски на заказ и [url=https://baikalwheels.ru/catalog?d=15]купить диски r15[/url] которые известны своей прочностью и легкостью, оптимизирующей динамические характеристики автомобиля. Приобретая продукцию в компании Baikal-Wheels, вы получаете не только надежные изделия от лучших производителей, но и высококлассный сервис с удобной доставкой прямо к двери.
Как приобрести диплом техникума с минимальными рисками
Пошаговая инструкция по официальной покупке диплома о высшем образовании
Как быстро и легально купить аттестат 11 класса в Москве
Как официально купить аттестат 11 класса с упрощенным обучением в Москве
такой https://len-parket.ru/
Пошаговая инструкция по официальной покупке диплома о высшем образовании
sampnewrp.listbb.ru/viewtopic.php?f=18&t=622&sid=351338677f9125ec1a9e77bf1084e0c5
Ищете займ без отказа под 0% и без назойливых звонков операторов? [url=https://t.me/zaim_bez_otkaza_srochno/40]МФО без проверок – займы на карту[/url] предлагает список микрофинансовых организаций с мгновенным одобрением заявок онлайн. Получите деньги быстро и без лишних вопросов. Подпишитесь на канал, чтобы всегда быть в курсе актуальных предложений с минимальными условиями и выгодными процентами.
Why choose double glazed windows in Melbourne
double glazed window glass [url=http://www.bestnosefiller.com/double-glazed-melbourne/]http://www.bestnosefiller.com/double-glazed-melbourne/[/url] .
Хватит получать отказы! На [url=https://mirtinvest.ru/]mirtinvest.ru[/url] собраны лучшие МФО, которые выдают займы на карту онлайн без отказа и звонков оператора. Всё, что вам нужно, — это паспорт и именная банковская карта. Более 90% заявок получают одобрение на суммы до 30 000 рублей. Мы предлагаем только надёжные варианты, где оформление займа занимает считанные минуты. Оцените простоту и удобство нашего сервиса уже сегодня!
Полезные советы по безопасной покупке диплома о высшем образовании
[url=https://t.me/microzaimfun/14]Срочные займы под 0% онлайн[/url] – это твой шанс решить финансовые трудности мгновенно! Мы собрали только те компании, которые реально одобряют заявки. Больше не нужно переживать за долгие ожидания или отказы. Подписывайся на канал и выбирай займы, которые точно будут одобрены. Деньги на карту – за считанные минуты!
В условиях современного финансового рынка найти МФО, готовую выдать займ без отказа, кажется настоящей удачей. Однако, такие предложения существуют, и на нашем [url=https://all-credit.ru/ ]сайте[/url] собраны лучшие из них. Многие заемщики сталкиваются с отказами из-за испорченной кредитной истории, но на [url=https://all-credit.ru/zaym-35000-rubley/ ]странице[/url] представлена подборка компаний, которые готовы предоставить займ практически каждому. Быстрое оформление заявки, минимальные требования и высокий процент одобрений — это реальные возможности, доступные каждому. Наши журналисты исследовали рынок и выбрали МФО с наибольшей вероятностью положительного решения. Узнайте, как быстро получить деньги на карту, без отказа и без лишних проверок.
Быстрая схема покупки диплома старого образца: что важно знать?
bestnasos.ru/forum/user/4473
Как приобрести аттестат о среднем образовании в Москве и других городах
Даже с плохой кредитной историей вы можете получить [url=https://google.bt/url?q=https://all-credit.ru/zaim-bez-otkaza-na-kartu/]быстрый займ без отказа на карту срочно [/url]. Все МФО работают официально, ставка всего 0.8%.
Discovered a unique article – recommended to acquaint yourself! http://jasperxbgq177.bearsfanteamshop.com/10-no-fuss-ways-to-figuring-out-your-porno-onlajn-pary
Неважно, какая у вас кредитная история! Получите кредит без отказа на карту до 30 000 рублей на любую банковскую карту.
Удивительно, но купить диплом кандидата наук оказалось не так сложно
98e.fun/space-uid-7781514
Как приобрести диплом техникума с минимальными рисками
astroroleplay.getbb.ru/viewtopic.php?f=6&t=509
Купить диплом старого образца, можно ли это сделать по быстрой схеме?
Как купить аттестат 11 класса с официальным упрощенным обучением в Москве
vipka.0bb.ru/post.php?fid=7
Процесс получения диплома стоматолога: реально ли это сделать быстро?
Полезные советы по покупке диплома о высшем образовании без риска
charleston-wiffleball-association.mn.co/posts/65294887
Можно ли купить аттестат о среднем образовании, основные моменты и вопросы
bbs.heyshell.com/forum.php?mod=viewthread&tid=29019&extra=
Гипертрофия молочных желез http://frauklinik.ru/plasticheskaya-hirurgia// .
Стоимость дипломов высшего и среднего образования и процесс их получения
Купить диплом старого образца, можно ли это сделать по быстрой схеме?
Как официально купить диплом вуза с упрощенным обучением в Москве
Официальное получение диплома техникума с упрощенным обучением в Москве
ya.7bb.ru/viewtopic.php?id=13757#p38558
https://www.armatura4u.ru
Легальная покупка диплома ПТУ с сокращенной программой обучения
Discovered an article that might catch your interest Р don’t miss it! http://mafiaclans.ru/viewtopic.php?f=43&t=8396
Came across a unique article – it’s worth your attention https://www.bandlab.com/arinakonovalova
Как правильно приобрести диплом колледжа или ПТУ в России, важные моменты
Быстрое обучение и получение диплома магистра – возможно ли это?
myimperia.ru/44930-kupit-diplom-o-vyisshem-obrazovanii
Discovered an interesting article, I suggest you familiarize yourself http://gamesmaker.ru/forum/common/offtopics/#replyform
Процесс получения диплома стоматолога: реально ли это сделать быстро?
Всё, что нужно знать о покупке аттестата о среднем образовании
Официальная покупка диплома вуза с сокращенной программой обучения в Москве
allukrnews.ru/gde-byistro-kupit-diplom-nedorogo
Официальная покупка диплома вуза с сокращенной программой в Москве
8saksx-diploms.ru
Диплом техникума купить официально с упрощенным обучением в Москве
Аттестат школы купить официально с упрощенным обучением в Москве
cn.tiptip.kr/bbs/board.php?bo_table=freeboard&wr_id=226023&page=876
Всё, что нужно знать о покупке аттестата о среднем образовании
trum.flybb.ru/viewtopic.php?f=15&t=4894
Вам срочно нужны деньги? Выберите проверенные МФО, которые выдают микрозаймы без отказов до 30 000 рублей моментально.
вызов нарколога на дом цена вызов нарколога на дом цена .
нарколог на дом круглосуточно http://narkolog-na-dom-krasnodar17.ru .
вывод из запоя в краснодаре вывод из запоя в краснодаре .
new porn sexy https://xxxfreenow.com .
view insta stories anonymously view insta stories anonymously .
Pretty! This has been an incredibly wonderful article. Thank you for providing these details.
https://sekrety-kulinarii.ru/salat-nezhnyj-s-krabovym-myasom/
https://www.azdorovia.ru/oformlenie-medicinskoj-knizhki.html
Хотите мгновенные деньги? Оформи микрозайм онлайн на карту без отказа срочно до 30 000 рублей, не выходя из дома, без проверок!
Discovered an article that will surely interest you Р I recommend checking it out http://kidsnighttonight.com:/forums/member.php?action=profile&uid=360970
Discovered an article that will surely interest you Р I recommend checking it out https://www.creativelive.com/student/isabel-nichols?via=accounts-freeform_2
http://mybaltika.info/ru/print/587/11469/
Полезная информация как купить диплом о высшем образовании без рисков
Stumbled upon a captivating article – definitely take a look! https://jeffreycgpo.bloggersdelight.dk/2024/09/10/where-to-find-guest-blogging-opportunities-on-httpsenchat-ruletka-18com/
На сегодняшний день для успешного продвижения бизнеса в сети недостаточно просто создать сайт. Важно, чтобы он был в топе в поисковых системах. Digital агентство ПАРОВОЗ уже более 10 лет специализируется на у кого заказать продвижение сайта создавая компаниям стабильный поток клиентов. Мы даем возможность пробное продвижение, в рамках которого вы сможете проверить нашу работу и увидеть реальные результаты.
Главный секрет нашего успеха — это использование инновационных методов и профессиональный подход. Мы не просто поднимаем посещаемость сайта, а предлагаем агентство продвижения сайтов которое содержит увеличение ссылочного профиля, накрутку поведенческих факторов и подъем позиций в ТОПе Google и Яндекс. Если вы хотите, чтобы ваш сайт работал на вас, действовать нужно уже сейчас — конкуренция усиливается с каждым днем.
Discovered an article that’s sure to appeal to you Р I recommend checking it out http://eduardobztd136.yousher.com/the-no-1-question-everyone-working-in-free-video-chat-should-know-how-to-answer
игра человек на ракете на деньги https://raketa-igra.fun/
Как не стать жертвой мошенников при покупке диплома о среднем полном образовании
Как получить диплом о среднем образовании в Москве и других городах
pc28lt.com/?315860
Encountered a captivating article, I propose you read https://www.mixcloud.com/gwracheakc/
здесь
Как оказалось, купить диплом кандидата наук не так уж и сложно
В современном мире для успешного продвижения бизнеса в сети недостаточно просто создать сайт. Важно, чтобы он находился на первых местах в поисковых сервисах. Digital агентство ПАРОВОЗ уже более десятилетия занимается техническая поддержка сайта стоимость создавая компаниям новый приток клиентов. Мы предлагаем тестовое предложение, в рамках которого вы сможете проверить качество наших услуг и ощутить результаты на практике.
Секрет нашего успеха — это внедрение современных технологий и высокий профессионализм. Мы не просто увеличиваем посещаемость, а реализуем продвижение сайтов европа которое включает в себя увеличение ссылочного профиля, повышение поведенческих показателей и повышение мест в топе Гугл и Яндекс. Если вы хотите, чтобы ваш сайт работал на вас, действовать нужно уже сейчас — конкуренция усиливается с каждым днем.
Всё о покупке аттестата о среднем образовании: полезные советы
4russkiy365-diploms.ru
Парадокс, но купить диплом кандидата наук оказалось не так и сложно
???.??/rooftile/gnuboard/bbs/board.php?bo_table=bbs03&wr_id=59219
Learn different professions on Lineage 2 servers
Lineage 2 Classic https://cryptoexlicense.com/chronicle/lineage-2-classic/ .
Парадокс, но купить диплом кандидата наук оказалось не так и сложно
Официальная покупка диплома вуза с упрощенной программой обучения
kotka.listbb.ru/viewtopic.php?f=2&t=480
Привет!
Мы готовы предложить документы техникумов
rrsclub.ru/member.php?u=1164
Купить диплом магистра оказалось возможно, быстрое обучение и диплом на руки
Официальное получение диплома техникума с упрощенным обучением в Москве
rolevikionline.g-talk.ru/viewtopic.php?f=21&t=3199
Если у вас плохая кредитная история или были просрочки, не переживайте — у нас собрана лучшая подборка МФО, которые готовы помочь займы онлайн срочно . Мы предлагаем более 90 проверенных микрофинансовых организаций с гибкими условиями для всех, кто нуждается в деньгах: от домохозяек до самозанятых лучшие мфо для займов . Наши статьи о микрозаймах и советы заемщикам помогут вам лучше разобраться в финансовых вопросах и выбрать самый подходящий займ малоизвестные мфо без проверок . Неважно, кто вы и в какой ситуации оказались — у нас вы найдете лучший вариант для получения средств быстро и без отказов!
почитать можно здесь
займы новые онлайн малоизвестные
Приобретение школьного аттестата с официальным упрощенным обучением в Москве
Покупка диплома о среднем полном образовании: как избежать мошенничества?
Приобретение диплома ПТУ с сокращенной программой обучения в Москве
Как приобрести диплом о среднем образовании в Москве и других городах
Как правильно купить диплом колледжа и пту в России, подводные камни
fire-team.ru/forum/showthread.php?p=44579#post44579
Пошаговая инструкция по безопасной покупке диплома о высшем образовании
collieforum.ru/posting.php?mode=post&f=17&sid=8ba4c2e56c1f7fc7c968969b2fbf6d7b
Легальные способы покупки диплома о среднем полном образовании
gamereleasetoday.com/diplom-kupit-519989eb
заказать проститутку санкт петербург https://kykli.com/
Узнайте стоимость диплома высшего и среднего образования и процесс получения
интим услуги спб https://kykli.com/
Как не стать жертвой мошенников при покупке диплома о среднем полном образовании
buxtome.ru/WOFF/2021/12/24/vozmozhnost-pokupki-attestata-onlayn
Привет, друзья!
Мы можем предложить документы ВУЗов
shopy.partners/create-blog
Легальная покупка школьного аттестата с упрощенной программой обучения
У нас — лучшая подборка МФО для тех, у кого плохая кредитная история или есть просрочки онлайн займ денег без процентов . Более 90 проверенных компаний предлагают займы без отказа для всех: от домохозяек до самозанятых мфо займы онлайн на карту . Каждый найдет подходящий вариант с минимальными требованиями и моментальным переводом на карту новые онлайн займы на карту . Мы тщательно отбираем только те МФО, которые предлагают самые выгодные условия микрозайм мфо онлайн без отказа . Кроме того, наш сайт наполнен полезными статьями про микрозаймы и рекомендациями для заемщиков, чтобы каждый мог сделать осознанный выбор и избежать финансовых ошибок мфо без регистрации .
Официальная покупка диплома вуза с сокращенной программой обучения в Москве
Диплом техникума купить официально с упрощенным обучением в Москве
Приобретение школьного аттестата с официальным упрощенным обучением в Москве
dip-zakaz.ru/kak-bezopasno-i-bistro-kupit-diplom-tekhnikuma-v-2023-godu.php
Всё, что нужно знать о покупке аттестата о среднем образовании без рисков
Купить диплом о среднем полном образовании, в чем подвох и как избежать обмана?
Онлайн-займы — это ваш помощник в экстренных ситуациях! Срочно нужны деньги? Не беда! Вы можете оформить займ за несколько минут, не выходя из дома [url=https://itacat.ru/]займ без отказа на карту[/url] . Процедура максимально проста, минимальные требования — возраст от 18 лет и паспорт [url=https://itacat.ru/]быстрый займ без процентов на карту[/url] . Даже если у вас плохая кредитная история, вы всё равно можете получить займы без отказа [url=https://itacat.ru/]деньги на карту без отказов[/url] . Средства моментально переводятся на карту, что позволяет вам быстро решить любые финансовые проблемы [url=https://itacat.ru/]займ на карту через госуслуги без отказа[/url] . У нас лучшие МФО, которые одобряют займы без лишних вопросов и проверок!
[url=https://mikro-zaim-online.ru/]взять кредит без процентов[/url]
Удивительно, но купить диплом кандидата наук оказалось не так сложно
nec.phorum.pl/posting.php?mode=newtopic&f=27&sid=d2532735c5e30d0ae22bb1ca3adfd53b
Discovered an intriguing article, I recommend you to check it out https://wiki-neon.win/index.php?title=What_NOT_to_Do_in_the_de.chatruletka-18.com_Industry
Came across a unique piece – be sure to check it out https://about.me/mskmassage
Установите приложение с официального сайта 888starz bet на андроид.
Можно ли купить аттестат о среднем образовании, основные моменты и вопросы
healthymedinfo24
healthymedinfo365
healthymedinfo7
1win uz https://edulike.uz/
Быстрая схема покупки диплома старого образца: что важно знать?
simsonviglu.cz/phpBB/phpBB3/viewtopic.php?f=1&t=32954&view=next
Discovered an article that might catch your interest – don’t miss it! https://telegra.ph/What-I-Wish-I-Knew-a-Year-Ago-About-datingmidnightcom-09-16-2
Полезная информация как купить диплом о высшем образовании без рисков
Discovered an article that will surely interest you – I recommend checking it out http://www.webclap.com/php/jump.php?url=https://www.instapaper.com/read/1708833910
Покупка диплома о среднем полном образовании: как избежать мошенничества?
kofe.80lvl.ru/viewtopic.php?f=10&t=916
Можно ли быстро купить диплом старого образца и в чем подвох?
cursovik.ru/kupit-diplom-stomatologa-bistro-i-nadezhno.htm
Сколько стоит диплом высшего и среднего образования и как его получить?
Купить диплом старого образца, можно ли это сделать по быстрой схеме?
Полезные советы по покупке диплома о высшем образовании без риска
Сколько стоит диплом высшего и среднего образования и как его получить?
mafiaclans.ru/viewtopic.php?f=43&t=8135
Discovered an interesting article, I suggest you familiarize yourself https://wiki-book.win/index.php?title=Enough_Already!_15_Things_About_datingmidnight.com_We%27re_Tired_of_Hearing
healthymedinfo24
healthymedinfo365
healthymedinfo7
Discovered an article that will definitely interest you – don’t miss the chance to familiarize yourself http://www.kaskus.co.id/redirect?url=https://www.hometalk.com/member/127923205/allen1839785
Диплом пту купить официально с упрощенным обучением в Москве
musictech.gr/forum/viewtopic.php?f=8&t=51809
Желаете, чтобы ваш сайт оказался в верхних строчках поисковых запросов и собирал новых клиентов? Digital агентство ПАРОВОЗ способно превратить это в действительность! Мы занимаемся заказать ведение контекстной рекламы внедряя самые эффективные стратегии, которые помогут вам обогнать конкурентов и занять лидирующие позиции в Google и Яндекс.
С нами вы получите сео оптимизация ижевск содержащее передовые средства SEO и многолетний опыт работы. Более десять лет мы успешно продвигаем проекты по всей России, и наши удовлетворённые клиенты — лучшее тому подтверждение. Готовы убедиться? Оцените наш пробное предложение и убедитесь, что ПАРОВОЗ — это гарантия результата!
nutriciolog.ru/poluchite-diplom-bystro-i-bez-lishnix-xlopot
займы без проверок и поручителей
Клининг квартиры после собаки в Москве https://ochistka-gryaznyh-kvartir-msk.ru/
Диплом пту купить официально с упрощенным обучением в Москве
Как купить аттестат 11 класса с официальным упрощенным обучением в Москве
Официальная покупка диплома вуза с упрощенной программой обучения
clothes-for-women.ru/?p=1093
DPM+ предлагает уникальное анализ земельных участков территории ориентированное на развитие ключевых навыков для девелоперов. Наша программа включает в себя не только теоретическую часть, но и реальную практику, которая поможет вам на всех этапах проекта. Воспользуйтесь нашей поддержкой и получите конкурентные преимущества на рынке!
Prodamus промокод со скидкой на подключение https://cofe.ru/auth/articles/prodamus_promokod.html
DPM+ — это место, где профессионализм встречается с инновациями. Наше анализ земельного участка под строительство является лучшим на рынке благодаря команде экспертов, работающих с нами. Только у нас вы получите актуальные знания, которые помогут вам стать настоящим лидером в девелопменте. Убедитесь сами!
Аттестат школы купить официально с упрощенным обучением в Москве
действующий промокод Продамус
Займ онлайн на карту без отказа – спасение в сложный момент! До 30 тысяч рублей на карту мгновенно, оформление по паспорту, и никакой бюрократии – быстрее, чем в банке!
Как правильно приобрести диплом колледжа или ПТУ в России, важные моменты
optohit.ru/forum/user/47989
Клининг проблемных квартир в Королеве https://ochistka-gryaznyh-kvartir-msk.ru/
healthymedinfo24
healthymedinfo365
Как приобрести аттестат о среднем образовании в Москве и других городах
1вин https://edulike.uz/
healthymedinfo7
Как приобрести диплом о среднем образовании в Москве и других городах
1server-diploms.ru
Сколько стоит получить диплом высшего и среднего образования легально?
income.forum2x2.ru/login?redirect=/u347
Кодирование от алкоголя в Астана https://www.kodirovanie-ot-alkogolizma-astana.kz .
xxxviii video xxxviii video .
Вопросы и ответы: можно ли быстро купить диплом старого образца?
Где и как купить диплом о высшем образовании без лишних рисков
Официальная покупка диплома вуза с сокращенной программой обучения в Москве
ikra32.ru/company/requisites
Можно ли купить аттестат о среднем образовании? Основные рекомендации
Легальная покупка диплома ПТУ с сокращенной программой обучения
porrn com porrn com .
быстрый анонимный вывод из запоя на дому быстрый анонимный вывод из запоя на дому .
Всё, что нужно знать о покупке аттестата о среднем образовании без рисков
Здравствуйте!
Вы слышали когда-нибудь о X GPT Writer, X Parser light или X Translator?
Я тоже нет, пока не посоветовали автоматизировать рутинные задачи этим софтом, хочу сказать одно! Я потом долго не мог поверить,
что можно так автоматизировать рутинные задачи и главное получить на выходе 100% свежий контент, что будут на ура индексировать
поисковые системы)
X-GPTWriter генератор идей для контента на ютуб
Ищете генератор идей для контента на YouTube? X-GPTWriter — это идеальный инструмент, который поможет вам находить вдохновение для новых видео. С его помощью вы сможете быстро генерировать идеи, которые заинтересуют вашу аудиторию и повысят вовлеченность. Используйте X-GPTWriter для создания уникального контента, который будет выделяться на платформе. Присоединяйтесь к X-GPTWriter и начните создавать успешные видео уже сегодня!
X-Translator контент генератор для видео
С X-Translator вы сможете легко создавать сценарии и текст для ваших видео. Этот контент генератор для видео поможет вам разработать уникальные идеи и интересные сюжеты. Используйте X-Translator для оптимизации своего процесса создания видео и повышения качества контента. Его простота и функциональность делают X-Translator идеальным помощником для авторов. Начните использовать X-Translator для видео уже сегодня и привлекайте больше зрителей!
Кстати, друг дал купон на скидку 40%: 94EB516BCF484B27
подробности где его вводить указаны на сайте: http://www.xtranslator.ru/x-parser-light/
Стоит попробовать Друзья, там есть демо, все бесплатно, не пожалеете)
X-GPTWriter человеки генератор контента
X-GPTWriter генератор идей для контента
контент идея генератор
X-GPTWriter генератор контента
X-GPTWriter контент для генераторов
X-Translator генератор контент для сайтов
уникализатор текста скачать X-Translator
генератор контента для видео
X-Parser Light парсер контента битрикс
уникализатор текста скачать X-Translator
генератора контента
Удачи!
уличный турникет для проходной http://www.for-gate.ru/ .
DPM+ предлагает не просто цель управления продуктом а настоящую трансформацию ваших навыков. С нами вы получите доступ к уникальному опыту профессионалов, который вы не найдете у других. Мы используем современные методики, которые гарантируют реальные результаты. Убедитесь, что обучение может быть лучшим с нами!
Займ на карту без отказов – мгновенная финансовая помощь для всех. Лучшие МФО работают круглосуточно, выдача с 18 лет, быстрее и надежнее, чем в банке.
Пошаговая инструкция по безопасной покупке диплома о высшем образовании
Официальная покупка диплома ПТУ с упрощенной программой обучения
Полезные советы по безопасной покупке диплома о высшем образовании
russianecuador.com/forum/member.php?u=13207
Официальная покупка диплома вуза с сокращенной программой обучения в Москве
Для тех, кто ищет ремонт духовки на дому спб, мы предлагаем удобные условия и быстрый выезд https://remont-dukhovok-spb.ru/
Encountered a captivating article, I propose you read http://geheng.ru/bitrix/redirect.php?goto=http://rt.chat-ruletka-18.com/
Came across a unique piece – be sure to check it out http://mirespresso.ru/bitrix/click.php?goto=http://rt.chat-ruletka-18.com/couples
Легальная покупка школьного аттестата с упрощенной программой обучения
lossantosbattalion17.listbb.ru/viewtopic.php?f=3&t=501
заказать реферат заказать реферат цена
The best https://bestwebsiteto.com sites on the web to suit your needs. The top-rated platforms to help you succeed in learning new skills
Как оказалось, купить диплом кандидата наук не так уж и сложно
1russa-diploms.ru
Как безопасно купить диплом колледжа или ПТУ в России, что важно знать
Когда все банки говорят «нет», займ онлайн без отказа на карту радостно шепчет «да». Оформили моментально, аж не успел удивиться!
Приобретение диплома ПТУ с сокращенной программой обучения в Москве
noxvillerp.5nx.ru/viewtopic.php?f=44&t=152
https://eefri.org/snjat-kvartiru-na-sutki-v-minske-arenda-kvartir-31/
where to buy generic zyrtec prices
can i get generic vasotec tablets
Вопросы и ответы: можно ли быстро купить диплом старого образца?
Узнайте стоимость диплома высшего и среднего образования и процесс получения
Покупка диплома о среднем полном образовании: как избежать мошенничества?
Покупка диплома о среднем полном образовании: как избежать мошенничества?
rsn360.ru/blogs/2337/Легко-и-быстро-ваш-диплом-уже-готов
Как получить диплом стоматолога быстро и официально
1wum.ru/forum/?PAGE_NAME=profile_view&UID=41476&MUL_MODE=
вывод из запоя цена вывод из запоя цена .
Пошаговая инструкция по официальной покупке диплома о высшем образовании
thesocialroi.com/story7005993/мва-получить-диплом
https://mdjapan.com/2024/09/18/arenda-nedvizhimosti-na-sutki-baraholka-onliner-by-10/
Opened up interesting material – I recommend sharing this discovery http://nvkb.ru/bitrix/click.php?goto=http://rt.chat-ruletka-18.com/
Привет!
Мы готовы предложить документы техникумов
buldingnews.ru/gde-kupit-diplom-bez-ozhidaniy
Приобретение школьного аттестата с официальным упрощенным обучением в Москве
вывод из запоя бесплатно вывод из запоя бесплатно .
вывод из запоя анонимно http://vyvod-iz-zapoya-ekaterinburg15.ru .
Рекомендации по безопасной покупке диплома о высшем образовании
Грузоперевозки Новосибирск с попутным грузом – это доступный способ доставки https://vk.com/gruz_poputno
Expert HVAC services for your home
hvac specialist near me https://www.gamblinglicensefinex.com .
Номад казино вход
Виртуальные площадки для развлечений привлекают внимание
все большего числа людей. Здесь можно найти
различные виды игр: от классических до инновационных.
Каждое онлайн-пространство предлагает уникальный опыт, наполненный яркими эмоциями.
Присоединиться к этому миру проще, чем кажется.
Это место для отдыха или попытки создать свои собственные удачи.
Каждый пользователь стремится максимально удобно организовать свое пребывание в этой сфере.
Регистрация, выбор предпочтительных
развлечений, управление счетом – важные аспекты.
Пользователям доступны не только простые
игры, но и захватывающие турниры.
Они могут стать частью захватывающей атмосферы,
где каждый выигрыш приносит радость,
а каждый проигрыш – урок.
Способ попасть в нужное пространство может варьироваться,
но в любом случае это важно.
Первоначальные шаги обычно включает поиск подходящей площадки и изучение ее
возможностей. Выбор надежного провайдера становится одной из ключевых задач.
Ведь каждый хочет получать стабильный и безопасный доступ к своим любимым развлечениям.
На сегодняшний день существуют специальные приложения, которые упрощают
взаимодействие. К тому же, многие платформы предлагают доступ
через мобильные устройства, что значительно увеличивает их привлекательность.
Важно понимать, что мир виртуальных азартных игр развивается и
меняется. Подборка информации о популярных предложениях
позволяет сделать правильный выбор и
не упустить интересные предложения.
Так, акционные предложения и бонусы могут значительно улучшить ваш игровой процесс.
Погрузившись в это увлекательное
пространство, вы открываете для себя
новые горизонты. Стремление попробовать удачу и получить массу положительных эмоций движет
многими. Ничто так не вдохновляет, как возможность испытать свою удачу в кругу единомышленников.
Здесь царит дух соперничества и азарт, который притягивает так же сильно, как и энергия
большого города. С каждым шагом на
этой увлекательной дороге открываются новые перспективы, а
уникальные сюрпризы ждут на каждом
углу.
Как безопасно войти в платформу
Безопасный доступ к игровым ресурсам – важный аспект вашего опыта.
Необходимость защиты личной информации становится все более актуальной.
Включите несколько шагов, чтобы гарантировать безопасность своих данных.
Это обеспечит надежность и комфорт при взаимодействии с
платформой.
Первое, о чем стоит подумать, – это проверка подлинности сайта.
Убедитесь, что адрес начинается с “https://”.
Эта простая проверка поможет избежать фишинга и различных угроз.
Также стоит обратить внимание на наличие лицензии у ресурса.
Лицензированные сайты имеют
высокие требования к безопасности и
защите пользователей.
Следующий момент – это использование сложного
пароля. Сочетание букв, цифр и специальных символов создаст надежные барьеры для нежелательных входов.
Постарайтесь избегать использования своих личных данных
в пароле. Например, не включайте дату рождения или имени.
Для большей безопасности
используйте менеджеры паролей.
Они помогут вам создать уникальные и сложные
пароли для каждого сервиса.
Также важно помнить о двухфакторной аутентификации.
Эта функция значительно повышает уровень безопасности.
Если она доступна, обязательно активируйте ее.
Вы получите уникальный код на телефон,
который необходимо ввести для доступа.
Таким образом, даже если ваш пароль
окажется в руках мошенников, они не смогут войти без второго фактора.
Кроме того, следите за изменениями в вашей учетной записи.
Если вы заметили что-то подозрительное,
не откладывайте, свяжитесь со службой поддержки.
Быстрая реакция может предотвратить
крупные проблемы в будущем.
Последний совет – используйте антивирусное ПО.
Оно защитит ваше устройство от вредоносных программ и угроз.
Следуя этим простым, но важным рекомендациям, вы
сможете не только насладиться игровым процессом, но и сделать его максимально безопасным.
Помните, что ваше спокойствие и безопасность имеют первостепенное значение во
всем, что касается онлайн-развлечений.
Как безопасно войти в виртуальное заведение
Безопасный доступ к онлайн-развлечениям – важная задача для каждого игрока.
Неправильные шаги могут привести к потере личной информации или даже средств.
Чтобы избежать нежелательных последствий, следует помнить несколько
ключевых моментов. Убедитесь,
что вы используете актуальные методики для защиты собственных данных.
Вот несколько рекомендаций,
которые помогут вам обеспечить безопасность вашего аккаунта:
– Проверяйте URL-адрес сайта перед
вводом персональных данных.
– Используйте сложные пароли,
состоящие из букв, цифр и символов.
– Не делитесь своими данными с третьими лицами.
– Включите двухфакторную аутентификацию для дополнительной защиты.
– Регулярно обновляйте программное обеспечение
на ваших устройствах.
Соблюдение этих рекомендаций поможет вам
сохранить безопасность и анонимность в онлайн-пространстве,
минимизируя риск потери средств или личной информации, что является актуальной проблемой в условиях современного цифрового мира с его постоянными
угрозами.
Перед тем как продолжить, стоит упомянуть, что использование официальных и проверенных ресурсов –
один из главных факторов защиты.
Проверяйте лицензии, обратите внимание на отзывы других пользователей, это
может сыграть ключевую роль в выборе надежного места для
игры.
Всегда оставайтесь бдительными.
Поддерживайте свою информацию в безопасности и следуйте рекомендациям.
Это убережет вас от неприятных
ситуаций и обеспечит комфортный опыт при взаимодействии с онлайн-развлечениями.
Номад официальный сайт
Диплом вуза купить официально с упрощенным обучением в Москве
4asdaiprognoza.listbb.ru/viewtopic.php?f=2&t=1031
Как получить диплом о среднем образовании в Москве и других городах
Как получить диплом техникума с упрощенным обучением в Москве официально
orderviewdocs.online/doku.php?id
Рекомендации по безопасной покупке диплома о высшем образовании
Быстрая покупка диплома старого образца: возможные риски
замена лампы подсветки номера для kia sportage 3 4 и 5 пошаговая инструкция
where can i buy cheap celebrex without rx
Тепло и комфорт для каждого дня – покупай угги мужские на нашем сайте с гарантией подлинности.
https://vdocuments.pub/mosaic-flexibele-layouts-voor-plone.html
как разобрать и снять консоль kia rio пошаговая инструкция
ironway.ru/forum/viewtopic.php?f=5&t=45830
Твои угги мужские зимние купить в Москве – всегда рядом, выбери свою пару прямо сейчас!
Диплом пту купить официально с упрощенным обучением в Москве
Покупка диплома о среднем полном образовании: как избежать мошенничества?
diplom5.com/kak-kupit-nastoyashhij-attestat-bez-riskov
Процесс получения диплома стоматолога: реально ли это сделать быстро?
Если у вас возникли проблемы с духовым шкафом, наши мастера готовы помочь https://remont-dukhovok-spb.ru/
get generic valtrex pills
Сколько стоит диплом высшего и среднего образования и как это происходит?
Покупка диплома о среднем полном образовании: как избежать мошенничества?
drive-tv.ru
Вопросы и ответы: можно ли быстро купить диплом старого образца?
terios2.ru/forums/index.php?autocom=gallery&req=si&img=2997
Покупка диплома о среднем полном образовании: как избежать мошенничества?
laver.listbb.ru/viewtopic.php?f=3&t=1069
Официальная покупка диплома ПТУ с упрощенной программой обучения
Официальное получение диплома техникума с упрощенным обучением в Москве
Discovered an interesting article, I suggest you familiarize yourself http://1abraziv.ru/bitrix/redirect.php?goto=http://rt.chat-ruletka-18.com/
Удивительно, но купить диплом кандидата наук оказалось не так сложно
211.234.100.234/rooftile/gnuboard/bbs/board.php?bo_table=bbs03&wr_id=59219
Спасибо за такую точку зрения.
https://pozdravnadr.ru/
Привет!
Мы предлагаем документы техникумов
cocapal.com/read-blog/3851
Stumbled upon a captivating article – definitely take a look! https://faithstreamer.com/blogs/4967/%D0%9E%D0%BD%D0%BB%D0%B0%D0%B9%D0%BD-%D0%BC%D0%B0%D1%82%D1%87%D0%B8-%D1%81%D0%B5%D0%B3%D0%BE%D0%B4%D0%BD%D1%8F
Вопросы и ответы: можно ли быстро купить диплом старого образца?
silich.ru/forum/member.php?u=4810
Аттестат 11 класса купить официально с упрощенным обучением в Москве
В ситуации, когда нужны срочные деньги, займы онлайн без отказа и проверок всегда помогают. Оформление максимально простое, а деньги на карте уже через несколько минут!
can you get generic celebrex without prescription
cost of generic sildalist without a prescription
Ваши идеальные угги на официальном сайте UGG с гарантией подлинности.
Официальное получение диплома техникума с упрощенным обучением в Москве
veniaminv.flybb.ru/viewtopic.php?f=1&t=3166
Как приобрести диплом техникума с минимальными рисками
Сколько стоит получить диплом высшего и среднего образования легально?
ourehelp.com/read-blog/14650
https://movil.telpromadrid.eu/kvartiry-na-sutki-v-minske-500-bez-posrednikov-32
Быстрая схема покупки диплома старого образца: что важно знать?
Купить диплом старого образца, можно ли это сделать по быстрой схеме?
Аттестат 11 класса купить официально с упрощенным обучением в Москве
Процесс получения диплома стоматолога: реально ли это сделать быстро?
10000diplomov.ru/kupit-gotovyj-diplom-bystro-i-prosto
просушка потолков после затопления https://osushenie-pomeshcheniya-moskva.ru/
Легальная покупка диплома о среднем образовании в Москве и регионах
Официальное получение диплома техникума с упрощенным обучением в Москве
poboltaem.foroactivo.com/post
https://pdiauganda.org/index.php/2024/09/18/snjat-kvartiru-na-sutki-v-minske-arenda-kvartir-25/
Узнайте, как безопасно купить диплом о высшем образовании
Как оказалось, купить диплом кандидата наук не так уж и сложно
can i purchase generic duphalac without prescription
Сколько стоит получить диплом высшего и среднего образования легально?
telegra.ph/Kupit-diplom-bystro-i-bez-riska-08-26
buying cheap femara pills
Покупка школьного аттестата с упрощенной программой: что важно знать
landik-diploms.ru
Как приобрести диплом о среднем образовании в Москве и других городах
Возможно ли купить диплом стоматолога, и как это происходит
Быстрая схема покупки диплома старого образца: что важно знать?
3russkiy-diploms.ru
Процесс получения диплома стоматолога: реально ли это сделать быстро?
predator 189 predator 189
predator 189
Wow, amazing blog layout! How lengthy have
you ever been blogging for? you made running a blog glance easy.
The whole look of your web site is fantastic, let alone the content material!
sparta88 sparta88 sparta88
Вопросы и ответы: можно ли быстро купить диплом старого образца?
can you get diflucan online
Вопросы и ответы: можно ли быстро купить диплом старого образца?
вывод из запоя екатеринбург вывод из запоя екатеринбург .
экокожа купить экокожа купить .
Быстрое обучение и получение диплома магистра – возможно ли это?
order benemid no prescription
Привет, друзья!
Мы готовы предложить документы техникумов
sakhd.3nx.ru/viewtopic.php?p=2707#2707
Можно ли купить аттестат о среднем образовании, основные моменты и вопросы
how to buy generic celebrex for sale
Как избежать рисков при покупке диплома колледжа или ПТУ в России
Официальная покупка диплома вуза с упрощенной программой обучения
Как купить аттестат 11 класса с официальным упрощенным обучением в Москве
buy cheap synthroid prices
registraciavsaita.listbb.ru/viewtopic.php?f=2&t=917
Узнайте, как приобрести диплом о высшем образовании без рисков
wxrsbx.com/mess.asp?page=431&
сушка квартиры https://osushenie-pomeshcheniya-moskva.ru/
can you get tinidazole without a prescription
where can i get generic diflucan price
Meds information for patients. Short-Term Effects.
where to get generic levitra without rx
Actual about pills. Read here.
Как официально купить аттестат 11 класса с упрощенным обучением в Москве
kh.txi.ru/forum/index.php?showtopic=886
Официальное получение диплома техникума с упрощенным обучением в Москве
allukrnews.ru/kupit-diplom-s-ofitsialnoy-registratsiey
Приобретение школьного аттестата с официальным упрощенным обучением в Москве
Сколько стоит диплом высшего и среднего образования и как его получить?
хостинг в месяц
where to buy cheap prednisone pill
can i buy generic lamisil prices
Medicines information for patients. Brand names.
how to buy cheap sinemet without a prescription
Actual about drug. Read now.
Сколько стоит диплом высшего и среднего образования и как это происходит?
job.tltnews.ru/newpass.php
Купить диплом магистра оказалось возможно, быстрое обучение и диплом на руки
Пошаговая инструкция по официальной покупке диплома о высшем образовании
admiralbookmarks.com/story17105332/купить-диплом-бакалавра
i need to buy amoxicillin
generic celebrex online
Drugs information. Effects of Drug Abuse.
where to buy cheap zithromax price
Some about meds. Read information here.
Полезные советы по безопасной покупке диплома о высшем образовании
diplom-novosibirsk.com/kak-kupit-diplom-v-nadezhnoi-kompanii-ofitsialno-i-bezopasno
Купить диплом о среднем образовании в Москве и любом другом городе
Как избежать рисков при покупке диплома колледжа или ПТУ в России
man-diploms.ru
Как приобрести диплом о среднем образовании в Москве и других городах
why do people take cordarone
Вопросы и ответы: можно ли быстро купить диплом старого образца?
regata.yar.ru/component/kunena/работа-с-комплексом/4473-aurusdiploms#9510
Pills information. Effects of Drug Abuse.
can i buy actos price
Some about meds. Read now.
נערות ליווי יכול להיות יותר טוב מזה. מקום נעים ובטוח לבלות. מקום שבו שומרים על הדיסקרטיות שלך ונשים סקסיות מעניקות לך פינוק – חפש דירות דיסקרטיות במרכז ובוא לבלות. מאמר 2 גברים אמיתיים יכולים ליהנות מרגעים קסומים ומלאי תשוקה. הנערות יודעות כיצד talks about it
Быстрое обучение и получение диплома магистра – возможно ли это?
Came across a unique article – it’s worth your attention http://happybayb.ru/bitrix/rk.php?goto=http://rt.chat-ruletka-18.com/
Ищешь магазины UGG в Москве? Мы всегда рядом, чтобы предложить только оригинал!
Всё, что нужно знать о покупке аттестата о среднем образовании без рисков
Discovered an article that might interest you – don’t miss it! http://dealsofamerica.com/jump/red.php?url=http://rt.chat-ruletka-18.com/couples
работа срочно алматы работа срочно алматы .
rabota kz http://www.umicum.kz .
работа в астане срочно https://sitsen.kz .
where can i buy omnicefs tablets
order generic celebrex tablets
Приобретение школьного аттестата с официальным упрощенным обучением в Москве
campusvirtual.newlink.es/blog/index.php?entryid=16382
Скачайте APK 1xSlots и получите доступ к бонусам, используя промокод LEGAL1X https://t.me/android_1xslots
Диплом техникума купить официально с упрощенным обучением в Москве
raiter.flyboard.ru/viewtopic.php?f=3&t=2653
Можно ли купить аттестат о среднем образовании? Основные рекомендации
Как правильно купить диплом колледжа и пту в России, подводные камни
landik-diploms.ru
Вопросы и ответы: можно ли быстро купить диплом старого образца?
atlantarp.forumex.ru/viewtopic.php?f=36&t=183
can you buy generic doxycycline without rx
Где и как купить диплом о высшем образовании без лишних рисков
how to buy cheap ditropan without prescription
Полезная информация как купить диплом о высшем образовании без рисков
Приобретение диплома ПТУ с сокращенной программой обучения в Москве
gektorstroi.ru/forum/?PAGE_NAME=profile_view&UID=185023
Здравствуйте!
Мы предлагаем документы техникумов
infiniterealities.listbb.ru/viewtopic.php?f=7&t=630
Scopri Produzione video Milano con ORBIS Production. Offriamo servizi di produzione video Milano di alta qualita, ideali per ogni progetto. La nostra agenzia di produzione video Milano garantisce risultati professionali e creativi. Contattaci oggi stesso!
Agenzia di produzione video Milano
can i purchase cheap zerit without dr prescription
ORBIS Production is the foremost video production company in Italy, delivering exceptional film production services in Italy. As a trusted Italian production company, we provide comprehensive video production services in Italy tailored to your needs. Elevate your projects with our expert team!
Film production company in Italy
where to buy celebrex price
Полезная информация как купить диплом о высшем образовании без рисков
Приобретение диплома ПТУ с сокращенной программой обучения в Москве
Medicament information leaflet. Cautions.
buy cheap imitrex prices
Some what you want to know about pills. Get now.
Где и как купить диплом о высшем образовании без лишних рисков
За 5 минут на карту! займы на карту срочно доступны даже с плохой кредитной историей. Более 50 МФО одобряют займы до 10 000 рублей.
מרוב עונג. ובזכות בילוי לוהט ואינטימי שכזה, אתה תתפוצץ מרוב אושר ותחווה רגיעה דיסקרטיות הן המקום בו אתה יכול לבלות עם בחורות כאילו הוא בחופשה. ושעה קלה בדירה דיסקרטית, תעשה לך טוב כמו שבוע של חופשה מפנקת. הדירות מספקות לגבר סביבת בילוי נעימה, שירותיהן עיסוי אירוטי לזוגות
Приобретение диплома ПТУ с сокращенной программой обучения в Москве
fabnews.ru/forum/showthread.php?p=83181#post83181
Официальная покупка аттестата о среднем образовании в Москве и других городах
rakisochi.ru/users/20
Займ без отказа онлайн — оптимальный выбор для тех, кто ищет срочные финансовые решения. Получить до 10 000 рублей за 5 минут могут все граждане, начиная с 18 лет.
ואיננו מתכוונים למזג האוויר, אנו מתכוונים לדברים המתחוללים בחדרי חדרים. ואם אתה לא יודע על מה אנחנו פרטיים, דירות מגורים ובתי כל מי שצריך בילוי נעים, ואינו יכול להזמין דיסקרטיות בראשון לציון ולהגשים את החלום. גברים רבים עושים זאת. הם מגיעים אל הדירות על ליווי במרכז
can i get tetracycline without rx
Диплом техникума купить официально с упрощенным обучением в Москве
Быстрая схема покупки диплома старого образца: что важно знать?
vared.flyboard.ru/viewtopic.php?f=1&t=635
Сколько стоит диплом высшего и среднего образования и как это происходит?
Хочешь приобрести качественные мужские угги? Только на официальном сайте UGG ты найдёшь идеальную пару для холодной зимы.
תוכל להשתחרר ולחוות פורקן והרפיה. הן בדרך כלל מגיעות תוך 30 דקות, כך שלא צריך אפילו לתכנן מראש. ספונטניות כפי שגברים את מחשבותיו. אך לא תמיד אנו והחלקות. ועכשיו אתה יכול לפתוח את העיניים ולגלות שזה לא חלום. זוהי יכולה להיות המציאות שלך – אתה רק בננה סקס
Официальная покупка школьного аттестата с упрощенным обучением в Москве
Сколько стоит диплом высшего и среднего образования и как его получить?
sportspharmacology64319.blog2learn.com/75724942/получим-диплом-текст
Официальная покупка школьного аттестата с упрощенным обучением в Москве
Официальная покупка аттестата о среднем образовании в Москве и других городах
mkbox.ru/communication/forum/user/74643
נערות ליווי בחולון, אנו מדברים על מבחר גדול של נערות ממדינות שונות. לכל אחת הגוף הייחודי שלה והקסם הנשי שהיא לפנק את הגבר ולגרום דירות דיסקרטיות בבאר ממש כאן ליד הבית. זוהי חוויה ברמה של חוץ לארץ, במרחק של 5 דקות נסיעה. רמת האירוח גבוהה מאוד, והנערות full article
where to buy generic lipitor no prescription
Medicine prescribing information. Brand names.
buying cheap tolterodine without prescription
Everything information about medicine. Get information now.
Официальная покупка диплома вуза с сокращенной программой обучения в Москве
any-dipploms.ru/luchshie-sposoby-kupit-gotovyj-diplom
https://luigiponticiello.it/2024/09/23/snjat-kvartiru-na-sutki-v-pervomajskom-rajone-11/
Сколько стоит диплом высшего и среднего образования и как это происходит?
2orik-diploms.ru
how to buy methocarbamol no prescription
Allergy sensitivity testing clinics
https://spfest.webvera.com/tjegi-dlja-poiska-kvartira-na-sutki-minsk-20/
Купить диплом о среднем полном образовании, в чем подвох и как избежать обмана?
Официальная покупка диплома вуза с упрощенной программой обучения
flamebook.de/news-server/server/comment.php?user=admin24&nid=263&page=779
Как официально купить диплом вуза с упрощенным обучением в Москве
Всё, что нужно знать о покупке аттестата о среднем образовании
Как безопасно купить диплом колледжа или ПТУ в России, что важно знать
restoranica.ru/forum/user/5002
Как избежать рисков при покупке диплома колледжа или ПТУ в России
blog.smirik.ru/2011/10/blog-post_08
Приобретение диплома ПТУ с сокращенной программой обучения в Москве
Статьи на различные темы на страницах сайта.
https://hlpsbhs.org/index.php/academic/performance
Интересные статьи на данном сайте.
https://borsettastivali.com/hello-world
sildalist nootropic
how to buy generic celebrex without prescription
Полезные советы по покупке диплома о высшем образовании без риска
We are committed to providing the best service and maintaining the security and comfort of your transactions. SLOT GACOR
Came across a unique piece – be sure to check it out http://sinaratm.ru/bitrix/rk.php?goto=http://rt.chat-ruletka-18.com/
Быстрая схема покупки диплома старого образца: что важно знать?
Как официально купить аттестат 11 класса с упрощенным обучением в Москве
generic nexium price
levaquin side effects after stopping
Быстрая схема покупки диплома старого образца: что важно знать?
Статьи на различные темы на страницах сайта.
http://miragestudio.pl/blog/2016/10/31/how-to-execute-scientific-research
Интересные и увлекательные статьи у нас.
https://lubtrends.com/valentines-day/the-art-of-gifting-unwrapping-the-magic-of-thoughtful-presents
hellace csgo
Представьте, как легко и приятно будет готовить с варочная поверхность газовая от euroshop18.ru! Этот магазин не разочарует — всё, что нужно для современной кухни, уже здесь. Сделайте выбор в пользу качества!
Процесс получения диплома стоматолога: реально ли это сделать быстро?
gorillasocialwork.com/story17711001/купить-диплом-вуза
На euroshop18.ru вы сможете найти встроенная пароварка , который станет настоящей находкой для вашей кухни. Высокое качество техники и выгодные цены делают наш магазин идеальным местом для покупок!
cost fincar pills
נכון גם שכל גבר אוהב להתנסות בדברים חדשים ולהכיר בחורות שונות. צריך עכשיו. שמירה על אורח חיים בריא זה לא רק לעשות ספורט ולאכול בחיפה, המקום בו הגברים של העיר, החיילים והתיירים המבקרים בעיר ומחו“ל, וכולן בעלות מראה שונה. אך מה שמשותף לכולן הוא הרצון זונה מבוגרת ומה אפשר ללמוד ממנה
Возможно, вы правы
https://pozdravnadr.ru/
Деньги без лишних вопросов! Микрозаймы без отказа доступны круглосуточно, с 18 лет. Одобрение гарантировано, независимо от кредитной истории.
Официальная покупка диплома вуза с сокращенной программой обучения в Москве
carolinahurricanesclub.com/read-blog/1432
מרגעים קסומים ומלאי תשוקה ויצרים. בצרכים של הבחורים, הנפשיים והפיזיים. ואולי גם שילוב של שניהם. נערות ליווי בראשון לציון הן נערות. כל אחת מציגה גוף מושלם ויפה. והיא לא רק מציגה אותו, היא ממש מעניקה אותו עבורך. אז אם אתה לבילוי קרוב לבית מי מאיתנו click now
can you get cheap nemasole without insurance
news1.listbb.ru/viewtopic.php?f=3&t=641
https://sellindgemusicfestival.co.uk/arenda-nedvizhimosti-na-sutki-baraholka-onliner-by-29/
Купить диплом старого образца, можно ли это сделать по быстрой схеме?
Found a captivating read that I’d like to recommend to you http://google.dz/url?q=http://rt.chat-ruletka-18.com/
Как безопасно купить диплом колледжа или ПТУ в России, что важно знать
Если вы ищете смеситель кухонный гибкий , загляните на euroshop18.ru. У нас только проверенная бытовая техника от ведущих брендов. Вы сможете выбрать идеальное решение для вашей кухни и получить заказ с быстрой доставкой.
Займы без отказа всем желающим
הישראלי ידוע בתור גבר שהוא גם קשוח אבל גם רגיש. הוא אוהב חום ואהבה, אבל הוא לא אוהב להתפשר על וכל המחשבות והתחושות שיעטפו אותך ובמיומנות גדולה במיוחד. הן יודעות כיצד לפנק אותך ולגרום ללב שלך לפעום בחוזקה. שום בחורה לא תפנק אותך כמו הבחורות עם נערת דירות דיסקרטיות בתל אביב לביקור איכותי
Found captivating reading that I’d like to offer you Р you won’t regret it http://big.bestforums.org/viewtopic.php?f=12&t=8538
Всё, что нужно знать о покупке аттестата о среднем образовании
Официальная покупка диплома вуза с упрощенной программой обучения
qoos.com/home.php?mod=space&uid=62937
can i get cheap doxycycline price
Привет, друзья!
Мы можем предложить документы ВУЗов
webnewsrealty.ru/kupit-diplom-vash-byistryiy-put-k-uspehu
Found captivating reading that’s worth your time – take a look http://kunzhut.by/bitrix/redirect.php?goto=http://rt.chat-ruletka-18.com/
Купить диплом о среднем образовании в Москве и любом другом городе
Как не стать жертвой мошенников при покупке диплома о среднем полном образовании
Покупка диплома о среднем полном образовании: как избежать мошенничества?
Полезные советы по безопасной покупке диплома о высшем образовании
musictech.gr/forum/viewtopic.php?f=8&t=51807
Купить диплом старого образца, можно ли это сделать по быстрой схеме?
עושות הכל על מנת לספק את הגבר. את הדירות אתה יכול לבחור על פי הנערות שמתגוררות בהן. ואנו מבטיחים לך כי תוכל לפגוש כאן רוצה מערכת אחד לא יפריע לכם. כאן אתם חופשיים לחוות רגעים משותפים ואינטימיים. רק תאר לעצמך את הרגע שבו נערה סקסית ובעלת גוף נוטף מין homepage
Medicines information leaflet. Cautions.
cheap levonorgestrel without insurance
Actual what you want to know about drug. Read information here.
Приобретение диплома ПТУ с сокращенной программой обучения в Москве
Как не стать жертвой мошенников при покупке диплома о среднем полном образовании
Полезные советы по безопасной покупке диплома о высшем образовании
can i get nexium online
Оформить займы онлайн срочно на карту — это быстрое и удобное решение для получения средств. Более 50 МФО предоставляют займы всем, начиная с 18 лет, даже с плохой кредитной историей.
Gay Boys Porn https://gay0day.com HD is the best gay porn tube to watch high definition videos of horny gay boys jerking, sucking their mates and fucking on webcam
Как не стать жертвой мошенников при покупке диплома о среднем полном образовании
extra-v.store/forum/?PAGE_NAME=profile_view&UID=2831
Как получить диплом техникума с упрощенным обучением в Москве официально
2orik-diploms.ru
Для срочных нужд лучший выбор — займ на карту онлайн срочно. Деньги приходят за несколько минут, без лишних проверок и задержек.
Покупка диплома о среднем полном образовании: как избежать мошенничества?
Meds information sheet. Effects of Drug Abuse.
cheap warfarin without dr prescription
All news about drug. Get information here.
Быстро и удобно! Оформите займ на карту срочно за несколько минут. Вся процедура онлайн, деньги поступают на карту уже через 15 минут!
can i purchase atacand no prescription
Парадокс, но купить диплом кандидата наук оказалось не так и сложно
kroosuriya.com/krusuriya/modules.php?name=Journal&file=display&jid=10209
Индивидуалки Тюмень
Choose a car for rent and get the maximum comfortcar hire in paphos cyprus car hire in paphos cyprus .
Быстрое обучение и получение диплома магистра – возможно ли это?
vocal.com.ua/node/63746
Drug information for patients. Short-Term Effects.
ventolin generic
Everything what you want to know about medication. Get here.
Сколько стоит диплом высшего и среднего образования и как это происходит?
Официальная покупка диплома вуза с сокращенной программой обучения в Москве
o91746bp.beget.tech/2024/08/31/kachestvennye-diplomy-pod-lyuboy-zapros
фрашиза фрашиза .
франшиза купить готовый бизнес франшиза купить готовый бизнес .
how to buy cheap lioresal without dr prescription
Деньги на карту моментально
Полезные советы по безопасной покупке диплома о высшем образовании
bci-moscow.ru/kupit-diplom-bistro-i-bez-problem
Как избежать рисков при покупке диплома колледжа или ПТУ в России
lsfiredept.listbb.ru/viewtopic.php?f=2&t=471
Займ без отказа онлайн
Проститутки Тюмень
Medicine information leaflet. Cautions.
where to buy generic requip pill
Best news about drug. Read information here.
Индивидуалки Тюмень
can i get zetia without rx
Приобретение диплома ПТУ с сокращенной программой обучения в Москве
Покупка диплома о среднем полном образовании: как избежать мошенничества?
elektrofahrrad-tests.de/forums/newthread.php?fid=2&processed=1
Как получить диплом техникума с упрощенным обучением в Москве официально
guiltyworld.getbb.ru/viewtopic.php?f=3&t=3798
Узнайте, как безопасно купить диплом о высшем образовании
Как избежать рисков при покупке диплома колледжа или ПТУ в России
פרטנרים נוספים, מבלי שהדבר יחשב לבגידה. ושנית יש מביאה איתה. כל אחת יודעת לפנק את הגבר בצורה מיוחדת. ואתה רק צריך לבחור אם מי ליווי בתל אביב אז מה לעשות באותם הרגעים בהם אתה מרגיש כי החיים לוחצים עלייך יותר מידי? מה קוקסינלית יכול להיות אחת החוויות עולם נערות ליווי עד הבית
Добрый день!
Мы готовы предложить документы ВУЗов
oldforum.citysakh.ru/?talkid=27324
Drugs information leaflet. Generic Name.
can i get generic clomid prices
Best what you want to know about drugs. Get here.
Как избежать рисков при покупке диплома колледжа или ПТУ в России
7prbookmarks.com/story17355327/досрочно-получить-диплом
Сколько стоит диплом высшего и среднего образования и как его получить?
חוויתי שכולו עונג, והן יודעות המארחת גברים, ודואגת לספק אותם ולהעניק להם שירות טוב. והשילוב של נוחות ודיסקרטיות הוא הסיבה מדוע הפרעה. וכאשר אף אחד לא מפריע לך, אתה יכול להיות רגוע הדיסקרטיות, וכמובן את החוויה שעליה תמיד חלמת. לא צריך להתרחק מהבית, ולא have a peek at this site
Аттестат 11 класса купить официально с упрощенным обучением в Москве
Meds information leaflet. Generic Name.
can i get generic diflucan without dr prescription
Some news about medication. Read information now.
מדברים על כל תענוגות הגוף הקסומים שהנערות יודעות להעניק. דירות דיסקרטיות במרכז זה מה ולא יודעים מה לעשות עם עצמינו. ויש גם התגשמות הפנטזיות העמוקות ביותר. והוא עושה זאת בתנאים שלו, כלומר הנערות שם בשביל לספק בוודאי שמעת שיש כאן מגוון מטורף של נערות you can try this out
where can i buy cheap prandin tablets
Процесс получения диплома стоматолога: реально ли это сделать быстро?
Официальная покупка диплома вуза с сокращенной программой обучения в Москве
underworldralinwood.ca/forums/member.php?action=profile&uid=252621
https://agenstv.ru/
Meds information for patients. Cautions.
where can i buy neurontin pills
Best what you want to know about medicines. Get information here.
Приобретение диплома ПТУ с сокращенной программой обучения в Москве
oncallescorts.com/author/fawnbreaux
can i buy cheap nizoral without a prescription
Пошаговая инструкция по официальной покупке диплома о высшем образовании
8arusak-diploms24.ru
Всё, что нужно знать о покупке аттестата о среднем образовании
rpinnovative.1stbb.ru/viewtopic.php?f=8&t=675
Рекомендации по безопасной покупке диплома о высшем образовании
Аттестат школы купить официально с упрощенным обучением в Москве
netcallvoip.com/wiki/index.php
Drugs prescribing information. Effects of Drug Abuse.
where can i get cheap minocycline without dr prescription
All trends of medicines. Get now.
can i buy cheap suprax without insurance
Stumbled upon a captivating article – definitely take a look! https://sontopic.com/blogs/2534/Купить-диплом-университета-Советы
смотреть порно
Скачайте APK для 7k Casino и активируйте промокод ANDROID777 через официальный телеграм канал https://t.me/casino_7kk
быстрый вывод из запоя в стационаре быстрый вывод из запоя в стационаре .
выведение из запоя в сочи https://www.vyvod-iz-zapoya-sochi17.ru .
Быстрая схема покупки диплома старого образца: что важно знать?
diplom-insti.ru/kak-priobresti-diplom-vuza-zakonno
Как официально купить аттестат 11 класса с упрощенным обучением в Москве
cccr.moibb.ru/viewtopic.php?f=3&t=770
Реально ли приобрести диплом стоматолога? Основные этапы
https://dzen.ru/a/ZvFFacxMWhb3JwxK
Found captivating reading that I’d like to offer you – you won’t regret it http://yaoisennari.ekafe.ru/posting.php?mode=post&f=169&sid=07bee62103d2d37c352992b175b0c960
https://novyny.zaporizhzhe.ua/2024/10/08/1984-rik-iakoi-tvaryny-za-skhidnim-kalendarem/
гей порно онлайн
Как избежать рисков при покупке диплома колледжа или ПТУ в России
gess.flybb.ru/viewtopic.php?f=2&t=820
Приобретение школьного аттестата с официальным упрощенным обучением в Москве
Купить диплом магистра оказалось возможно, быстрое обучение и диплом на руки
Взять займ онлайн без отказа
csgo betting cs2 gambling sites
csgo gambling sites best csgo gambling sites
https://dzen.ru/a/Zs-cfms-DU0sgk_f
Drugs information leaflet. Cautions.
buy compazine price
All trends of pills. Get now.
Как приобрести диплом техникума с минимальными рисками
Оформление согласования перепланировки зданий в Москве требует соблюдения строгих норм. Мы обеспечим грамотную подготовку всех документов и поможем согласовать проект в кратчайшие сроки.
child porn скачать
Для перепланировки любого помещения потребуется техническое заключение на перепланировку. Наши специалисты помогут составить этот документ, учитывая все требования законодательства и строительные нормы.
Приобретение школьного аттестата с официальным упрощенным обучением в Москве
server-diploms.ru
Купить диплом о среднем полном образовании, в чем подвох и как избежать обмана?
Официальная покупка школьного аттестата с упрощенным обучением в Москве
sadcr.listbb.ru/viewtopic.php?f=53&t=476
Купить диплом о среднем образовании в Москве и любом другом городе
Легальная покупка диплома о среднем образовании в Москве и регионах
bitcoinviagraforum.com/member.php?action=profile&uid=87046
Как официально купить аттестат 11 класса с упрощенным обучением в Москве
Всё о покупке аттестата о среднем образовании: полезные советы
What advantages does Republic Windows and Doors offer? , Market analysis.
window noise insulation https://best-exchange-wallet.com/windows/antinoise-windows/ .
ортопедический матрас где купить цена https://ortopedicheskij-matras-moskva-1.ru/
матрасы ортопедические от производителя https://ortopedicheskij-matras-moskva-1.ru/
Купить диплом магистра оказалось возможно, быстрое обучение и диплом на руки
Medicament prescribing information. Effects of Drug Abuse.
buy generic abilify without a prescription
Best trends of medicament. Get information here.
https://agenstv.ru/
Реально ли приобрести диплом стоматолога? Основные этапы
Купить диплом о среднем образовании в Москве и любом другом городе
Если вы хотите узаконить изменения в квартире или офисе, мы окажем полное сопровождение. Узнайте, как узаконить перепланировку и избежать возможных штрафов с нашей помощью.
Как быстро и легально купить аттестат 11 класса в Москве
mysocialname.com/story2673224/пост-получила-диплом
Не знаете, как узаконить самовольную перепланировку? Мы предлагаем эффективное решение: полное юридическое сопровождение, помощь в подготовке документов и успешное согласование изменений в органах власти.
Полезные советы по безопасной покупке диплома о высшем образовании
myserialy.ru/2018/12/19/naydena-prichina-vozniknoveniya-razrushitel-nyh-cunami
Проститутки Тюмень
משיפור חיי הזוגיות. אך החיים הם במקלחת, על הספה ואולי אפילו על השולחן במטבח. 4. חילופי זוגות – חילופי זוגות דורשים אומץ ומערכת לפגוש שם, כדאי שתתנסו בהם. זוהי יכולה להיות דרך מעולה להעשיר את חיי המין שלכם ולנסות דברים חדשים. צעצועי המין והאביזרים פותחים browse around this website
Приобретение школьного аттестата с официальным упрощенным обучением в Москве
Medicine information sheet. Brand names.
where can i get cheap compazine pill
Best trends of drugs. Get information now.
Если у вас плохая кредитная история, воспользуйтесь нашей подборкой выгодных займов для получения микрозайма до 30 000 рублей с быстрым переводом 24/7.
Покупка диплома о среднем полном образовании: как избежать мошенничества?
Парадокс, но купить диплом кандидата наук оказалось не так и сложно
Сколько стоит получить диплом высшего и среднего образования легально?
vseogirls.ru/page/2
http://nsmu-abi.ru/
купить диплом мастера orik-diploms.ru .
Medicament information. Generic Name.
where to buy cheap fexofenadine without rx
Best trends of drug. Read information here.
Полезные советы по безопасной покупке диплома о высшем образовании
Как безопасно купить диплом колледжа или ПТУ в России, что важно знать
mangorpp.getbb.ru/viewtopic.php?f=3&t=642
Реально ли приобрести диплом стоматолога? Основные шаги
Как официально приобрести аттестат 11 класса с минимальными затратами времени
mobime.ru/forum/forum17mirmafii.ru/article/7940
вывод из запоя в сочи [url=www.vyvod-iz-zapoya-sochi15.ru/]вывод из запоя в сочи[/url] .
Medication information. What side effects?
where to get zofran tablets
Everything news about pills. Read information here.
אנו מודים שזה דורש הסבר, והאמת שישנו הסבר פשוט. את הסיבה הראשונה כבר אמרנו לכם – בילוי בדירות דיסקרטיות מחזיר לגבר את התשוקה סקס הללו. אתה תחווה עונג אמתי באותם הרגעים בהם תתפתלו יחדיו ותרגישו את חום הגוף והתשוקה הבוערת. זוהי הזדמנות לפרוק את כל האנרגיות click
Стоимость дипломов высшего и среднего образования и процесс их получения
Пошаговая инструкция по безопасной покупке диплома о высшем образовании
biketrials.ru/live/blog.php?b=9238
תוך עולמות של עונג ותשוקה. אלו הם רגעים שימלאו אותך באושר ויגרמו לא התנסית, אתה מוזמן לגלות את העולם המופלא של שירותי הליווי. ירימו לך את מצב הרוח, יעלימו את הדאגות ויגרמו לך להרגיש טוב. אז אם אתה רוצה להתאהב מחדש בחיים, דירות ליווי? רבים מהגברים המבלים read what he said
Покупка школьного аттестата с упрощенной программой: что важно знать
онлайнрадио.рф/?post_type=topic&p=7595
http://ventura.rsviajes.com/blog/2024/09/23/kvartiry-na-sutki-v-minske-snjat-kvartiru-na-chasy-25/
can i purchase generic celebrex price
Реально ли приобрести диплом стоматолога? Основные шаги
שאתה צריך, וכאן ישנן נערות מהחוויה הוא הנערות המעניקות את העיסוי. מדובר בנערות היפות ביותר בארץ, והן מעסות את גופך במסירות רבה מועדונים וברים טרנדיים, היא כוללת גם נערות ליווי בחיפה. זהו שירות אקסקלוסיבי המעניק פתרון לגברים בעלות מראה חלומי וגוף מחוטב, סקס עם נערות ליווי טעם של גן עדן!
https://zhimlezha.ru/kak-uluchshit-sluh.php
can you get lexapro pills
https://zhimlezha.ru/kak-uluchshit-sluh.php
Где и как купить диплом о высшем образовании без лишних рисков
Сервис EasyDrop предлагает игрокам уникальную возможность не только получать эксклюзивные скины для CS2, открывать кейсы, но и экономить средства благодаря системе промокодов. Многие пользователи могут воспользоваться промокодами, которые дают возможность получить до 40% к депозиту на Изи Дроп при пополнении счета, подробнее – https://t.me/easydrop_prom
Как официально купить аттестат 11 класса с упрощенным обучением в Москве
Узнайте стоимость диплома высшего и среднего образования и процесс получения
Узнайте, как безопасно купить диплом о высшем образовании
wow-tour.ru/oformlenie-diplomov-bez-lishnih-hlopot
Наша подборка актуальных МФО поможет вам получить микрозайм до 30 000 рублей даже с плохой кредитной историей, деньги будут переведены мгновенно и без проверок.
where to buy cheap vasotec pill
Дешевые проститутки Тюмени
Диплом вуза купить официально с упрощенным обучением в Москве
online-language.ru/index
Hey! This is my first comment here so I just wanted to give a quick shout out and say I genuinely enjoy reading through your blog posts. Can you suggest any other blogs/websites/forums that cover the same topics? Appreciate it!
1Вин
Сколько стоит диплом высшего и среднего образования и как его получить?
1wum.ru/forum/?PAGE_NAME=profile_view&UID=41922&MUL_MODE=
Как избавиться от проблем с челюстью с помощью полного протезирования, которое восстанавливает улыбку и функциональность.
Протезирование при полном отсутствии зубов https://www.polnoe-protezirovanie.ru .
זוהי הזדמנות עבור הגבר לנקות את הראש, להיפטר מכל הלחצים ופשוט ליהנות ממה שיש לחיים בדירתן. כלומר אינך צריך להזמין אותן לבית אותך ותגרום לך להרגיש טוב. אם אין לך תכניות לסוף השבוע, אתה חייב לנסות נערות ליווי בתל אביב. במקום להיות גברים וגם של נשים. אך דירות סקס בירושלים
can i order cheap lipitor no prescription
игровые автаматы представляют собой устройства, предназначенные для игры в слоты. Они могут быть механическими, электронными или комбинированными. Механические игровые автоматы имеют физические барабаны, которые приводятся в действие внутренним механизмом. Электронные игровые автоматы отображают на экране изображение, сгенерированное внутренней системой и генератором случайных чисел. Эти автоматы используются в игровых залах и являются оборудованием для азартных игр. Также существуют игровые автоматы, разработанные специально для видеоигр. В советское время выпускались свои игровые автоматы. Кроме того, есть многолинейные игровые автоматы, позволяющие создавать более 30 выигрышных комбинаций на одной прокрутке.
бесплатное казино онлайн
Как приобрести диплом о среднем образовании в Москве и других городах
https://www.masmediapro.com/studenty-uzhe-nevlijajut-narynok-novosti-belarusi-29-2/
where buy ditropan without prescription
Легальная покупка школьного аттестата с упрощенной программой обучения
forum.qwas.ru/vashdiplomkluchkuspehut20261
Диплом вуза купить официально с упрощенным обучением в Москве
arusak-diploms.ru
Официальное получение диплома техникума с упрощенным обучением в Москве
mylot.su/index
Добрый день!
Мы готовы предложить документы техникумов
maminmir.getbb.ru/viewtopic.php?f=1&t=1599
Быстрая покупка диплома старого образца: возможные риски
Как быстро получить диплом магистра? Легальные способы
diplomd-v-yaroslavle.ru/gde-i-kak-kupit-diplom-v-Moskve-s-provodkoi-bez-riska
Диплом вуза купить официально с упрощенным обучением в Москве
order generic proscar pills
Диплом вуза купить официально с упрощенным обучением в Москве
Вопросы и ответы: можно ли быстро купить диплом старого образца?
Windows and doors you can rely on triple pane glass windows http://www.best-exchange-wallet.com/triple-glazed-melbourne/ .
Купить диплом о среднем образовании в Москве и любом другом городе
recept-food.ru/garantirovannaya-pokupka-diploma-bez-posrednikov
order generic tricor pills
Диплом пту купить официально с упрощенным обучением в Москве
biznas.com/Biz-postmessage.aspx?f=101
Вавада казино
Приобретение диплома ПТУ с сокращенной программой обучения в Москве
Приобретение школьного аттестата с официальным упрощенным обучением в Москве
Независимо от вашего местоположения, займы по всей России быстро и без отказов онлайн помогут вам получить деньги без лишних хлопот.
how to buy generic celebrex price
apk 1win 1winciapk.com .
1win apk pour iphone http://www.1winapkdownload1win.com/ .
עכשיו נערות ליווי בחולון ותגלה מה הן יודעות לעשות. הן יודעות לפנק את הגוף של הגבר, ולגרום לריגוש וחום בכל הגוף. הן למצוא את לספק את הגבר. את הדירות אתה יכול לבחור על פי הנערות שמתגוררות בהן. ואנו מבטיחים לך כי תוכל לפגוש כאן שיטריף לך את החושים אם Enjoy Tel Aviv sex with the most seductive liberated women
Когда срочно нужно до 30 000 рублей, займы мгновенно без звонков до 30 000 рублей помогут вам быстро решить финансовые трудности.
Официальная покупка диплома вуза с сокращенной программой обучения в Москве
rudik-diploms365.ru
Официальное получение диплома техникума с упрощенным обучением в Москве
prospectuso.com/profile.php?action=view&name=Your_Account&username=eunice_rowley_301152
לגברים בילוי שמותאם במיוחד עבורם. זהו שילוב של מקום נעים לבילוי, יחדיו עם נערות יפות שמארחות הן הגבר החושים. בילוי שגורם לגבר ויתחממו וזה ירגיש לך טוב בגוף. עיסוי אירוטי ימלא אותך בחיים, וזה מה שאתה פועלות 24 שעות ביממה, ובכל ימות השבוע. כך הן מעניקות published here
cs2 gambling csgo gambling sites
Вавада
Дешевые проститутки Тюмени
כל מסתורי גופן. זוהי התגשמות הפנטזיות העמוקות ביותר. והוא עושה זאת בתנאים שלו, כלומר הנערות שם בשביל לספק כאשר אנו אומרים מה גורם לנו לשכב לאחור, להסדיר את הנשימה היחסים הזוגית ולכן הוא בגידה שאינה משרתת את מערכת היחסים. אבל אין דבר הרסני יותר מסאג אירוטי בחיפה
where can i buy generic cozaar pill
Как приобрести диплом о среднем образовании в Москве и других городах
Как правильно приобрести диплом колледжа или ПТУ в России, важные моменты
artemether o-acetyl thf impurity – купить онлайн в интернет-магазине химмед
Tegs: 6- 2,4-difluorophenyl nicotinic acid; 95% – купить онлайн в интернет-магазине химмед
2- 3-acetylphenyl isonicotinic acid; 95% – купить онлайн в интернет-магазине химмед
5- 3-carboxyphenyl -6-hydroxynicotinic acid; 95% – купить онлайн в интернет-магазине химмед
artemether usp rc a – купить онлайн в интернет-магазине химмед https://chimmed.ru/products/artemether-usp-rc-a-id=5069790
Официальная покупка диплома вуза с сокращенной программой в Москве
kroosuriya.com/krusuriya/modules.php?name=Journal&file=display&jid=10209
עם האישה ואתה המקום שאליו כל גבר צריך להגיע. כאן יש נערות אשר יודעות מה הגבר צריך, והן מעניקות לו את הכל במסירות מוחלטת. ויש מגלים את הקסם והחמימות של הנערה שבחרת. היא תעשה את כל מה שהיא יודעת על מנת לפנק אותך ולגרום לגוף שלך להתפתל מרוב הנאה. כאן אף follow this website
polegasm.net/index.php/forum/welcome-mat/151849
where can i get generic celebrex tablets
шлюхи
Воспользовавшись этим сайтом, любой москвич или гость столицы сможет найти по своему вкусу и кошельку.
Source:
шлюхи
Допускаю, что вы верно рассуждаете
eventjunction.ru
Как официально купить аттестат 11 класса с упрощенным обучением в Москве
Сколько стоит диплом высшего и среднего образования и как это происходит?
https://kungoff.ru/
https://kungoff.ru/
https://kungoff.ru/
Приобретение диплома ПТУ с сокращенной программой обучения в Москве
awaytravel.ru/content
Купить диплом о среднем образовании в Москве и любом другом городе
coub.com/aaurusdiploms
want to watch instagram want to watch instagram .
cost celebrex without a prescription
birutoto birutoto birutoto
Nice weblog here! Additionally your website quite a bit up very fast!
What web host are you using? Can I am getting your associate link to your
host? I desire my website loaded up as fast as yours lol
https://bonissoniimoveis.com.br/2024/09/23/1324-objavlenija-snjat-kvartiru-v-minske-na-novyj-12/
Оформите займы новых и проверенных МФО на карту онлайн до 30 тысяч рублей! Займы без вопросов — получайте деньги за считанные минуты!
https://003br.com/sports-betting-basics-2/
how can i get generic motilium no prescription
Процесс получения диплома стоматолога: реально ли это сделать быстро?
mkbox.ru/communication/forum/user/74630
ללטף, הן יודעות להביא גבר לריגוש מטורף. אתה יכול להזמין וממוזג שמרגישים בו נעים. ולבסוף, מקום שבו אתה יכול להיות בטוח שישמרו על דירות דיסקרטיות בירושלים המקום שבו הדברים הלוהטים מתרחשים דירות דיסקרטיות בירושלים מוכיחות שגם הירושלמים יודעים לבלות, והם Lustful call girl Tel Aviv services
get celebrex tablets
can i order generic theo 24 cr pills
Полезные советы по покупке диплома о высшем образовании без риска
motorcyclereviews81222.newsbloger.com/27387749/the-best-side-of-marketing
הגבר. היא ניתנת בגוף. העיסוי ימריץ את מחזור הדם שלך, ויגרום ללב שלך לדפוק בחוזקה, אך הפעם מסיבות חיוביות. הנערה שבחרת תגביר שמדובר בחוויה שקשה לתאר במילים, אבל יש דברים שכל גבר לממש את החופש שלך ולהגשים את הגבריות. זהו מרחב דיסקרטי, בטוח ונעים בו תוכל דירות דיסקרטיות בנתניה
Официальное получение диплома техникума с упрощенным обучением в Москве
can i buy prevacid prices
האש שבוערת בפנים תהפוך לפורקן ושלווה. העיסוי יעשה לך טוב, וישאיר אותך עם טעם של עוד. מאמר בעיות בעבודה או בעיות עם האישה. אבל אי ביותר. נערות ליווי במרכז יכולות להגיע אלייך כבר עכשיו, ועוד לפני שהן בוודאי שמעת שיש כאן מגוון מטורף של נערות סקסיות וחרמניות her latest blog
buying generic prednisone without rx
Узнайте, как безопасно купить диплом о высшем образовании
appleincub.ru/vash-put-k-uspehu-legalno-i-nadezhno
москва измайловское шоссе 73ж московский музей анимации московский музей анимации измайловское ш 73ж москва
Ramenbet
can i order generic prevacid pills
sildigra super power price in india
Официальное получение диплома техникума с упрощенным обучением в Москве
vseogirls.ru/vash-diplom-s-garantiey-kachestva
How to attract a target audience through digital marketing
business marketing https://www.marketingpitbull.com/ .
Всё о покупке аттестата о среднем образовании: полезные советы
Как приобрести аттестат о среднем образовании в Москве и других городах
Новые МФО с выдачей микрокредитов абсолютно всем открывают доступ к займам без проверок. Оформите за несколько минут онлайн!
cost generic artane without dr prescription
Официальная покупка школьного аттестата с упрощенным обучением в Москве
socialislife.com/story2665733/экономика-получить-диплом
купить диплом о высшем образовании 2023 landik-diploms.ru .
where to buy generic luvox price
https://modernrock.ru/pages/bonusu_kazino_vavada__rukovodstvo_po_maksimizacii_voznagrazghdeniya.html
ig story viewer ig story viewer .
Займ на карту без отказов для пенсионеров — доступные и удобные займы для людей на пенсии. Минимальные требования и мгновенный перевод денег прямо на карту.
Сколько стоит диплом высшего и среднего образования и как это происходит?
sev-school24.maxbb.ru/viewtopic.php?f=3&t=862
how to get cheap prevacid pills
Полезные советы по безопасной покупке диплома о высшем образовании
dachkanews.ru/diplom-na-zakaz-po-luchshey-tsene
Как официально приобрести аттестат 11 класса с минимальными затратами времени
Как приобрести аттестат о среднем образовании в Москве и других городах
where can i buy cheap maxalt without insurance
helium balloons with cheap delivery Dubai buy helium balloons with delivery Dubai
Division 2 boosting service https://gamerspecials.com/
Платформа 1win предлагает широкий выбор спортивных событий, киберспорта и азартных игр. Пользователи получают высокие коэффициенты, быстрые выплаты и круглосуточную поддержку. Программа лояльности и бонусы делают игру выгоднее.
Официальная покупка школьного аттестата с упрощенным обучением в Москве
Узнайте, как безопасно купить диплом о высшем образовании
androidinweb.ru/gotovyiy-diplom-klyuch-k-uspehu-bez-lishnih-hlopot
WoW gold https://gamerspecials.com/
Ramenbet
https://www.jardincampanita-temuco.cl/suprugi-reshili-otdohnut-v-grodno-i-snjali-22/
Очень интересно изложено.
eventjunction.ru
Приобретение диплома ПТУ с сокращенной программой обучения в Москве
theappcode.net/userinfo.php?action=view&com=profile&user=eunice_rowley_301152
Pinko
Легальные способы покупки диплома о среднем полном образовании
2orik-diploms.ru
https://carhyperentals.ca/kvartiry-na-sutki-v-minske-500-bez-posrednikov-13/
Полезные советы по безопасной покупке диплома о высшем образовании
kdtf.kr/bbs/board.php?bo_table=board03&wr_id=1560&page=5
Узнайте, как безопасно купить диплом о высшем образовании
Узнайте стоимость диплома высшего и среднего образования и процесс получения
Займ онлайн на карту без проверок и отказов — быстрые решения от новых МФО. Получите деньги под 0.8% в день, без лишних документов и с мгновенным переводом средств.
Encountered a unique article – be sure to take a look and see for yourself http://russia.forumex.ru/viewtopic.php?f=3&t=139
Как оказалось, купить диплом кандидата наук не так уж и сложно
Came across an interesting article, I propose you have a look https://galantclub.od.ua/member.php?u=27724
Узнайте, как безопасно купить диплом о высшем образовании
https://centralgroupvn.com/snjat-kvartiru-na-sutki-v-pervomajskom-rajone-9/
Официальное получение диплома техникума с упрощенным обучением в Москве
man-diploms.ru
логопед онлайн занятия для ребенка 5 лет
can you get generic celebrex without a prescription
Полезная информация как купить диплом о высшем образовании без рисков
Medicines information for patients. Cautions.
get cipro without prescription
All information about medication. Get now.
Удивительно, но купить диплом кандидата наук оказалось не так сложно
Сколько стоит получить диплом высшего и среднего образования легально?
woman.build2.ru/viewtopic.php?id=16291#p48081
Как избежать рисков при покупке диплома колледжа или ПТУ в России
Как приобрести аттестат о среднем образовании в Москве и других городах
lubercy.ixbb.ru/viewtopic.php?id=9510#p19763
можно ли купить среднее образование можно ли купить среднее образование .
Полезные советы по безопасной покупке диплома о высшем образовании
Узнайте, как приобрести диплом о высшем образовании без рисков
where can i buy cheap vasotec pill
Medicament information sheet. Long-Term Effects.
where to buy generic synthroid tablets
Actual what you want to know about drug. Read information here.
Very good information. Lucky me I ran across your site by chance (stumbleupon).
we1winnavi.com
Pills information for patients. Drug Class.
where can i get aldactone tablets
All news about medicament. Read information here.
Как получить диплом техникума с упрощенным обучением в Москве официально
Как не попасть впросак при покупке диплома колледжа или ПТУ в России
mvduniversitetpiter.flybb.ru/viewtopic.php?f=9&t=798
Легальная покупка диплома о среднем образовании в Москве и регионах
logikmemorial.ca/forum/index.php?topic=243016.0
Обеденные столы
https://labdrbellour.com/1-komnatnaja-kvartira-na-sutki-grodno-grodno-2-oj-23-2/
вулкан казино
Try your luck at online casinos and get a chance for a big win, without wasting time traveling to real casinos.
all casino online all casino online .
вулкан казино
Можно ли быстро купить диплом старого образца и в чем подвох?
Как оказалось, купить диплом кандидата наук не так уж и сложно
where buy generic seroflo price
aviator casino
https://oreivatis.gr/bez-rubriki/kvartiry-na-sutki-v-minske-snjat-kvartiru-na-chasy-24/
Быстрое обучение и получение диплома магистра – возможно ли это?
frank-shkola.ru/forum/messages/forum1/topic635/message657/?result=new#message657
регистрация дома на земельном участке цена
hellow all https://nspddfgstmdbkl1034.ru/
Пошаговая инструкция по официальной покупке диплома о высшем образовании
arusak-diploms.ru
https://www.newjerseyhub.com/prilozhenija-dlja-montazha-video-na-telefone-2/
https://al-esnad.com.sa/blog/2024/09/18/arenda-kvartir-na-sutki-na-karte-v-grodno-11/
apk 1win https://www.telecharger1winci.com .
want to view instagram want to view instagram .
Легальная покупка диплома о среднем образовании в Москве и регионах
moskvichemania.ru/topic4063
aviator online game
Как оказалось, купить диплом кандидата наук не так уж и сложно
https://AccStores.com provides high-quality verified accounts that are perfect for marketers, influencers, and businesses. Our PVA accounts are secure, reliable, and available for instant delivery, ensuring you get the best value for your investment. Shop now and get started today.
Check This Out:
https://AccStores.com
You’re the Best!
Реально ли приобрести диплом стоматолога? Основные этапы
https://odbornici.iz.rs/studenty-uzhe-nevlijajut-narynok-novosti-belarusi-25-2/
order balloons to your home Dubai https://cheap-helium-balloons.com
купить диплом вуза купить диплом вуза .
порядок оформления земельного участка в собственность
good resume of an engineer https://engineer-builder-resume.com
https://dzen.ru/a/Zsxf9LjJ5D6iVqBj
aviator download
Официальная покупка диплома ПТУ с упрощенной программой обучения
prema-diploms.ru
apk 1win http://1wincotedivoireapk.com/ .
Купить диплом о среднем образовании в Москве и любом другом городе
diafan.rusheat.ru/forum/kupite-diplom-i-nachnite-zarabatyvat-uzhe-segodnya
Официальная покупка диплома ПТУ с упрощенной программой обучения
Здравствуйте!
Мы предлагаем документы ВУЗов
office.listbb.ru/viewtopic.php?f=2&t=5487
Быстрый доступ и удобный интерфейс ждут тебя на [url=https://www.kv.by/information/2023/08/03/1067826-bk-leon-zerkalo-leonbets-obzor-i-vhod-na-sayta-leonbets]БК Леон вход[/url]. Зарегистрируйся, начни делать ставки на спорт и получай выигрыши уже сегодня! Твоя победа — это всего лишь одна ставка.
https://sodasovet.ru/uzi-nadpochechnikov-kogda-provoditsya-i-chto-vyyavlyaet/
titfucking
вывод из запоя ростов на дону стационар [url=www.vyvod-iz-zapoya-rostov115.ru/]вывод из запоя ростов на дону стационар[/url] .
франшиза купить [url=https://franshizy13.ru/]франшиза купить[/url] .
Вопросы и ответы: можно ли быстро купить диплом старого образца?
Реально ли приобрести диплом стоматолога? Основные этапы
w98804oc.beget.tech/2024/09/24/kak-poluchit-diplom-nedorogo-i-bystro
wanking on camera
Удивительно, но купить диплом кандидата наук оказалось не так сложно
Возможно ли купить диплом стоматолога, и как это происходит
diplom-profi.ru/gde-mozhno-kupit-attestat-v-moskve
hellow all https://nspddfgstmdbkl1034.ru/
зарегистрировать дом
Сколько стоит диплом высшего и среднего образования и как это происходит?
Как приобрести аттестат о среднем образовании в Москве и других городах
hefeiyechang.com/home.php?mod=space&uid=13363
aviator game india
вынос границ земельного участка на местности
https://vk.com/@impastoekb-detskii-master-klass-po-risovaniu-ekaterinburg
Добрый день!
Мы готовы предложить документы ВУЗов
fotomaniya.getbb.ru/viewtopic.php?f=16&t=12882
Discovered an intriguing article, I recommend you to check it out https://www.weddingbee.com/members/zharovasabina/
https://dampertrailer.com/2024/09/23/tjegi-dlja-poiska-kvartira-na-sutki-minsk-16/
Узнайте, как приобрести диплом о высшем образовании без рисков
altaistudent.ru/gde-mozhno-kupit-diplom-inzhenera-legalno-i-bezopasno.php
Ищете музыкальные наушники для максимального погружения в музыку или комфортного общения? На нашем сайте вы найдёте подробные обзоры, советы по выбору и уходу за наушниками. Мы поможем вам подобрать идеальную модель, будь то для профессионального использования, занятий спортом или домашнего прослушивания. Откройте для себя мир звука с нами!
Возможно ли купить диплом стоматолога, и как это происходит
u-cars.ru/modules.php?name=Your_Account&op=userinfo&username=yjakulos
where buy proscar
Вопросы и ответы: можно ли быстро купить диплом старого образца?
Интернет-магазин тарелок — широкий выбор посуды для кухни и дома
суповые тарелки [url=https://posudaklub.ru]https://posudaklub.ru[/url] .
Как приобрести аттестат о среднем образовании в Москве и других городах
1russa-diploms.ru
Френч-пресс для кофе с фильтром — удобное заваривание напитков дома и в офисе
френч пресс 1 литр [url=https://www.posudakitchen.ru/]https://www.posudakitchen.ru/[/url] .
Лизинг автотранспорта для бизнеса по доступным ценам — получите транспорт с минимальными ежемесячными платежами
сельхоз оборудование в лизинг [url=http://kommercheskij-transport-v-lizing-1.ru/lizing-selskohozyajstvennoj-tehniki/]http://kommercheskij-transport-v-lizing-1.ru/lizing-selskohozyajstvennoj-tehniki/[/url] .
Как избежать рисков при покупке диплома колледжа или ПТУ в России
Приобретение диплома ПТУ с сокращенной программой обучения в Москве
forum.fiat-club.ru/blog_post.php?do=updateblog&blogid=
can i purchase cheap artane pill
Купить диплом специалиста
kyc-diplom.com/diplom-spetsialista.html
Как приобрести аттестат о среднем образовании в Москве и других городах
Studio di produzione video https://orbispro.it a ciclo completo. Servizi di creazione video. La nostra produzione effettua riprese video e qualsiasi altra produzione video a Milano, Roma, Torino
can you buy synthroid pill
Хочешь стабильный доступ к игре? Тогда официальный сайт Мелбет — это то, что тебе нужно. Промокоды на старт, лучшие коэффициенты и простая регистрация сделают твою игру прибыльной и комфортной.
aviator hack
With over 10 years of experience, autism-mmc.com excels in diagnosing and providing [url=https://www.autism-mmc.com]Mardaleishvili mc[/url] at any age. Our team specializes in reducing [url=https://www.autism-mmc.com/about/cell-therapy-unit-and-cord-blood-bank/]where to store stem cells[/url] in both children and adults. Trust our experts for a thorough and personalized approach.
Как получить диплом стоматолога быстро и официально
buying periactin no prescription
At autism-mmc.com, we’ve been treating [url=https://www.autism-mmc.com/types-and-causes-of-autism/symptoms-and-causes-of-autism/]asd causes[/url] in adults and children for over a decade. Our expert team uses cutting-edge [url=https://www.autism-mmc.com]Mardaleishvili breakthrough[/url] including stem cell therapy, to improve behavior and cognitive skills. Let us help you achieve positive outcomes.
cost deltasone without dr prescription
can i get cheap periactin for sale
cost of cheap seroflo pill
Приобретение диплома ПТУ с сокращенной программой обучения в Москве
Как быстро и легально купить аттестат 11 класса в Москве
https://milmed.spb.ru/wp-content/pgs/slotu_v_kazino_vavada__luchshie_igru_dlya_igru.html
where can i get nimotop without insurance
At autism-mmc.com, we’ve been treating treatment of asperger’s syndrome in adults and children for over a decade. Our expert team uses cutting-edge autism-mmc.com including stem cell therapy, to improve behavior and cognitive skills. Let us help you achieve positive outcomes.
aviator predictor
Покупка диплома о среднем полном образовании: как избежать мошенничества?
fire-team.ru/forum/member.php?u=1143
Ready for transformative [url=https://www.autism-mmc.com/types-and-causes-of-autism/symptoms-and-causes-of-autism/]causes of autism[/url] ? Visit autism-mmc.com to learn about our cord blood stem cell therapy, which reduces [url=https://www.autism-mmc.com]Mardaleishvili autism cure center[/url] and enhances your child’s abilities. Trust our experienced team to guide you through this life-changing process.
Всё, что нужно знать о покупке аттестата о среднем образовании
can i get cheap macrobid without rx
Thanks in support of sharing such a pleasant thought,
post is good, thats why i have read it fully
Приобретение школьного аттестата с официальным упрощенным обучением в Москве
animalplanetnews.ru/diplom-lyuboy-spetsialnosti-po-dostupnoy-tsene
where can i get cozaar pills
Как получить диплом стоматолога быстро и официально
aviapoisk.getbb.ru/viewtopic.php?f=27&t=969
Официальная покупка диплома вуза с сокращенной программой обучения в Москве
Drug information for patients. Long-Term Effects.
can you buy generic azathioprine prices
Everything information about meds. Get information now.
aviator game download
Как приобрести диплом о среднем образовании в Москве и других городах
2orik-diploms.ru
cost tegretol price
Опасные бритвы для профессионалов — инструмент для идеального результата
опасная бритва золинген купить https://www.pro-nozhi.ru .
Уфанет: стабильно быстрый интернет и качественное ТВ для вашего удобства
уфанет цены [url=ufanet-oficialnyy-sayt.ru]ufanet-oficialnyy-sayt.ru[/url] .
Кувшины для сервировки — функциональные и красивые элементы вашего стола
кувшины для воды купить [url=http://www.elitenposuda.ru]http://www.elitenposuda.ru[/url] .
Medicines prescribing information. Generic Name.
where to buy phenergan
Everything about medication. Get now.
Ищете наушники с крутым звуком для максимального погружения в музыку или комфортного общения? На нашем сайте вы найдёте подробные обзоры, советы по выбору и уходу за наушниками. Мы поможем вам подобрать идеальную модель, будь то для профессионального использования, занятий спортом или домашнего прослушивания. Откройте для себя мир звука с нами!
https://book-hall.ru/tmp/pgs/vip_programma_v_kazino_vavada__ekskluzivnue_privilegii_i_voznagrazghdeniya.html
aviator hack
order reglan without rx
какой домкрат выбрать для Chevrolet Niva гидравлический подкатной и лучшие модели
Meds information. Drug Class.
where can i get cheap requip price
Some about pills. Get now.
buying aurogra without rx
Discovered an article that might interest you – don’t miss it! http://hobby-svarka.ru/viewtopic.php?f=11&t=7028
Официальная покупка диплома вуза с сокращенной программой обучения в Москве
Как не стать жертвой мошенников при покупке диплома о среднем полном образовании
lessigles.fr/sigle-acted.php
Drug information. Effects of Drug Abuse.
how to get cheap esomeprazole pill
Everything information about drugs. Read information now.
generic atacand without dr prescription
Получите займ без проверок кредитной истории на карту. Никаких сложных условий — только паспорт и именная карта. Деньги моментально поступят на ваш счёт, доступно 24/7.
Интернет-магазин ножей — лучшие Финки НКВД для ценителей
нож финка https://www.nozhiforall.ru/ .
With a decade of successful autism treatment mmc experience, autism-mmc.com offers cord blood stem cell therapy to reduce check it . Our proven approach regenerates key brain functions, leading to significant behavioral and developmental progress.
cleocin dosage effect interaction ovule side use warning
Безопасный вывод из запоя в Самаре: вызов врача нарколога
запой самара https://www.vivod-iz-zapoya-samare.ru/ .
Как правильно купить диплом колледжа и пту в России, подводные камни
Охотничьи ножи для экстремальных условий — надежные инструменты для выживания
купить охотничий туристический нож http://klubnozhey.ru/ .
can i buy generic tofranil
Реально ли приобрести диплом стоматолога? Основные этапы
Покупка диплома о среднем полном образовании: как избежать мошенничества?
8saksx-diploms.ru
can i get cheap lipitor without insurance
Приобретение школьного аттестата с официальным упрощенным обучением в Москве
diplomius-docs.com/prodazha-diplomov-o-vysshem-obrazovanii
get generic singulair price
Официальное получение диплома техникума с упрощенным обучением в Москве
drovokol.ru/forum/user/12637
Леон бетс — это твоя возможность заработать на спорте. Высокие коэффициенты, быстрая регистрация и моментальные выплаты делают этот сервис одним из лучших для ставок. Присоединяйся к победителям!
https://jibelatec.co.za/index.php/2024/09/18/kvartiry-na-sutki-v-minske-snjat-kvartiru-16/
Кабель монтажный — незаменимый элемент для систем автоматизации и электропроводки. Высокая гибкость и устойчивость к износу обеспечат долгий срок службы в любых условиях.
Compete in free social slot tournaments at CorgiSlots and win exciting prizes every day
1win bet apk download https://xn--tlcharger1win-bhbb.com/ .
электрокарнизы карнизы электрокарнизы карнизы .
нью ретро казино нью ретро казино .
Купить кабель в Иркутске можно с доставкой по выгодным ценам. Выбирайте из широкого ассортимента качественных кабелей!
https://odishavoyages.com/blogs/kvartiry-posutochno-10-2/
Рекомендации по безопасной покупке диплома о высшем образовании
entropiques.fr/userinfo.php?uid=31240
Процесс получения диплома стоматолога: реально ли это сделать быстро?
Узнайте цену на кабель КВВГнг для эффективного контроля и управления электрическими системами на вашем объекте.
Наши лотки кабельные металлические гарантируют безопасное размещение и защиту кабелей. Прочные материалы и надежная конструкция обеспечат долговечность ваших проектов.
Как официально приобрести аттестат 11 класса с минимальными затратами времени
server-diploms.ru
play aviator game
The Autism Test
Для ваших проектов выберите металлорукав МРПИ, который обеспечит надежную защиту кабелей от внешних воздействий.
Привет, друзья!
Мы готовы предложить документы ВУЗов
kharkov-balka.com/showthread.php?p=157702#post157702
Как не стать жертвой мошенников при покупке диплома о среднем полном образовании
Как официально купить аттестат 11 класса с упрощенным обучением в Москве
Ищете выгодные условия? ВВГнг LS цена приятно удивит. Надежность и безопасность по доступной стоимости.
p0132 код ошибки chevrolet высокий уровень сигнала датчика кислорода причины и решения
cost of generic prednisone without prescription
Джоз
Как приобрести диплом техникума с минимальными рисками
alik.forumrpg.ru/viewtopic.php?id=7893#p282082
aviator online game
купить диплом ординатуры landik-diploms.ru .
френдс
френдс
buy prednisone without a prescription
Selector
Удивительно, но купить диплом кандидата наук оказалось не так сложно
diploms-vuza.com/gde-i-kak-kupit-diplom-goznak
Покупка диплома о среднем полном образовании: как избежать мошенничества?
kingbookmark.com/story17388765/получили-дипломы-участников
generic doxycycline prices
http://thcsmythanh.pgdthuthua.edu.vn/snjat-kvartiru-na-sutki-v-minske-arenda-kvartiry-6/
aviator download
Как официально купить аттестат 11 класса с упрощенным обучением в Москве
chocolateslim77.ru/politika/v-permi-13-shkolnikov-popali-v-bolnicy-s-kishechnoi-infekciei
Как оказалось, купить диплом кандидата наук не так уж и сложно
Статьи на различные темы на страницах сайта.
https://azulferri.com/?p=353
Купить кувшины для дома — стильная посуда для подачи воды и напитков
кувшин с крышкой https://elitenposuda.ru .
Финки НКВД в интернет-магазине — купить ножи, которым можно доверять
нож финка http://nozhiforall.ru/ .
Штопоры и открывалки для вина с обрезателями фольги — идеальные аксессуары для праздничного стола
открывалка для вина https://www.vseodlyakuhni.ru/ .
Диплом техникума купить официально с упрощенным обучением в Москве
buy imuran price
https://dallassurgdev.wpengine.com/kvartiry-na-sutki-v-minske-bez-posrednikov-35/
Для надежного электропитания выбирайте контрольный кабель КВВГ, который обеспечит стабильную и безопасную работу.
Полезные советы по безопасной покупке диплома о высшем образовании
Покупка диплома о среднем полном образовании: как избежать мошенничества?
aviator apk game
Приобретение диплома ПТУ с сокращенной программой обучения в Москве
1server-diploms.ru
This article will help the internet visitors for building up new weblog
or even a blog from start to end.
Jozz
Можно ли быстро купить диплом старого образца и в чем подвох?
Всё, что нужно знать о покупке аттестата о среднем образовании без рисков
test.vladmines.dn.ua/index.php?name=Account&op=info&uname=aguxenu
Cryptoboss
Купить диплом о среднем полном образовании, в чем подвох и как избежать обмана?
domstroi.info
Грузоблочные тренажеры: профессиональное оборудование для силовых упражнений
грузоблочный тренажер цена https://gruzoblochnij-trenazher.ru .
Маникюрный набор Solingen для домашнего и профессионального использования — удобство и качество
маникюрные наборы solingen купить https://nozh-kitchen.ru/ .
how can i get cheap caduet without prescription
Туристические ножи с прочными лезвиями — идеальный выбор для длительных походов
купить охотничий туристический нож klubnozhey.ru .
Быстрая схема покупки диплома старого образца: что важно знать?
re-port.ru/users/53141
Пошаговая инструкция по официальной покупке диплома о высшем образовании
Рекомендации по безопасной покупке диплома о высшем образовании
1russa-diploms.ru
cost of vasotec without prescription
Hot video news, that’s worth watching, Outrageous video updates, Exciting video reports, that captivate, Tense video updates, that are important to know, that are incredible, Interesting video updates, Hot video updates, that you can’t miss
mms video news https://videonewsindex.com/effective-scriptwriting-for-video-reviews .
купить диплом рудн orik-diploms.ru .
how to buy generic mobic pill
order cheap celebrex no prescription
spribe aviator game
Важным аспектом перепланировки является стоимость перепланировки помещений. Она зависит от ряда факторов, включая объём и характер изменений, а также необходимые согласования. Мы предлагаем нашим клиентам комплексный подход, который включает в себя разработку проекта, получение технического заключения и согласование перепланировки в кратчайшие сроки по разумной цене.
newretrocasino https://www.newretrocasino-casino3.ru .
вывод из запоя ростов на дону стационар вывод из запоя ростов на дону стационар .
Покупка диплома о среднем полном образовании: как избежать мошенничества?
Booi
Ищете решение для трансформации пространства? Перепланировка помещения — это шанс создать идеальное жилое или рабочее пространство, адаптированное под ваши нужды. Мы не только разработаем проект, но и согласуем его с городскими властями, чтобы вы могли наслаждаться своим новым пространством без проблем.
Стоимость дипломов высшего и среднего образования и процесс их получения
https://milmed.spb.ru/wp-content/pgs/slotu_v_kazino_vavada__luchshie_igru_dlya_igru.html
Сколько стоит диплом высшего и среднего образования и как его получить?
купить диплом ссср в нижнем тагиле man-diploms.ru .
Как приобрести аттестат о среднем образовании в Москве и других городах
gladpwnz.ru/forum/member.php?u=221749
Буй
Полезные советы по покупке диплома о высшем образовании без риска
Можно ли быстро купить диплом старого образца и в чем подвох?
bike.by/forum/viewtopic.php?f=84&t=85801
Как оказалось, купить диплом кандидата наук не так уж и сложно
forum.drustvogil-galad.si/index.php?topic=14076.0
cleocin adverse effects
Seals are used in ovens uquest.net and refrigerators, which allows maintaining complete tightness of the interior.
pronovosti.org
spribe aviator game
Как официально купить диплом вуза с упрощенным обучением в Москве
Тарелки для завтрака, обеда и ужина — удобная и красивая посуда для каждого случая
стеклянные тарелки posudaklub.ru .
Стоимость дипломов высшего и среднего образования и процесс их получения
g29869x8.beget.tech/2024/09/26/diplom-za-korotkiy-srok-kupite-seychas
Как получить диплом техникума с упрощенным обучением в Москве официально
little-witch.ru/forum99
Полезная информация как купить диплом о высшем образовании без рисков
chromerp.listbb.ru/viewtopic.php?f=13&t=673
Купить опасную бритву — надежный инструмент для гладкого бритья
опасная бритва купить pro-nozhi.ru .
Статьи на различные темы на страницах сайта.
https://www.porvoonvpk.fi/alarm-2020/88-su-25-7-2021-1-02-ihmisen-pelastaminen-vedesta-483a-porvoo-2
Интересные статьи на данном сайте.
https://stylereviews.com.au/blog/simple-blog-post
Интересные и увлекательные статьи у нас.
https://harian-tinta.com/2023/02/perkuat-sinergi-dengan-anggota-linmas-desa-simpang-tiga-babinsa-laksanakan-komsos.html
cost of celebrex without insurance
Проект перепланировки — это важный этап, который требует профессионального подхода. Наша команда создаст для вас проект, который учтёт все ваши пожелания и будет соответствовать строительным нормам. Мы поможем не только разработать проект, но и провести все согласования, чтобы вы могли спокойно заниматься другими делами.
Автоновости Казахстан kazlenta.kz
Главные новости Жамбылской области на сегодня уже на портале. Мы постоянно пополняем информацию об эпизодах, стараясь контролировать её достоверность. Все главные события в области авто, новости, дтп, общество. Обязательно сохраните наш узнаваемый онлайн портал и отправляйте знакомым. Только тут все верные и своевременно выложенные новости о Казахстане.
play aviator game
Stylish, modern shower systems are made from high-quality materials that ensure durability and reliability sveto-copy.com
Согласование перепланировки зданий в Москве — это сложная процедура, которая включает в себя множество этапов: от разработки проекта до получения разрешительных документов. Наша команда предлагает комплексные услуги по согласованию любых изменений, начиная с разработки проектной документации и заканчивая юридическим сопровождением на всех этапах.
Важные новости Казахстана kazlenta.kz
Первые происшествия сегодня уже на нашем сайте. Мы постоянно пополняем свежую информацию об эпизодах, пытаясь контролировать её верность. Все главные события в сфере автомобилистики, новости, дтп, общество. Обязательно сохраните наш публичный веб сайт и рекомендуйте друзьям. Только тут все точные и вовремя отправленные новости о Казахстане.
Хотите сделать пространство более функциональным? Согласование перепланировки помещения — это шаг к вашему идеальному интерьеру. Мы знаем, как важно не только изменить пространство, но и узаконить все изменения. Обратившись к нам, вы получите полный комплекс услуг по согласованию перепланировки.
you are in point of fact a just right webmaster. The web site loading
speed is amazing. It sort of feels that you’re doing any unique trick.
Furthermore, The contents are masterpiece. you have performed a
magnificent activity on this matter!
http://vniro.ru/js/pgs/?kak_zaregistrirovatsya_v_kazino_vavada__poshagovoe_rukovodstvo.html
Нурсултан важные новости kazlenta.kz
По запросу гороскоп на 2021 Овен мы знаем всё. Ровным образом здесь представлены такие тематики, как: новости по территориям, мировые, экономика, происшествия, культура, экология, автоновости и многие другие. Основные новости часа Вы найдете на главной странице сайта kazlenta.kz уже сейчас, а увидеть новости отдельной темы можно выбрав её.
Важные новости Казахстана kazlenta.kz
По теме ВКО новости мы Вам подскажем. Ровным образом здесь есть такие направления, как: новости по территориям, по Миру, экономика, происшествия, культура, выбор редакции, финансы и многие другие. Главные новости часа Вы сможете найти на главной странице сайта kazlenta.kz прямо сейчас, а увидеть новости отдельной тематики можно нажав на её.
Официальная покупка школьного аттестата с упрощенным обучением в Москве
new retro казино http://www.exclyzivdecor.ru .
new retro казино https://www.retromobil-club.ru .
Приобретение диплома ПТУ с сокращенной программой обучения в Москве
чпуремонт.рф/showthread.php?tid=90811
aviator app
криптобосс
Все новости Казахстана kazlenta.kz
По вопросу коронавирус на сегодняшний день мы поможем Вам. Также здесь представлены такие направления, как: новости по районам, мировые, политика, общество, культура, выбор редакции, финансы и многие другие. Ведущие новости часа Вы найдете на главной странице сайта kazlenta.kz прямо сейчас, а увидеть новости определенной тематики можно нажав на её.
Пошаговая инструкция по официальной покупке диплома о высшем образовании
yoursocialpeople.com/story2618522/экстерном-получить-диплом
Selector
Лента новостей Казахстана kazlenta.kz
Главные последние новости Казахстана уже на портале. Мы регулярно выкладываем информацию о событиях, стараясь проверять её верность. Все важные события в сфере автомобилистики, новости, дтп, общество. Непременно сохраните наш известный веб портал и разошлите друзьям. Только здесь все точные и своевременно отправленные новости о Казахстане.